
Supplies and Tools for the Folding Acrylic Stand
- 7" x 3" piece of acrylic (I used 1/16" thick, but you could use 1/8")
- Two ¾" hinges
- E6000 adhesive
- Pattern shown below
- Proxxon Table Saw FET
- Proxxon Scroll Saw DSH/E
Supplies and Tools for the Key Chain Fob Stand
- 3" x 1" piece of hard wood (I used bubinga)
- 1 eye screw
- 1 swivel latch or split ring
- Pattern shown below
- Proxxon Table Saw FET
- Professional Rotary Tool IBS/E and Drill Stand MB 200
Instructions for the Folding Acrylic Stand
Begin by covering one side of the acrylic with painter's tape. Cut the acrylic in half to make two 3½" x 3" pieces.


On the painter's tape on one of the pieces spray repositionable adhesive. Put the two pieces of acrylic together forming a sandwich with the painter's tape in the center.

Cover one of the exposed sides of this sandwich with painter's tape. Spray the reverse side of the pattern with spray adhesive, and adhere to the painter's tape. Because you're cutting both sides at the same time, you'll end up with the right and left pieces for the stand—each an identical mirror image of the other.
|

Following the pattern, cut the pieces on the scroll saw. If necessary, lightly sand any rough edges.

Position the hinges to be sure they are aligned. I taped mine to a teflon mat on top of my grid work surface. Use a dab of E6000 to glue the hinges in place, taking care not to get adhesive in the hinges. Carefully line up the second wing of the stand making sure the bottoms are level. Let the glue dry for 24 hours.
 |
 |
Instructions for the Key Chain Fob Stand
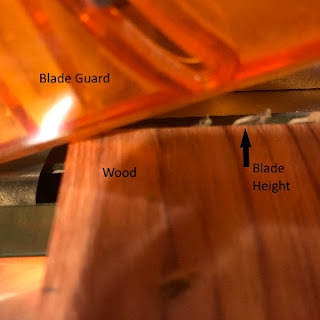
Adjust the blade height on the table saw and cut a 3" x 1" piece of hard wood. The blade should extend slightly above the height of the wood.
Set the longitudinal stop on the table saw so the blade cuts the leftmost side of the notch on the pattern below. Set the blade height only to the top of the 5/8" high notch.

If necessary, sand any rough edges. On the end of the stand, mark the center for the eye screw.


Set the longitudinal stop on the table saw so the blade cuts the leftmost side of the notch on the pattern below. Set the blade height only to the top of the 5/8" high notch.

Make the first cut. Using the scale on the longitudinal stop, move the stop 1/8" to the left. Make the second cut. Continue alternately moving the stop and making a cut until the notch is ½" wide. (If you have a case on your device you may need to increase the width of this notch.)
 |
| Setting the longitudinal stop |

Select a drill bit the same size as the eye screw, and use the professional rotary tool and drill stand to drill a pilot hole.

Add the screw eye and swivel (or split ring) to complete the stand.

Now, you're ready to be on the go with your smart devices.
 |
| Carole |

No comments:
Post a Comment