
Scary Carol here Today I am going to show you how to make an ugly witch shelf sitter with lights. Halloween is coming.... time to get those fun and spooky crafts started. Ha ha ha ha ha..gasp
Supplies and equipment:
2 pieces of 1/2" pine or other wood approx. 6x14"
1/4" thick plywood piece big enough to cut the hand and letters.
Proxxon jig saw
Proxxon delta sander
string of mini lights and batteries
drill with various drill bits
Plaid paints
wood glue
silicone glue
I started with a scary looking pattern which I drew on a piece of paper. This is my design and anyone can use it if they want to.


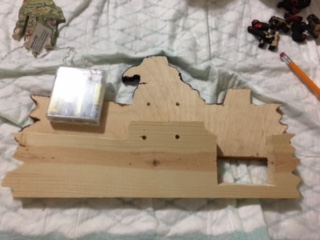
Now you have to make a back to hold the battery pack. I used the proxxon jig saw and cut out a pattern similar to the original one except for making a cut our where the battery pack for the lights will sit. Glue these together and let dry.


I painted the front witchy looking using plaid paints. Just for fun I added a little bit of glow in the dark paint to her hands and face.
On the front side I marked where I wanted my lights to go. I purposely wanted the lights to be in her eyes. I used a very small drill bit to drill all the way through to the back. This hole is large enough to let the light through but small enough the little bulb will not show. From the back I used a larger drill bit to enlarge the from the back This made a hole the little bulb would slide into. I took care not to drill all the way through.
Push the lights in and seal the hole with the silicone glue. Let dry.


Hope you enjoyed this project, I did. Have a fun filled, spooky, but safe Halloween.... Best wishes, Carol.
2 pieces of 1/2" pine or other wood approx. 6x14"
1/4" thick plywood piece big enough to cut the hand and letters.
Proxxon jig saw
Proxxon delta sander
string of mini lights and batteries
drill with various drill bits
Plaid paints
wood glue
silicone glue
I started with a scary looking pattern which I drew on a piece of paper. This is my design and anyone can use it if they want to.
I transferred the pattern onto my wood (except the hand which is cut out separately.) then cut it out using my proxxon jigsaw . I cut the board straight across where the hand will be but I left a little bit of height there to add strength for when you glue on the hand. Next I cut out the hand out using the proxxon jig saw. on the smaller piece of 1/4" wood. A proxxon mini scroll saw would really work fantastic for this as it is the perfect tool for intricate cutting.


Next, cut out all the letters for your sign. using the proxxon mini scroll saw, or the proxxon jig saw. Sand everything with the proxxon delta sander. This is the only tool I know that can get into all the little tight spots. Did you know the speed is adjustable? How cool is that?

Now you have to make a back to hold the battery pack. I used the proxxon jig saw and cut out a pattern similar to the original one except for making a cut our where the battery pack for the lights will sit. Glue these together and let dry.
I painted the front witchy looking using plaid paints. Just for fun I added a little bit of glow in the dark paint to her hands and face.

On the front side I marked where I wanted my lights to go. I purposely wanted the lights to be in her eyes. I used a very small drill bit to drill all the way through to the back. This hole is large enough to let the light through but small enough the little bulb will not show. From the back I used a larger drill bit to enlarge the from the back This made a hole the little bulb would slide into. I took care not to drill all the way through.
Push the lights in and seal the hole with the silicone glue. Let dry.
Set her on a window sill on a dark night and let her shine!
Here's the little witch.


Hope you enjoyed this project, I did. Have a fun filled, spooky, but safe Halloween.... Best wishes, Carol.
13 comments:
That is one UGLY witch Carol. Good job. I would not want to see those hands after me!
A lot of good photos and directions.
Great Halloween project, Carol. As always, you did a great job with instructions and construction of the project.
fun creation
What a wonderful project, I simply love love the witch...
This is really cute thanks
Thank you. Staying dry?
Thanks for stopping by. It was fun to make.
This is my self-portrait. :-(
Thank you everyone for stopping by. I appreciate your comments.
That is just wonderful Carol! I like this idea and your tutorial is great!
thanks Carol you are really good love it
This is fabulous!
Looks great .. love all of the projects
Post a Comment