Hi everyone. Springtime is here and I've been wanting to build a few things for the garden. I've always loved a obelisk. I want something that I could grow stuff on vertically. After looking at lots of pictures and doing some research, I came up with this design. Follow along with me and I'll show you how I made it.
Supplies:
Proxxon Table Saw FET
Proxxon Micro-Bandsaw MBS 115/E
Proxxon Cordless Belt Sander
Pressure Treated Pine 1"x 2" 10 pieces 8' long
Pressure Treated Finial
Outdoor Wood Glue (Gorilla Brand)
Drill and Drill Bit
Screws
Brad Nailer and Brads
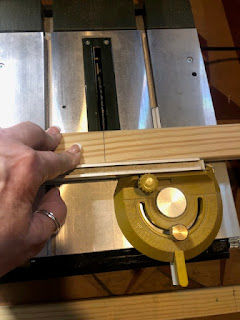
First thing is I determined how tall I wanted the obelisk to be. I decided on 7' without the finial. I laid out my wood on the floor. Marked 4 of the pieces at 7' and cut with the Proxxon Table Saw.
.jpg)
Lay 2 of the pieces on the floor and put a clamp at one end just to hold them together. Open the legs on the other end. I made mine 24" across the bottom. I tacked my legs to the floor temporarily just so it would stay still while I figured the sizes of the side stretchers.
I decided I wanted a side stretcher every 21". I marked that along each leg. Then at each mark I laid a piece of wood under the les and just drew on the angle that it had to be cut. So much easier than doing all the math. Cut with
Proxxon table saw and dry fit in between legs.
Take all the 3 pieces out and get ready to glue. Glue and let dry. Repete for the second side
Once those side stretchers are dry then I removed the clamp, cut and secured a top piece with glue and brad nails. I also measured up an inch and added a stretcher to the bottom.
After both sides were dry, I drilled and put a screw in at each stretcher, to add extra stability.
Now the sides are done enough to stand up and clamp together at the top. keeping the top clamped, lay piece on its side so we can measure the side pieces for sides 3and 4. again I measured 24" spance at the bottom. I wanted these side pieces to go on the outside of the legs and each one to cover the screw holes. Lay a piece of wood across and mark the angle with a pencil. Cut angles with either the
Proxxon bandsaw or the
Proxxon table saw. Glue and nail on the with brad nailer.
Repete for side 4. Now stand the piece up. I decided each side needed a strip going up the middle for style and extra stability.
Two of the sides I shortened. the strip and cut a point on one end using the band saw, then again attached with glue and brads. I also cut another top piece for these two sides, I glued and nailed with the brad nailer
Now there was some places that the brads came all the way through to the other side of the wood strips. I didn't want any sharp nails exposed so I grinded them off with the
Proxxon belt sander.
I sat my piece up. Screwed the finial on the top and started to paint.
My obelisk is complete! I'm thrilled at how it turned out. I cant wait to place it in my garden and start growing stuff on it. Thanks for following along with me. Colleen :-)


.png)


.png)


.jpg)

.jpg)
.jpg)
.jpg)
.jpg)


.jpg)
.jpg)
.jpg)
.jpg)

.jpg)
.jpg)
.jpg)
.jpg)


.jpg)


.jpg)
.jpg)