Sunday, December 17, 2023

How to Make a Custom Shelving Unit for Video Consoles

 This project come as a request from my son so he could have a more organized space for his video  and gaming consoles. 


Supplies and Equipment:

How to construct the shelving unit:

  1. Decide on the dimensions for your shelving unit. You will need four shelves and two sides. You'll also need to determine the space between the shelves. The back of the unit is open.
  2. Cut the shelves and side using the table saw. Set the blade height and, if necessary, use the extendable extension.

  3. Sand the shelves and sides using the Delta sander.

  4. Measure and mark for holes on the side pieces. You'll need three holes on the top and three on the bottom. Since my boards are ¾" thick, the holes needed to be equally spaced 3/8" from the top and bottom edges of the side pieces.

  5. Drill these holes on the side pieces using the bench drill press. Set the adjustable fence to ensure accurate spacing from the edges.

  6. Change the bit in the drill press to a countersink bit WITHOUT moving the adjustable fence. Set the depth gauge on the drill press and countersink the holes on each of the sides. You can drill a hole in a scrap piece of wood to test the depth of the countersink.
  7. Now, on the inside of the side piece mark placement for the self-tapping screws to support the  removable two center shelves. You'll need four self-tapping screws—two on each inside side piece—for each of the center shelves. Drill these holes and screw in the self-tapping screws. This is a self-tapping screw.

  8. Next, you will need to drill holes in the top and bottom shelves where they will be screwed to the sides. I used a workbench to secure the shelf so I could position and clamp the side piece on it, and then, used the holes that I drilled in the side piece as a guide for drilling the holes in the shelves using the flexishaft.

  9. Next, I unclamped the side piece leaving the shelf piece in the workbench, and applied liquid wood adhesive to the edge of the shelf.

  10. Now, reposition and clamp the side piece in place again. Screw the side and shelf together. 

  11. Repeat for the other side. Let the glue dry, and you're ready to use the shelving unit.

    Carole

    Sunday, December 3, 2023

    Easy Reindeer for kids to paint

     Hey happy holidays to all of you!!

    This is an easy to make on purpose so you can make a dozen.  The idea is to give these to kids to paint and this might keep them busy for a little while.  Its best with a small group so it doesn't get out of control.

    I used Proxxon tools to make these and I admit it was fun for me too.  Some of the kids enjoyed watching the process and having me change a few things so there's was a little different.  It's easy to personalize this little reindeer.  

    For a little nicer reindeer if you are aiming for pretty instead of fun look at the last blog before this for step-by-step directions.  

    Equipment and supplies.   Thin Plywood, short pieces of 1 x 3 board, pencil, Proxxon mini scroll saw, Plaid paints glue, clamps.   Add a few kids and this is going to be fun!

    1-Firstly, draw your easy design onto your plywood piece.  

    Make 2 of these per reindeer


    \


    Cut these out using the Proxxon mini scroll saw.
    \


    Use a little wood glue and glue the two pieces together and clamp then till dry.


    Using the Proxxon mini table saw set the fence about 1" from the sawblade and set the saw blade at about 1/4" high.  You will run the short piece of 1 x 3 across the saw blade.  (You must remove the blade guard to do this), This will make a groove that the reindeer feet will sit in so it will stand upright.


    Get the kids and let them paint their new little project.  Use Plaid paints for good coverage.


    Add a little bling bling if desired and your done,
    The kids had a blast. and I think they came out cute.  Wish I had a picture before they took them home.

    Merry Christmas everyone.  I'll be seeing you in the new year.  
    Play safe!
    Carol W


    Sunday, November 19, 2023

    Country Chic Holiday Reindeer Wall Decoration

     Just in time for the holiday season—Country Chic Reindeer.

    Other Country Chic projects include:

    Supplies and Equipment

    Instructions

    1. Cover one side of the blank with painter's tape. Mist the back side of the pattern with spray adhesive, and mount on the taped blank. The painter's tape makes removal of the pattern easy without leaving any sticky residue. 
    2. Cut shapes on bandsaw or scroll saw.


    3. Sand edges using the Delta sander. I use the Delta sander mounted in the Precision Vice FMZ.

    4. Sand intricate areas of the antlers with the cordless belt sander.

    5. Use the bench drill press to drill holes in hooves and body. Placing a piece of waste wood under the piece helps minimize tearout.

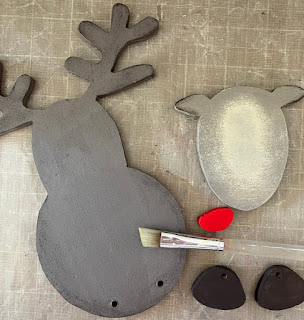
    6. Paint the pieces with acrylic paint. 

    7. Paint eyes on the face and glue the nose in place.

    8. Glue the face to the body/antler piece.

    9. Add stitching lines to face and body with gel roller pen.

    10. Stamp snowflakes on body.

    11. Attach the hooves to the body with chenille stems. Tie bows around chenille stem legs above the hooves.

    12. Glue neck bow with jingle bell in place.

    13. Add hardware for hanging.

    Carole

    Saturday, November 4, 2023

    How to make a patriotic frame for Veteran's day


    Hi folks, Carol here to show you how to make a simple but fun picture frame to celebrate Veterans' Day

    Does anybody out there have scraps of wood laying around?   
    Who doesn't,  right? 
    Ok, we are going to take those little scraps of wood to make our Veteran a special picture frame.  


    I started with a long piece of simple pine.  It measured 1 1/2 inches wide by 3/8 inches thick and about 3 feet long.   I'm going to rip it down to 3/8 inches wide so that I can have a perfect square strip.


    I use the Proxxon mini table saw to cut my strips of wood.
    \

    Now I have a long square strip of wood, I need some angles for what I'm doing.  I chose and 8-pointed star so that I could make 45-degree angled cuts that will fit together nicely.   This is so easy using the Proxxon mini chop saw.  I just set the angle to 45 and make my cuts.  I want the lengths to be even, so I use a guide mark where to put the wood for cutting.  I am going to use the edge of the circle to line up my cuts.  If I want a different spot, I might place a piece of tape to guide me.


    So, I need 16 identical pieces to form my eight-pointed star.  So easy with the Proxxon mini chop saw.  I love it!


    I use the Proxxon disc sander to just smooth the edges.  Use a gentle touch here.  
    \
    Ok, now glue 2 pieces together to form a >   8 times.  Let it dry good.

    I use Titebond glue.  I use the premium for quick setting and ultimate for stronger set.  For this project I used the Premium because I'm a little impatient. 😁  

    To hold things really well I added toothpicks.

    \Using the Proxxon cordless mini rotary tool I drilled a hole through both pieces and stuck a toothpick in it.  When it dries, I will break off the toothpicks and sand it smooth. before I paint it. 

    Put them all together in a similar manner and you have made a 8-pointed star.  


    Ok, I wanted to take it a little further, so I did exactly the same thing only cutting my pieces slightly shorter on the Proxxon mini chop saw.
    And then I did it again.    Hmmm 3 starts just beckoned to be red, white, and blue, the colors of our glorious flag.  
    I glued it all together and temporarily placed a flag picture in it for Veteran's Day.   I like it, and am going to place it on our door.  


    Hope you had some fun, I wanted to show you that no scrap is too small, that you can't make something out of it, using Proxxon tools.  They are the best tools for little projects.  

    Thanks for visiting today.  Hope you all have a wonderful Veteran's Day.  Well everyday can be wonderful,,, ENJOY !!    Carol

    Friday, October 27, 2023

     ~Vintage Story Telling Blocks~


    by Sherri Welser

    I love everything Vintage and when I had purchased some blocks I had something fun in mind! Follow along with me as I take you on a "story telling adventure"!

    Supplies

    Proxxon OZI 115/e

     6 Square wooden blocks

    White crackle paint( Ranger  brand is what I used)

    Copper acrylic paint

    Sepia stamp pad

    Brown stain wax (craft)

    Tim Holtz Victoriana paper cut outs and ephemera

    Mod Podge 

    Large buttons or jewelry components

    E6000 glue

    Sepia Stamp pad


    I started by taking the Proxon Ozi with sand paper  on the attachment and  rounding off the corners so they weren't so square. 


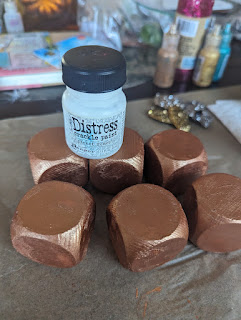
    After rounding them over I painted on a base coat of the copper acrylic paint covering each block 


    I then applied the  Distress White Crackle paint in a thick layer over the copper paint.


     Let completely dry... To deepen the cracked look I applied some brown stain wax to get in all cracks and give that" vintage look"


    I then added fun little Victorian ephemera such as flowers, butterflies and  old fashioned children
    I used the distress Sepia ink pad to age the edges of the papers . 


    I previously had chosen the jewelry "tops" for the blocks so at this point I was ready to apply them with the E 6000

    After attaching the paper ephemera and gluing the Jewelry items on top I added some inspirational words " as to tell a story"


    I always enjoy finding  unique and different ways to create from every day items! I hope you have been inspired to create your own "story"....