Sunday, November 19, 2023

Country Chic Holiday Reindeer Wall Decoration

 Just in time for the holiday season—Country Chic Reindeer.

Other Country Chic projects include:

Supplies and Equipment

Instructions

  1. Cover one side of the blank with painter's tape. Mist the back side of the pattern with spray adhesive, and mount on the taped blank. The painter's tape makes removal of the pattern easy without leaving any sticky residue. 
  2. Cut shapes on bandsaw or scroll saw.


  3. Sand edges using the Delta sander. I use the Delta sander mounted in the Precision Vice FMZ.

  4. Sand intricate areas of the antlers with the cordless belt sander.

  5. Use the bench drill press to drill holes in hooves and body. Placing a piece of waste wood under the piece helps minimize tearout.

  6. Paint the pieces with acrylic paint. 

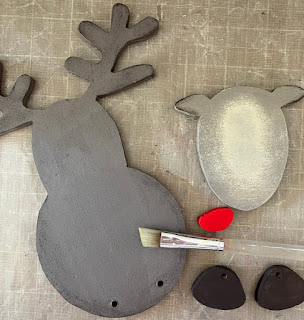
  7. Paint eyes on the face and glue the nose in place.

  8. Glue the face to the body/antler piece.

  9. Add stitching lines to face and body with gel roller pen.

  10. Stamp snowflakes on body.

  11. Attach the hooves to the body with chenille stems. Tie bows around chenille stem legs above the hooves.

  12. Glue neck bow with jingle bell in place.

  13. Add hardware for hanging.

Carole

Saturday, November 4, 2023

How to make a patriotic frame for Veteran's day


Hi folks, Carol here to show you how to make a simple but fun picture frame to celebrate Veterans' Day

Does anybody out there have scraps of wood laying around?   
Who doesn't,  right? 
Ok, we are going to take those little scraps of wood to make our Veteran a special picture frame.  


I started with a long piece of simple pine.  It measured 1 1/2 inches wide by 3/8 inches thick and about 3 feet long.   I'm going to rip it down to 3/8 inches wide so that I can have a perfect square strip.


I use the Proxxon mini table saw to cut my strips of wood.
\

Now I have a long square strip of wood, I need some angles for what I'm doing.  I chose and 8-pointed star so that I could make 45-degree angled cuts that will fit together nicely.   This is so easy using the Proxxon mini chop saw.  I just set the angle to 45 and make my cuts.  I want the lengths to be even, so I use a guide mark where to put the wood for cutting.  I am going to use the edge of the circle to line up my cuts.  If I want a different spot, I might place a piece of tape to guide me.


So, I need 16 identical pieces to form my eight-pointed star.  So easy with the Proxxon mini chop saw.  I love it!


I use the Proxxon disc sander to just smooth the edges.  Use a gentle touch here.  
\
Ok, now glue 2 pieces together to form a >   8 times.  Let it dry good.

I use Titebond glue.  I use the premium for quick setting and ultimate for stronger set.  For this project I used the Premium because I'm a little impatient. 😁  

To hold things really well I added toothpicks.

\Using the Proxxon cordless mini rotary tool I drilled a hole through both pieces and stuck a toothpick in it.  When it dries, I will break off the toothpicks and sand it smooth. before I paint it. 

Put them all together in a similar manner and you have made a 8-pointed star.  


Ok, I wanted to take it a little further, so I did exactly the same thing only cutting my pieces slightly shorter on the Proxxon mini chop saw.
And then I did it again.    Hmmm 3 starts just beckoned to be red, white, and blue, the colors of our glorious flag.  
I glued it all together and temporarily placed a flag picture in it for Veteran's Day.   I like it, and am going to place it on our door.  


Hope you had some fun, I wanted to show you that no scrap is too small, that you can't make something out of it, using Proxxon tools.  They are the best tools for little projects.  

Thanks for visiting today.  Hope you all have a wonderful Veteran's Day.  Well everyday can be wonderful,,, ENJOY !!    Carol