Sunday, November 21, 2021

How To Build A 3 Candle Wall Sconce


Hi everyone!  I wanted to share with you a wall sconce I built.  This is based on a tin sconce I've seen in a lot of stores that sell colonial lighting.  I thought using some scrap wood I could come close to making something that looked similar.  Follow along with me and I'll show you how I made it.


Supplies

  Proxxon 2-Speed Scroll Saw

  Proxxon Disc Sander

  Proxxon Power Carver

  Scrap 1/2" birch plywood

  Wood Glue

  Drill and drill bit

  3 Small tin candle holders

  Plaid Paint  Black

  Plaid Inspirations Varnish  Matte 


First I started out by drawing a paper pattern then transferred it to my scrap plywood.


Next using my Proxxon 2-speed scroll saw I cut it out.


I also cut out 3 small rectangles of wood to be glued on the bottom to hold the candle cups.


I sanded all the pieces using the Proxxon Disc Sander.


Next I glues and nailed those 3 pieces onto the notches of the base.


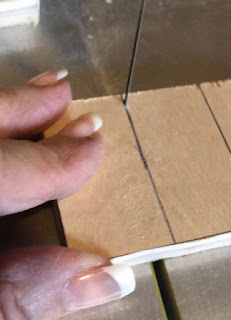
I drew some lines on the base and carved them out using the Proxxon Power Carver.


I lightly sanded everything and painted with Plaid Paint.  I chose black.


Using my drill I drilled a tiny hole at the top for hanging.


I gave it one coat of  Plaid Inspirations Matte Varnish.  Let dry then attached the candle cups with glue.


Here's my finished sconce. It can sit on a table or hang on the wall. I purchased 3 short battery operated candles to complete it.


Thanks for following along with me.  This was a fun and simple project. 
Colleen  :-)


Thursday, November 18, 2021

How to make a decorative snow stick.

 It's coming... You know it is.... Winter is coming. and that means snow...    Well, for most of us anyway.   Now that I am retired I enjoy snow.  Used to hate to drive in it but now, staying home cuddled up and warm, looking out the window.  Yeah I like snow.  

 Today I have an easy project.  We are going to make a snow stick so that we know just how much snow is out there, without having to go out there.  😎


Project Supplies and equipment.

1 piece of scrap board, preferrably outdoor wood.   I am using a piece of 3/4 inch treated yellow wood that was once part of a dog-earred fence board. 

Proxxon mini bandsaw, or Proxxon mini scroll saw

Proxxon cordless mini belt sander

yardstick or ruler.

Plaid paints and other decorative tidbits if desired, glitter, etc. 

Outdoor sealer. 

My wood piece is approxamately 24 inches x 3 inches

I need a pointy end so I can hammer it into the ground,  I use about 7" for that.  I used the Proxxon mini bandsaw to cut the spike it but you can use the Proxxon scroll saw if you prefer.

Next I drew a rudimenttary snowman on top.   (Like the woodcarvers do fancy canes), and cut it out using the Proxxon mini scroll saw


I painted it white for a first coat then painted my snowman on top with beautiful plaid paints. I painted  the stick brown.


I made a ground line then measured off my inches and painted them on my stick.

After a quick spary of sealer, he is ready to go live outside.
 

🎝🎜🎝🎜🎝Let it snow, let it snow, let it snow.   πŸŽπŸŽœπŸŽπŸŽ
(We rarely get more than a few inches)
   
Thanks for visiting.   Catch you next time.   Carol W,    


Sunday, November 14, 2021

How to Make Country Chic Rustic Pine Tree Holiday Wooden Decoration

 Use Proxxon tools to make this rustic pine tree decoration that's perfect for holiday home dΓ©cor.


Supplies and Equipment:

Instructions:

  1. Use the table saw to cut blanks to size.

  2. Print the Rustic Pine Trees template. Cut pattern pieces apart. Cover one side of the 8" x 6" blank with painter's tape.

     
  3. Mist the back side of the pattern pieces with spray adhesive, and mount on the taped blank. The painter's tape makes removal of the pattern easy without leaving any sticky residue.
  4. Cut the shapes on the bandsaw.

  5. Mark rounded corners on the bottom angles of the triangles. I traced around the end of a craft stick.

  6. Sand the rounded corners following the markings using the disc sander.

  7. Measure and mark the bottom center on the tree pieces. Secure the piece in the machine vice. Set the adjustable fence. Drill holes for the dowel rod tree trunks.

  8. Use the PDF template provided to mark and drill holes in the base for the dowel rod tree trunks.

  9. Use the Delta sander to sand all surfaces.

  10. Use acrylic paints to paint the base, trees, and dowel rod. Let dry thoroughly.
  11. Use the band saw to cut the dowel rod into 3¼" lengths.
  12. For the weathered, rustic look, sand the trees and base using the Delta sander, concentrating the sanding on the edges.
  13. Assemble the decoration. You can glue the dowel rods in place with a liquid wood adhesive, but I opted not to glue them in place so the decoration can be dismantled for easy storage.
Note: There is an optional star included on the printable template that can be adhered to the largest tree.


Monday, November 8, 2021

How To Build A Double Breadbox


Hi everyone! Today I wanted to show you a breadbox I built for my kitchen. I decided to make a double one because I need the extra room to stash a lot of stuff in it. Because the price of wood has gone up I wanted to just use scrap pine that I had laying around. When I build things like this I hardly ever make a pattern. I did draw something for the sides and center divider but the rest just depended on what wood I had on hand. I did vinegar grain painting on the two lids and the top. Follow along with me and you can see how I made it :-)

Supplies:
  Scrap pine boards
  Hinges (4)
  Wood Glue
  Brad Nailer and Brads
  Vinegar Paint and Varnish 

     
First I determined the size I wanted the box to be and drew a pattern for the side pieces.


Transfer pattern to pine and cut using the Proxxon Mini Band Saw. 


Using the Proxxon Table Saw I cut a board for the front face after I figured how long I wanted the piece to be.


Next I glued and nailed the to sides on the front.


Now I needed to cut the center divider so I altered my side pattern cutting a notch in the front and attached it with glue and brads.


.Before I went any further I wanted to cut out my lids. I determined the size that both lids needed to be and figured out the angle each had to be and cut to fit up to the base. I set my band saw at the angle and cut the long edge of the lids.


Next I measured and cut the upper front face using the band saw. I sanded the edges using the Proxxon Disc Sander and attached it with glue and brads,


I measured and cut a top piece and two back pieces and sanded on the disc sander.  Attached with glue and brads.


I then dry fit the lids and attached the hinges.


I removed the lids and hardware and sanded lightly. Next I prepared to paint. The lids and top board I did a faux graining technique using vinegar paint. Let those dry the applied a varnish.


The base and the inside I painted with Plaid Inspirations Chalk Paint. Color was called Ink. After dry I brushed on Plaid Inspirations Wax in Clear.


Here it is sitting on the countertop in my kitchen. I'll have it filled up in no time. Thanks for following along.... Colleen