Sunday, June 30, 2019

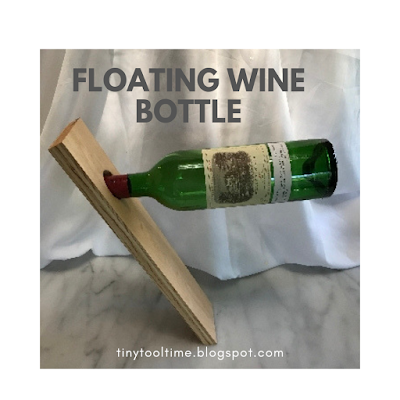
How to Make a Floating Wine Bottle Pillar

This floating wind bottle pillar will amaze your friends!! It's also a great project for working with the angle adjustments on your Proxxon tools.

Supplies and Equipment for Making the Floating Wine Bottle Pillar

Instructions for Making the Floating Wine Bottle Pillar

  1. Set the longitudinal stop on the table saw so the cut board measures 3¼" wide.
  2. Measure and mark a line across the width 15" from the top.
  3. Adjust the angle of the bandsaw to 27° and cut on the marked line. This is the bottom of the pillar.
  4. Measure and mark a line 3 1/8" from the top. Measure 1 5/8" from one edge and mark a cross line. The intersection of the two lines is the center of the 1½" hole that you will drill.
  5. I pulled out DH's big drill for drilling the 1½" hole for the neck of the wine bottle.
  6. Sand the edges on the disc sander. Adjust the angle of the table to 27°to sand the bottom end of the pillar.
  7. Sand the surfaces with the Delta Sander, using progressively finer grits of sandpaper.
  8. Apply the finishing of your choice to the floating wine bottle pillar—paint, stain, wax. I chose a paste wax finish.
  9. Amaze your friends with a floating wine bottle!!

Saturday, June 22, 2019

Proxxon and Plaid make a plain gourd bowl great!


Supplies Needed for this Project:

Fishing Line
Large Eye Needle
Plaid Paint - Black
School glue
Paint Brush
Wooden Cabone Ring 
Glue
A long string of blue rocks
X-acto knife
Spray Sealer


To begin, cut the top of your gourd out with the Proxxon Jig Saw that is made for cutting gourds. I mark my line first and start the entry for the jig saw with and x-acto blade. I just think it makes for a smoother start.


Once the top is cut off, use your rotary tool and this very small round, cleaning ball to clean out all the excess debris from the inside. After cleaning out the worst of the insides, use some sandpaper and finish smoothing out the inside.


Smooth the top of your gourd out with your Proxxon Belt Sander.

Glue your Cabone Ring to the bottom of the gourd to level it up and once the inside paint is dry, paint the outside of the gourd with the Plaid Paint Multi Surface - Sky Mist. This step took two coats to cover completely. I like that the Plaid Multi Surface Paint seems to be thicker.

I then painted the inside with a mixture of Plaid Paint - Black and some school glue mixed together.

Use the Proxxon Rotary Tool and a small drill bit to make holes approximately 1 inch apart around the top of the gourd. Use your needle and fishing line to coil your rock string two times around the top edge of the gourd.


This is what the gourd should look like when finished. The string of blue rocks give it a really pleasing finish and take a plain bowl up a notch.

I can't say enough good things about Proxxon Tools and Plaid Products. I hope you have tried them and like them as much as me.

Barbara


Friday, June 21, 2019

How to build a tape organizer for your shop

Hi everyone. It's Carol here and I'm back in my organizing frame of mind and thought I would share with you how to build a tape organizer for your shop or studio.   It's time to wrestle up all the various rolls of tape that seem to be all over the place, except when you need them, and coral them into one orderly spot.   This is an easy project and can be built in a couple of hours.


Equipment and Supplies

1/2"  OR   3/4" pine board, or plywood
1" x 12" dowel
1 old or new hacksaw blade
6- 1 1/2" screws
screwdriver
wood glue
Let's get started.   The first thing to do is to cut your wood to size.  
I made you a cutting diagram below.


  ^I forgot on my diagram (the pieces that will fit the slot) on the dowel are 1/2"  x 1/2"  ^


I used the Proxxon mini bandsaw to do my cutting.  I love this little but powerful workhorse.  

In the picture below I am cutting the sides off my 1" dowel.   It is going to fit into the slots I cut on my "sides".   I make two parallel cuts in the sides then cut them from the side to make a rectangle that is 1/2" deep and 1/2" long.
                                                                              Proxxon mini bandsaw


Next I glue my sides to my bottom and let dry.  


When it is good and dry, I flip it over and using my Proxxon professional rotary tool I put pilot holes into the bottom.  I am going to add screws to secure the sides to the bottom..  I want my tape holder sturdy.
Everything gets a good sanding from my Proxxon OZI/E delta sander.
  It's shape makes getting into corners a breeze.

.

I painted my front piece with Plaid's yellow paint before attaching it to the front piece with 2 screws.
 **  Make sure the sharp side is mounted so that it is about 1/8" to 1/4"  higher than the top edge and the teeth are pointing up .  **


Oh I added some flowers to make pretty.   Plaid paints make everything pretty!


Next I threaded my various tape rolls onto the dowel and placed the dowel into the slots and...wow, look 👀 now I am organized.  

And, the cutter works too. No need to look for the scissors!

 I just had to add some color to the sides too.   Thank you Plaid ! for making me dangerous with a paintbrush. 


I set mine on a shelf.  This can also be mounted to a wall....but I just don't have an inch of wall space.


I had fun with this project and I am another step closer to having an organized shop.  At least now I don't have to search for a specific tape or scissors to cut it.     Call me Happy.  😃

Thanks for visiting.    
Also thanks to Proxxon and Plaid. Your product are just amazing!
   Catch ya next time.   Carol


Thursday, June 20, 2019

How To Build A Patriotic Flag Holder

   
      Hello friends! This is the time of year that I decorate my home with a lot of patriotic things. My living room especially since it has a lot of red in it. It's my favorite color! Since I just received my new Proxxon Table Saw FET I decided to make something using it. I'm making a Patriotic Flag Holder, which could be used as a centerpiece or placed on a mantle. Follow along with me and I'll show you how I made it.


Supplies:
  •   Proxxon Table Saw FET
  •   Proxxon Delta Sander
  •   Scrap lumber  3/4" thick
  •   1 wooden bun foot 
  •   1/4" drill bit and drill
  •   Wood glue
  •   Waxing Brush
  •   Plaid Apple Barrel Paint  Barn Red, Award Blue, Antique White
  •   Plaid Inspirations Wax  Clear and Antique
  •   5 Cotton Tea Stained American Flags  7" x 11"
  1. Using the Proxxon Table Saw FET I cut 3 squares from my 3/4" scrap lumber. 4', 4 1/2", 5" square.


   2.  Using the Proxxon Delta Sander I rounded over the top edges slightly of each square.


3.  Using the wood glue I glued and stacked them largest to smallest on top.


4. Next I glued the Bun Foot on top of my stack (these can be purchased where they sell furniture building supplies).  Let dry.

5.  Now I drilled the holes for my flags. One on the top and four on the sides drilled at a slight angle.


6. Paint using the Plaid Apple Barrel Paint in a design of your choice. Let dry.


7. Apply a coat of Plaid Inspirations Clear Wax using a waxing brush and let dry. Lastly apply     sparingly the Plaid Inspirations Antique Wax and let dry. Insert the five flags and enjoy!


Wednesday, June 19, 2019

How to Make a Pennant with Proxxon Tools

Hi everyone, Steph Ackerman here to show you how to create a pennant with my Proxxon tools.


Supplies:
Plaid Paint
Stencil
Molding Paste
Pattern paper


Selecting a piece of wood, I used the to Measure Mate to mark the pennant shape.


The Scroll Saw made easy work of cutting the shape.


The Disc Sander easily sanded away the splintered wood creating a smooth base for painting.


For a little more sanding I used the Delta Sander.


To hang the pennant, I dril1ed 2 holes with the Bench Drill Press.


I painted the pennant with Plaid Folk ArtⓇ paint.  Using a stencil with molding paste, I added stars to the left corner.


A scrap of red, white and blue pattern paper was the perfect accent piece.  USA stickers were added above the pattern paper and painted in place with glitter paint


Thanks for stopping by.