Showing posts with label Bandsaw. Show all posts

Wednesday, June 3, 2020

How to Mend a Broken Heart

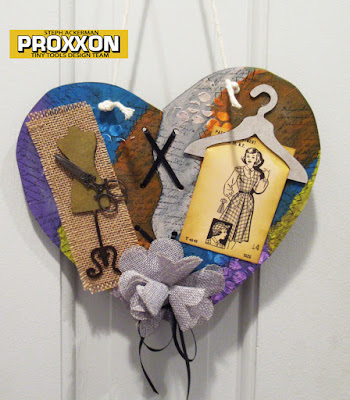
Hi everyone, Steph Ackerman here today with showing you how to mend a broken heart.


For today's project, I used the 2 Speed Scroll Saw to cut a a heart, then used the Band Saw to create the zig zag pattern while cutting it in half.


The Disk Sander made easy work of sanding the pieces.


Next, I used the Bench Drill Press to add holes in both pieces of the heart.


I began by painting the heart with Plaid black paint.  Next, I used modeling paste through a stencil to give the heart some depth.


I added an assorted of Plaid paints to give my heart life, then painted cross stitches where the colors met giving the illusion of a patchwork piece.  Using StazOn Ink, I stamped a script stamp randomly about the heart.


To "mend" the heart, I threaded ribbon through the holes and tied  it at the bottom.


Finally, in keeping with the patchwork/stitching theme, I added assorted embellishments.


Thanks for stopping by.


Sunday, May 3, 2020

How to Make a Wooden Letter Opener

A lovely letter opener is a graceful addition to any desk. This hardwood letter opener is easy to make and sure to bring satisfaction when using it.

Supplies and Equipment for Making the Letter Opener

Instructions for Making the Letter Opener

  1. Draw your desired letter opener shape to fit the wood blank.
  2. Mount the pattern on the blank. To mount the pattern on the blank cover one side of the blank with painter's tape. Mist the back side of the pattern with spray adhesive, and mount on the taped blank. The painter's tape made removal of the pattern easy without leaving any sticky residue.
  3. Cut the straight edges on the band saw.
  4. Cut any curved edges on the scroll saw. 
  5. Adjust the angle of the table on the disc sander to its lowest position. Sand the edges of the shape to form a tapered edge for slicing open envelopes.
  6. Sand all surfaces with progressively finer grits of sandpaper using the Delta sander.
  7. Polish the finished letter opener with paste wax, treat with wood oil, or finish as desired.
  8. Enjoy!!

Wednesday, February 19, 2020

How to Create Art

Hi everyone, Steph Ackerman here today using Proxxon tools to create Art.   Art has so many different meanings for everyone, so feel free to create what makes you happy.


Select a left over panel of wood that fits your stencil, then cut it with the Band Saw.


Use the Disc Sander to sand the panel.


Place a stencil on the panel and add color so the pattern is visible.  Use the Power Carver to carve  out the scroll pattern.  I've not used the Power Carve much so this was a learning process and I would rate this a beginner project.  With the variety of carving blades available, you can carve an assortment of details and with more practice, the possibilities are endless.


Now that the design has been carved into the panel, gesso the entire panel.


Once dry, reposition the stencil and repaint the panel with different colors.  Finish by spritzing a shimmery craft spray over the entire panel.


The final touch was adding brown ink around the panel as a contrast to the colors in the panel.


Thanks for stopping by.

Steph


Friday, January 3, 2020

How to make a custom frame

 Hi everyone,  Hope you had a great Christmas and are now looking forward to a truly awesome new year.  I love the holidays, but am looking forward to some extra spare time now to do some new and interesting craft projects that I can hopefully share with you in the coming months.   Today I will share a relatively easy project that you can make in an afternoon.  We are going to make a custom frame using some leftover pieces of  cedar I had lying around.


←Here is the finished project.  I made it for a little painting I had done in my art class.  I hadn't spent much effort painting it and it was a funny size so I really didn't want to invest a lot of money in a "custom" frame.  The beauty of this project is that you can make your frame any dimensions you want, and use whatever scraps of wood you have lying around.


Equipment and supplies:


1/2" x 2" by (   ) piece of wood suitable for the frame you desire.  (  )= length of picture x 2 + height of picture x 2 + 4"    Mine was 7" x 4 1/2" so I needed a piece about 27" long.
1/8" thick plexiglass piece big enough to cover your picture.
Woodburner  (optional)
wood glue
Sealer of your choice

So let's get started...
Here is the picture I am going to use.  It measures 7" x 4 1/2"


Using Proxxon's mini bandsaw I cut the plexiglas to size.  Note the masking tape.  This enables me to draw a line on the Plexiglas.  Leave the protective plastic on for now as this will protect the glass from scratches.   It cuts so easy on Proxxon's mini bandsaw.  Set the glass aside for now.


Now we are going to make a groove in the frame sides that will hold the glass and pictures.   For now I am going to leave the wood for my frame piece in one long piece.  This will ensure that the grooves line up when we put it together.... and it is just easier to push one piece through the saw.  (safer too)!

First thing that needs doing is to remove the wood splitter from the table saw.  This is necessary because we will not be cutting entirely through the wood at this step.  We are just making a groove.

Next I set the blade height between 1/8" and 3/16"  (the depth I want my groove).  Then I set the fence so that it would hit just about center in my wood side.   I then ran the length of the wood through the saw.  This left me with a groove just a bit too small for my Plexiglas to slide into... so I nudged out the fence a tiny bit and ran the wood through it again.   Now my Plexiglas and picture will sit nicely in the groove I just made.   👍


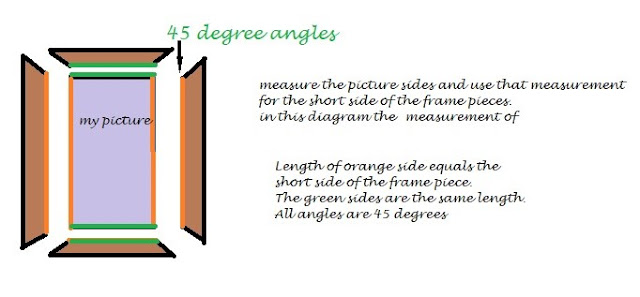
Now I have a long strip of wood with a nice groove.  Next step is to cut each side at 45 degree angle.   This is a miter cut.   It is easy to do on Proxxon's mini table saw.  Simply set the miter gauge to 45°.

Important. the  lengths of the sides of your picture are going to be equal to the of the short side of the frame pieces.  See below.     The picture here is worth a thousand words....(I hope)   The groove you made will always be on the short side of the frame sides


The next thing to do is to finish your frame--sanding always comes first and I sanded my frame using the Proxxon OZI/E delta sander.

Cedar wood if sanded fine enough will shine up like red glass when it is sealed or varnished.   I decided to do a little wood burning on mine prior to sealing it with krylon triple thick glaze.

I then glued 3 pieces together and let them dry well.  Keep your angles at 90°

When everything is dry, I slipped my picture behind the Plexiglas and slid them both in the groove then glued the final side on.   Add a sawtooth or other picture hanging device on the back and it is ready to hang.

Thanks for visiting.

Truthfully, thanks to Proxxon tools this was much easier to build, than it was to explain. .   I hope the pictures help, so you too can make your own picture frames.   Your really should check out the Proxxon line of tools.  They are certainly designed for the crafter in mind.

Catch ya next time   Carol  


Saturday, December 7, 2019

Let It Snow Banner

Hi everyone, Steph Ackerman here today using Proxxon tools to create a snow panel.


There are so many options with scraps of wood so I decided to create a winter themed banner.
Using the Micro Bandsaw, I cut up strips of left over plywood into irregular squares.


I quickly sanded each piece with the Disk Sander.


Using Plaid Paints, I painted each piece and adhered each square to a strip of plywood.


I created a snowy effect using a stencil with modeling past, then added the letters on top.  To complete my snow theme, I added clay elements.

Using the Bench Drill Press, I drilled a hole in the top and added ribbon to hang the panel.

Happy Holidays.

Thanks for stopping by.


Friday, December 6, 2019

Ho Ho Ho Christmas decor

Christmas is coming!!!
And we still have time to make some décor!
Today I have a simple but cute project that you can make in no time at all, and you probably have all you need to decorate it in your Christmas box.   I realize we all have a lot of decorations we use every year, but isn't it fun to have something new to set out?, and the fact that you made it makes it even more special.  Let the kids do the painting and you have a family treasure to pass down through the ages.

Supplies and Equipment:
1/4" - 1/2" scrap wood, large enough for your pattern
Small awl.
3 jingle bells
3 short pieces of thin wire
3 small eye screws
glitter and adornments  (optional)
hanger of your choice.

To get started I simply drew out a pattern I thought would be cute.  
I used graph paper to help me keep the HO HOs all the same size.  👷

I traced the pattern onto my piece of wood then cut it out first using the Proxxon mini bandsaw, (which cuts like butter) to do the long straight pieces.   I then turned to the Proxxon mini scroll saw to do the sharper inside cuts.   I could have used Proxxon's extra thin bandsaw blade to do the whole thing as it makes really sharp turns like a scroll saw, but I did it this way.


Next I sanded it all using Proxxon's OZI/E delta sander to get into all the nooks and crannys.  It's triangle shaped head really helps get the job done.


Using an awl I poked starter holes in the tip of the candy canes and inserted small eye hooks.   These are really small eyehooks as you can see.  


PAINTING

I first painted it all, front, back and sides, using Plaid icy white paint.  Next I painted the top and bottom HO's red and the middle HO green.  I used white to embellish them and paint the stripes on the candy canes.                Plaid makes beautiful paints!


Using my 3 pieces of thin wire I attached my Jingle bells to the eye hooks.  Oh and I added a little glitter for  some bling.   Sorry it doesn't show up well in this picture.  

Lastly, I attached a saw tooth picture hanger on the back.   You could alternately hang it with some wire.   It looks really nice on the door and the jingle lets you know you have somebody coming in.       Is it Santa?...?      no, he comes down the chimney silly.  


I told you it was easy.  Hope you choose to make one for yourself.
Thank you Proxxon and Plaid, our sponsors.  

Enjoy the Holiday season.     Carol


I

3