Showing posts with label disc sander. Show all posts

Saturday, July 17, 2021

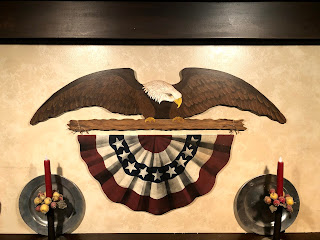
How To Make A Eagle Wallhanging Part Two


This will be the directions for making the bunting that hangs below the eagle.  For supplies you can refer to Part One.


I drew the pattern for the bunting then transferred it to the MDF. 


Due to the size of this sheet of MDF I needed to cut off some excess before I could cut it out with the Proxxon MICRO bandsaw.  For this I used the Proxxon Micro Jig Saw.


Now with a lot of the excess wood eliminated I was able to finish cutting out the bunting with the  Proxxon MICRO Bandsaw.


Using red, white and blue Plaid paint I painted the stripes and stars. Let dry


Now is kind of where the magic happens. Using scrap paper and black spray paint I made it look like it was ruffled. Finding the center spot at the top make a mark. Then using two sheets of paper cover all the paint except for a small wedge coming from that center mark. LIGHTLY SPRAY with the black spray paint.  Move the paper around from the center point out and lightly spray wedges. I gives the illusion of it being ruffled. Let dry.


I screwed two small eye screws into the top of the bunting.  I took twine and wrapped twice around the eagles branch going through the eye screws to hang the bunting. I coated both pieces with the varnish (back, front and all edges).  I also tapped in two picture hangers behind the eagles wings for hanging.


Hope you enjoyed my wall hanging!  Thanks for following along with me :-)...Colleen

Thank you Proxxon!


Thursday, July 15, 2021

How To Make A Eagle Wall Hanging Part One


Today I'll be showing you how I made this eagle wall hanging.  This is Part 1.


Supplies: 
  
  Proxxon MICRO-Bandsaw MBS 115/E
  Proxxon Disc Sander TSG 250/E
  Proxxon Jig Saw
  Proxxon Delta Sander
  MDF 1/2"
  Plaid Paint  assorted colors
  Hellmsman Spar Varnish
  2 Small Eye Hooks 
  Twine
  Picture Hanger (2)


I'm using 1/2" MDF simply because I have it on hand. Normally I would use birch plywood for something like this but wood is very expensive right now. MDF should not be used outside.  I'm eventually going to put this on my covered porch so I'll be covering it with a Spar Varnish.  I drew my pattern on the MDF.


Using the MICRO bandsaw I cut the eagle out. Some times due to the size of the throat on the bandsaw the pattern may need to be drawn on both sides of the wood to get into tight areas.


Once it is cut out I used the Disc Sander TSG 250/E to smooth edges and the Delta Sander for tight spots.


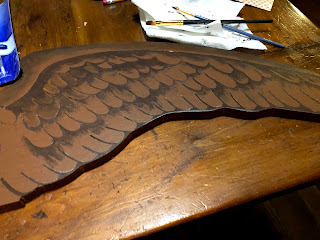
Now I'm ready to paint.  I base coated the eagle with A medium brown Plaid Paint and let dry. I then drew in the details of the eagle with a pencil. I then painted in the wings, legs and eagle head with multiple colors of Plaid Paint.  Also painting all the edges with matching colors.


Next I cut the wood that looks like a branch under the eagle that will be attached to the bottom using the Micro bandsaw.  I lined the branch up under the eagle and screwed the two pieces together.


Next I painted the branch and the eagles Talons.


This is part one.  Next in part two I'll be showing how I made the bunting.  Thanks for following along with me... :-)    Colleen


.


Sunday, May 3, 2020

How to Make a Wooden Letter Opener

A lovely letter opener is a graceful addition to any desk. This hardwood letter opener is easy to make and sure to bring satisfaction when using it.

Supplies and Equipment for Making the Letter Opener

Instructions for Making the Letter Opener

  1. Draw your desired letter opener shape to fit the wood blank.
  2. Mount the pattern on the blank. To mount the pattern on the blank cover one side of the blank with painter's tape. Mist the back side of the pattern with spray adhesive, and mount on the taped blank. The painter's tape made removal of the pattern easy without leaving any sticky residue.
  3. Cut the straight edges on the band saw.
  4. Cut any curved edges on the scroll saw. 
  5. Adjust the angle of the table on the disc sander to its lowest position. Sand the edges of the shape to form a tapered edge for slicing open envelopes.
  6. Sand all surfaces with progressively finer grits of sandpaper using the Delta sander.
  7. Polish the finished letter opener with paste wax, treat with wood oil, or finish as desired.
  8. Enjoy!!

Wednesday, February 19, 2020

How to Create Art

Hi everyone, Steph Ackerman here today using Proxxon tools to create Art.   Art has so many different meanings for everyone, so feel free to create what makes you happy.


Select a left over panel of wood that fits your stencil, then cut it with the Band Saw.


Use the Disc Sander to sand the panel.


Place a stencil on the panel and add color so the pattern is visible.  Use the Power Carver to carve  out the scroll pattern.  I've not used the Power Carve much so this was a learning process and I would rate this a beginner project.  With the variety of carving blades available, you can carve an assortment of details and with more practice, the possibilities are endless.


Now that the design has been carved into the panel, gesso the entire panel.


Once dry, reposition the stencil and repaint the panel with different colors.  Finish by spritzing a shimmery craft spray over the entire panel.


The final touch was adding brown ink around the panel as a contrast to the colors in the panel.


Thanks for stopping by.

Steph


Wednesday, January 8, 2020

How to Make a Vacation Album

Hi everyone, Steph Ackerman here today using Proxxon tools to create a customized vacation album.


You can purchase all kinds of albums, but why not create your own?  With assorted Proxxon Tools you can create any type of album you want.


I found this pallet sign.  It's basically layers of compressed chipboard with a layer of melamine on top and I wanted to see how the Band Saw would cut this sign.  Begin by using the Kapro 313 Measure Mate to size out the album.


The Band Saw easily cut through the pallet sign.  There was no shredding or distortion.

.
While I didn't need to, I used the Disc Sander to sand the edges of the album.


Use the Bench Drill Press to drill 2 holes in the album.


Paint the covers with FolkArt Acrylic Paint in Blue Echo.  Randomly dry brush on FolkArt Acrylic Paint in Windsor Blue.


Cut assorted pattern papers to fit.

Decorate the front cover with assorted left over elements.  Add Alaska 2019 to the corner.

Thanks for stopping by.


Wednesday, October 16, 2019

Happy Fall Sign

Hi everyone, Steph Ackerman here today sharing a new fall project.


The new sign was created with scraps of wood.  Using the Micro Bandsaw, I cut assorted sizes of blocks.  I wasn't too concerned with the sizes.


I used the Disc Sander to sand the edges of each block.


Next, I used Plaid FolkArt Paints to paint each block.


I needed a longer strip of wood to adhere the smaller blocks on, so I cut another strip of wood using the Micro Bandsaw again.


Next, I used the Bench Drill Press to drill holes in the ends of the strip.


I glued burlap to the panel, then glued the smaller blocks on top.


To decorate, I created assorted clay embellishments, inking each with Brilliance inks.


Placing the letters on each block, I adhered the clay leaves to each block.


Happy Fall.

Thanks for stopping by.