Showing posts with label mini jigsaw. Show all posts

Saturday, July 17, 2021

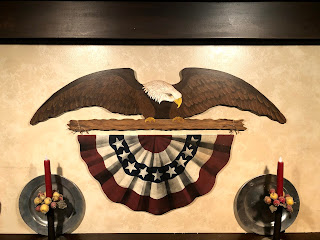
How To Make A Eagle Wallhanging Part Two


This will be the directions for making the bunting that hangs below the eagle.  For supplies you can refer to Part One.


I drew the pattern for the bunting then transferred it to the MDF. 


Due to the size of this sheet of MDF I needed to cut off some excess before I could cut it out with the Proxxon MICRO bandsaw.  For this I used the Proxxon Micro Jig Saw.


Now with a lot of the excess wood eliminated I was able to finish cutting out the bunting with the  Proxxon MICRO Bandsaw.


Using red, white and blue Plaid paint I painted the stripes and stars. Let dry


Now is kind of where the magic happens. Using scrap paper and black spray paint I made it look like it was ruffled. Finding the center spot at the top make a mark. Then using two sheets of paper cover all the paint except for a small wedge coming from that center mark. LIGHTLY SPRAY with the black spray paint.  Move the paper around from the center point out and lightly spray wedges. I gives the illusion of it being ruffled. Let dry.


I screwed two small eye screws into the top of the bunting.  I took twine and wrapped twice around the eagles branch going through the eye screws to hang the bunting. I coated both pieces with the varnish (back, front and all edges).  I also tapped in two picture hangers behind the eagles wings for hanging.


Hope you enjoyed my wall hanging!  Thanks for following along with me :-)...Colleen

Thank you Proxxon!


Thursday, July 15, 2021

How To Make A Eagle Wall Hanging Part One


Today I'll be showing you how I made this eagle wall hanging.  This is Part 1.


Supplies: 
  
  Proxxon MICRO-Bandsaw MBS 115/E
  Proxxon Disc Sander TSG 250/E
  Proxxon Jig Saw
  Proxxon Delta Sander
  MDF 1/2"
  Plaid Paint  assorted colors
  Hellmsman Spar Varnish
  2 Small Eye Hooks 
  Twine
  Picture Hanger (2)


I'm using 1/2" MDF simply because I have it on hand. Normally I would use birch plywood for something like this but wood is very expensive right now. MDF should not be used outside.  I'm eventually going to put this on my covered porch so I'll be covering it with a Spar Varnish.  I drew my pattern on the MDF.


Using the MICRO bandsaw I cut the eagle out. Some times due to the size of the throat on the bandsaw the pattern may need to be drawn on both sides of the wood to get into tight areas.


Once it is cut out I used the Disc Sander TSG 250/E to smooth edges and the Delta Sander for tight spots.


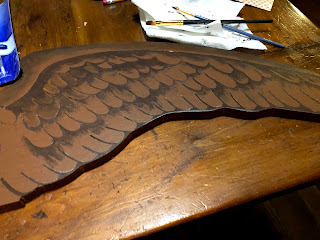
Now I'm ready to paint.  I base coated the eagle with A medium brown Plaid Paint and let dry. I then drew in the details of the eagle with a pencil. I then painted in the wings, legs and eagle head with multiple colors of Plaid Paint.  Also painting all the edges with matching colors.


Next I cut the wood that looks like a branch under the eagle that will be attached to the bottom using the Micro bandsaw.  I lined the branch up under the eagle and screwed the two pieces together.


Next I painted the branch and the eagles Talons.


This is part one.  Next in part two I'll be showing how I made the bunting.  Thanks for following along with me... :-)    Colleen


.


Thursday, October 1, 2020

How to carve a gourd pumpkin

Halloween is almost here and it is time to start thinking pumpkins, carving pumpkins and jack-o'-lanterns ðŸŽƒðŸŽƒðŸŽƒðŸŽƒ   I love pumpkins, and I enjoy carving them, but it's a little sad when the pumpkin begins to shrivel up after just a few weeks.   This year I am going to bring out a few of my smaller gourds and show you how easy it is to carve them using Proxxon tools.   And these "pumpkins" will last forever.  


Equipment and supplies

Small pumpkin shaped gourds

Proxxon mini jigsaw

Proxxon rotary tool with small drill bit or a sharp awl.

Plaid paints

sealer of your choice

2 small hinges + one small latch

super glue and small screwdriver

velcro dots

1 battery powered candle light.


Let's get started.   First we need to choose a gourd   Warning gourds start out dirty!  But they are easy to clean using steel wool and water.


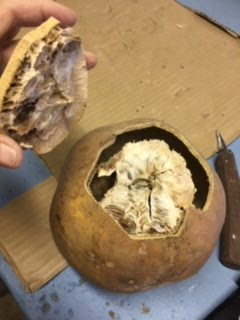
Now we are going to cut him open.   It is always a surprise to find out what is inside.

We need a small hole in order to insert our jigsaw blade.   If you have a Proxxon rotary tool this is perfect for drilling the small hole.   If you don't you may punch a hole using a sharp awl.


Using the Proxxon mini jigsaw I cut out the bottom of the gourd.  Notte that I made a zig-zag in my cut.   This is to make it easy to put back together properly.   Also it is important to make a straight edge where we are going to attach the hinges later.    OK let's open her up.  


Lucky me, it is dry and easy to remove.   Now my pumpkin is hollow.

Now to design a jack-o'-lantern.   I drew a simple face.   You can be more creative!


I cut it out using the Proxxon mini jigsaw.  It was a breeze!

Optional step:
Using the proxxon rotary tool with the bull nose rasp cutter I added some hair and a label on the back.


Ok back to our original plan.   We are going to add hinges to the bottom of our gourd and a latch to keep it shut.    I used glue to first affix the hinges then added very small screws.   I did the latch in the same way.


For candlelight I put velcro on the inside of the bottom of the gourd and the other side to the bottom of my battery powered candle.  That way I can open the bottom of the gourd, stick the candle on the velcro and shut the gourd.   I used some watered down plaid paints to give my pumpkin his orangey color.    And we are done.  


😀😀😀My candle changes color.  😀😀😀


Thanks for visiting.   I hope you have a happy and safe halloween.    
Thank you Proxxon and Plaid.

Check out these fine products.   Just click on the links above.   
Have fun!   catch you next time  Carol