Showing posts with label Micro bandsaw. Show all posts

Thursday, July 15, 2021

How To Make A Eagle Wall Hanging Part One


Today I'll be showing you how I made this eagle wall hanging.  This is Part 1.


Supplies: 
  
  Proxxon MICRO-Bandsaw MBS 115/E
  Proxxon Disc Sander TSG 250/E
  Proxxon Jig Saw
  Proxxon Delta Sander
  MDF 1/2"
  Plaid Paint  assorted colors
  Hellmsman Spar Varnish
  2 Small Eye Hooks 
  Twine
  Picture Hanger (2)


I'm using 1/2" MDF simply because I have it on hand. Normally I would use birch plywood for something like this but wood is very expensive right now. MDF should not be used outside.  I'm eventually going to put this on my covered porch so I'll be covering it with a Spar Varnish.  I drew my pattern on the MDF.


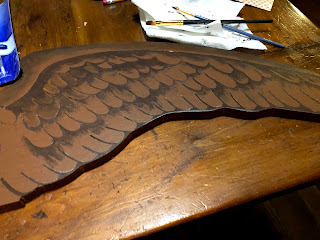
Using the MICRO bandsaw I cut the eagle out. Some times due to the size of the throat on the bandsaw the pattern may need to be drawn on both sides of the wood to get into tight areas.


Once it is cut out I used the Disc Sander TSG 250/E to smooth edges and the Delta Sander for tight spots.


Now I'm ready to paint.  I base coated the eagle with A medium brown Plaid Paint and let dry. I then drew in the details of the eagle with a pencil. I then painted in the wings, legs and eagle head with multiple colors of Plaid Paint.  Also painting all the edges with matching colors.


Next I cut the wood that looks like a branch under the eagle that will be attached to the bottom using the Micro bandsaw.  I lined the branch up under the eagle and screwed the two pieces together.


Next I painted the branch and the eagles Talons.


This is part one.  Next in part two I'll be showing how I made the bunting.  Thanks for following along with me... :-)    Colleen


.


Thursday, February 18, 2021

Making A Little Brown Jug


Hi everyone!  I'm continuing to make small accessories for the tiny houses I'm building (which I'm selling as fast as I can make them).  I thought a little brown jug would look cute along side the little bench I built.  I'm going to show you how to make one using the Proxxon Micro Woodturning Lathe.  follow along to see how I did it.


Supplies and Equipment

  Proxxon Micro Woodturning Lathe

  Proxxon Five Piece Chisel Set

  Proxxon Micro Bandsaw

  Proxxon Bench Drill Press

  1 1/4" round wood dowel

  Plaid Paint

  Sand Paper


Attach the dowel rod to the lathe.


Turn the lathe on and cut in a few reference lines.


Using the chisels begin shaping the jug.  Try different chisels to get a feeling for what each one is capable of.


Once I was satisfied with the shape I removed it from the lathe.


Using the Proxxon Mini Bandsaw, I carefully cut it away from the rest of the dowel.


Using the Proxxon Bench Drill Press, drill press I drilled a small hole in the top.


I sanded lightly with a small piece of sandpaper and painted with Plaid paint.


This is my finished product.  I think they look cute sitting on the tiny bench.  Can't wait to display them with my next cabin.  Till next time .... Colleen


Thursday, October 15, 2020

Building A Tiny House - Part 1


  Hi friends!  I've been working on making some miniature houses and barns that eventually I'll be selling. Today I'll show you Part 1 of making my tiny two story house using Proxxon tools.


Materials List

  • Proxxon Micro-Bandsaw
  • Proxxon 2 Speed scroll saw
  • Proxxon Delta sander
  • 1/2" birch sanded plywood
  • Wood corner molding 
  • Craft sticks  various sizes
  • Wooden windows  
  • Wood glue
  • Brad nailer and brads
  • Drill and drill bit
  • Paint     


I drew out my pattern pieces on graf paper and transferred them to my plywood


Using the Proxxon Micro-bandsaw I cut out the two sides, a front and a back.


I now have to cut out the windows. In order to cut them I drilled a hole in each window big enough to pass the blade of the Proxxon Scroll Saw through. Bringing the saw blade though the hole then reattaching it to the saw. Cut out the windows and door using the Proxxon scroll saw.  I tried one of the window panes in to make sure they fit.


Fit the sides, back and front together. Glue and nail in place with the brad nailer.


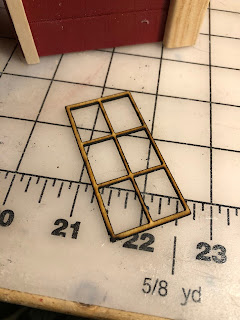
The tiny window panes were made from 1/16" craft wood. They were made with a laser burner. I fit the windows in and glued using wood glue.


Once everything was assembled I lightly sanded using the Delta Sander then painted with red spray paint.


Using the Micro bandsaw I cut pieces of corner molding for each of the outside corners and attached with wood glue and brad nails


With the Micro bandsaw I also cut out various pieces of craft sticks to trim out each window and the door.


Check out my next months blog for the completion of my tiny house project :-)