Sunday, March 19, 2023

Proxxon Tools and 3D Printing Come Together

I recently added 3D printing to my list of crafts. Happily, I've discovered that my Proxxon MICROMOT tools are ideal for post processing touch-ups. Here are some examples of how I use Proxxon tools for my 3D post processing.


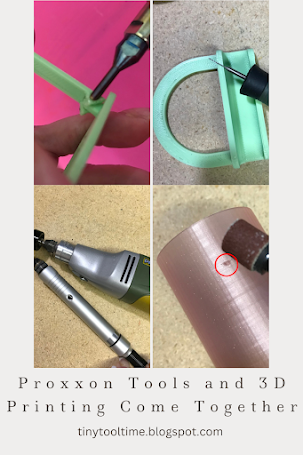
Here you can see a minor surface imperfection on this vase.


I used a small sanding drum to gently erase that little errant blob. 


I use the sanding drums paired with the Flexishaft 110/P and Professional Rotary Tool IBS/E


To make this combination ever more user-friendly, I use the Footswitch FS for easy on/off operation which frees my hands.


On this display egg I used the engraver tool with a milling bit to smooth the open edge.


The engraver tool has a wide selection of  engraving, milling, and drilling bits. Here I used a micro drill bit. 


I also use the Microflam soldering burner to set hinge pins on small boxes and cosplay glasses.

Setting hinge pin on tiny box

Setting pin on cosplay glasses

I'm sure as my 3D printing adventure continues, I will find other uses for my Proxxon tools.

Carole

Sunday, March 12, 2023

Building A Faux Raised Panel Door Using Proxxon Tools


Hi everyone!  As usual I'm working on projects around the house. We have lived in this old farmhouse for over 40 years. The house is over 90 years old.  I've got many projects lined up for the future.  These doors upstairs in my opinion were an eyesore.  I thought that by adding molding it would greatly improve the look of the doors.  Follow along with me and I'll show you how I created them using Proxxon tools.


Supplies:

    Proxxon Table Saw FET
    Proxxon Cordless Belt Sander BS/A
    Decorative Flat Trim Molding 
    Gorilla Wood Glue 
    Brad Nailer And Brads
    Wood Putty
    Paint
    Masking Tape


This is a picture of what the doors looked like to begin with. Solid flat builder grade doors.  Boring!!!  The other doors in our house are simple panel doors so I wanted to try and give these a similar look.


This is one of the original doors.


Using the measurements from this original door I taped off the same dimensions to the flat doors.


Measuring the length of the inside of the masking tape, that gave me the measurements of the trim molding.  Because the Proxxon tools are so small and easy to move around I was able to carry the table saw upstairs and make all my cuts right in this room!  Terrific time saver! This is the trim molding I purchased at Home Depot.


Using the blade guide I set it at a 45-degree angle and made my first cut. 


Keep in mind that the ends of the molding have two opposite 45-degree angles. Now all I had to do was cut each piece the length of inside my masking tape. As I cut them, I temporally held them up on the door with tape.  I cut all the pieces for both doors. The Proxxon Table Saw virtually made no sawdust.  Most of it stayed right in the saw which I will clean out when finished.


Now that all the pieces were cut, I carefully removed only one at a time.  I applied Gorilla wood glue to the backs and stuck them back on with the masking tape. After all the pieces were glued, I tacked each one with a few brad nails and my brad nailer gun.


I let everything dry for a few hours.  I removed the tape and filled in any nail holes or gaps at the corners with wood putty. I let that dry overnight.  Now I needed to sand away the excess wood putty. I used the Proxxon cordless belt sander.  It was perfect for getting in those tiny areas that would have taken me hours to do with sand paper.


After I finished sanding, I wiped everything down and started to paint, I first painted one coat over just the molding and let it dry.  Lastly, I painted a coat over the entire doors.  I'm very happy with the way they turned out.  Other than waiting for new doorknobs I ordered in a rubbed oil finish; this project is complete.


Thanks for following along with me :-)
Colleen


.


Saturday, March 4, 2023

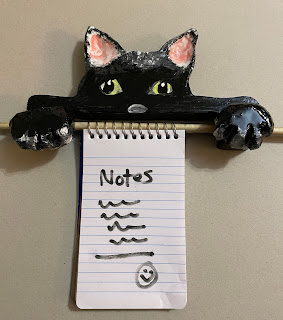
how to make a unique note holder

 Hi again.   Time for another quicky project that you can enjoy with or without kids.  We are going to whip out a little note holder.  This would go great in the kitchen for recipes and shopping lists, and that sort of thing.  I know I am always looking for a pen and paper to write down a number or put some items on a grocery list.  Stick this little note holder on the wall and it will always be there when you need it.  And it doesn't have to be a cat.   For you dog lovers, a dog will hold the note pad just as well.


Equipment and supplies

A minimum of 1" thick  piece of wood.  I used a 1 X 4 x about 2 1/2 foot long

Proxxon mini bandsaw or  Proxxon mini scroll saw 

Proxxon cordless mini belt sander

Proxxon OZI/E delta sander

Proxxon long neck angle grinder.  

Glue,  paint and  sealer

1/4" dowel,,,and 1/4 inch drill bit.-

sawtooth picture hanger 

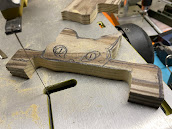
  First, we need a pattern.  If you can draw it, I say Yay draw it, otherwise I often look at magazines and or the clip art on the computer.   I drew the one we are going to work on,  on a piece of paper.   See  the cat below.

After transferring the pattern onto the wood of your choice, it's off to the Proxxon scroll saw for cutting.   This scroll saw handles the cut-ins and corners without any problem, and is a joy to use.


Next, I used a 1/4" drill bit to drill holes to hold the dowel that will hold the note pad


You can stop here, and get out the paints, or  chose to shape the little kitty and I did so using the Proxxon cordless long angle grinder.  I first ground out some wood from the front of his ear, then I worked on the backside.  Take your time and enjoy the process.   Remember to keep your holding hand away from the cutters.  


A little smoothing with the Proxxon cordless mini belt sander, and the Proxxon OZI/E delta sander. 


Now grab the kiddies and let;s paint this kitty!


Then stick the dowel through one hole, then through the wire spiral of the little note pad and out the other side.  It should fit tight enough to hold the dowel.  No need for glue. Glue the little feet to the front of the bridge.   Spray a little sealant and call it done.  If you want to hang it just fasten a saw toothed picture hanger on the back.  


Thanks for visiting.   Leave me a comment if you would.   If you have a project in mind, you want me to do put it in the comments and likely I will try it.  
Be safe, Have fun, make something.   Carol
Thanks Proxxon.  Love the little tools.