Showing posts with label Proxxon 2 speed Scroll Saw. Show all posts

Sunday, March 10, 2024

How To Cut Window Openings Using The Proxxon Scroll Saw


Hi Everyone!  As you may have already figured out from a few of my past pots, I have been building and selling tiny houses.  If I didn't have my Proxxon Tools, I don't think I'd be able to accomplish the things I'm now building.  I design all my own patterns. I thought maybe some people would be interested in seeing how i cut the window openings using the scroll saw.  Follow along with me and ill show you how I do it   :-)


Supplies:
   
   Proxxon 2 Speed Scroll Saw DS 460
   Proxxon Cordless Belt Sander
   1/2" wood  ( any thickness will work depending on your particular project)
   Drill and 1/4" drill bit


Using my own pattern, I draw the design on whatever thickness wood I'm using.  For this house I happened to be using 1/2" MDF.


Now that i have my pattern drawn, I cut it out using the Proxxon scroll saw.


Next, I determine where i want my windows placed.  I draw the shape of the windows on the wood.  In order to cut out the windows, you must drill a hole in the center of the window shape.  I always use a 1/4" drill bit in my drill.  Now I move the piece to the scroll saw and remove the blade. Drop the blade down through the hole and reattach the blade to the saw.


Now your blade is connected and ready to cut.


I've kind of got a system of how i cut to get perfect corners.  Get the blade over to one of the edges and saw to the corner.  then back up a tiny bit aur curve the blade to the next corner. Once you get all the way around the center blank mill be able to pop out. I just lift the piece up and it falls out.  Next, I turn the piece the opposite way and cut down to the other corner.  This does take quite a while to cut each window, but it works well.


Occasionally I may have to sand on the inside edge if there's any roughness, but my Proxxon Cordless Belt Sander cleans that right up.


This method will work when cutting out any shape in the middle of a piece of wood.  Thanks for following along with my little lesson.  Till next time...
                                                                      

                                                            Colleen  :-)


Sunday, February 25, 2024

Building Patriotic Buntings For Tiny Houses


Today I will show you how I built tiny patriotic buntings for one of my tiny houses. This simple project adds so much character to my fence. Follow along with me and I'll show you how I made them.


Supplies:
     1/16" Balsa Plywood
     Proxxon 2 Speed Scroll Saw DS460
     Plaid Paint


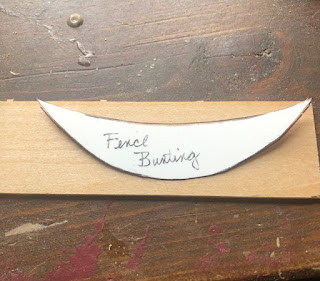
First, I determined the size I needed the buntings to be and drew a pattern.


I then drew the pattern on my balsa wood. Using my Proxxon Scroll Saw I began to cut them out. For the fence I needed 6.


The Proxxon Scroll Saw does such an amazing job that I didn't even need to sand the edges. If this were a thicker piece of wood, I'd imagine that to be necessary. As you can see in this picture, I even stacked 2 pieces together and cut.


Now all 6 pieces are cut out and ready to paint with my Plaid paint.


Using various shades of red, white and blue, the buntings are painted. I used a tiny awl to poke a hole in each end and attached them to the fence with sewing thread.


Here is my completed project.  Just wanted to add that every element of this tiny house was created using Proxxon tools.  Hope you enjoyed following along with me.
Colleen :-)


Saturday, January 6, 2024

How to make a dollhouse chair.

Hi everybody!   Guess you survived the holidays!    Time to get going onto something new in this brand-new year!   I'm in the process of helping a friend. refurbish an old doll house.  We have been working mostly on the structure and exterior, but now we are giving that a little rest and thinking about the interior. So, my project today is to make a little chair for this little house. It's very first piece of furniture.\


Ok, Let's get started, I saw a design for a chair and have redone it to fit my needs.   See below for my plan.
I see that it could have been darker,  sorry!
So the first step was to draw the pattern, as above.  This little chair is going to be about 4" tall.
Next it gets transferred to the 1/4" poplar plywood I am using and I begin to cut it out using the Proxxon mini band saw.   A scroll saw would work just as well, (maybe better), but I just love the little Proxxon band saw.   Anyway, there are parts of this I do take to the Proxxon mini scroll saw as it works better on the tight curves.
]


I need to tell you on the patterns there are small tabs and slots where things will fit together.  This makes gluing so much easier.  After all is done there might be a bit of tab showing but that can easily be sanded off.  I like to use the Proxxon delta sander for this and pretty much all my sanding needs.


For the inside cuts on the chair back, I drilled some holes ahead of taking it to the scroll saw as a shortcut.  You do have to drill a hole in it someplace anyway, so it might as well make it do something.  Then I released the sawblade on the Proxxon scroll saw and threaded it through the hole to cut the sides.  The Proxxon scroll saw can use blades with pins.  This makes changing blades or releasing and replacing blade for inside cuts very easy!
]````````````````````````````````


Once we get all our pieces cut and sanded it's time for gluing.  This can be little tricky but small clamps really help. 


And now we got a chair.  It's pretty sturdy and will look nice when I finish sanding and painting it.
]


There, Now, there is a place to sit on the porch.😁

I really enjoyed making the little chair and look forward to constructing some more furniture for this many-roomed dollhouse.

Thanks for visiting.  Hope to see you back next time.  Carol.
Play safe everybody.!

Thanks Proxxon, I'm still loving your tools.

Sunday, October 15, 2023

Building A frame For A Trade Sign


Hi everyone!  This is part 3 of building my trade sign.  This is the final step aside from painting it, which will come at a later time.  Follow along with me and I'll show you how I built the frame. 


Supplies:
  Clamps
  Wood Glue
  Brad Nailer and Brads
  Pine Trim Molding


First, I needed to cut, glue and clamp the trim across the curved top of the sign.  Using the 6table saw I cut a length of trim with excess on both sides. Knowing that this piece had to be flexible, I needed to soak it in water.  I wish I had taken a photo, but I forgot.  I soaked it in our pool for two hours. Removed it and bent it across the top curve.  Using clamps, I held it in place till it dried.


Once it was dry, I removed it. I cut it to size with a tiny bit extra. I then glued it and re-clamped it.  Next came the sides. I held a piece of trim up to figure the angle I needed to cut it. I wanted that piece to slide up under the top trim.  I marked it and cut the angle with the band saw. Checked for length and trimmed using the table saw.  I applied glue and attached the side. I repeated for the other side.


I measured and cut the bottom trim. When all the pieces were glued, I used the brad nailer and brads to secure everything.


Lastly, I used the Belt Sander to sand off each corner for a perfect fit.


My project is complete, except for painting.  That's coming at a later date. I'll be sure to post a picture when its painted!  Thanks for following along  :-)
Colleen


Sunday, August 13, 2023

Making A Nautical Trade Sign Part 1


Hi friends!  Today I'm starting kind of a lengthy project.  I'm designing and building a nautical trade sign to hang on the wall. I'm splitting it in 3 parts because each element is a project in itself.  The first is cutting and carving this whale. The second will be a ship and the third will be a wood sign with carved elements to mount parts one and two on.  Follow along with me.  Lets get started  :-)


Supplies  

   Proxxon  2 speed Scroll Saw DS 460
   Proxxon Cordless Belt Sander  BS/A
   Proxxon Power Carver
   Proxxon Precision Rotary Tool FBS 115/E
   Clear #1 white pine board   1x8x6
   Wood Glue
   Brad Nailer


First, I started by drawing my whale directly on the pine board. This was some pine I had left from another project. 


Using The Proxxon Scroll Saw, I cut out the whale.


Now the fun begins!  Using the Proxxon cordless belt sander, I began to round off the edges. I also used the Proxxon rotary tool and Proxxon power carver for details.


Next using the Proxxon rotary tool, I worked on the eye.


Lastly. I cut and carved the flipper.  I laid a small piece of wood on the whale and drew what I felt would be the appropriate size.  Using the scroll saw, I cut out the flipper.  I used the belt sander to round off the edges, then I attached the flipper to the lower portion of the whale with wood glue and a brad nail.


This part 1 is complete except that it will be painted when the other two elements are finished.  

Thanks for following along with me.  Stay tuned for 2 more segments to this project.
Colleen :-)