Friday, June 29, 2018

How to make a patriotic door hanger for the 4th of July


Hi everyone.   I'm doing the blog for Misty this week.  She had cataract surgery last Tuesday and she is having her other eye done this Thursday.  So far all has gone well but she of course has to avoid sawdust in her eyes for awhile.   So I'm stepping in as substitute until she is hale and hardy again.   Boy, is she going to owe me for this one.  

4th of July is just around the corner.  Let's celebrate our independence and freedom!  I also hope and pray for a little more peace in our country, and in the world. 

Let's get busy on this little decorative piece.  It really is very simple and doesn't require a lot of materials so it is easy and cheap.   This will probably take you just a couple of hours, longer if you really get fancy!

Materials:
1/4 inch plywood or similar thin wood.
6-8 inches of thin wire
dental floss or strong thread
plaid paints  (I used red white and blue)
glitter (optional)
sticky foam sheet (optional for making a star stamp)
wood sealer  (I used Krylon triple thick spray)

Equipment:
scissors
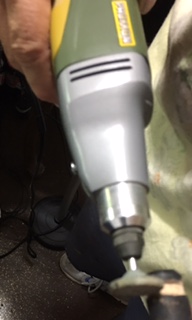
small drill or rotary tool
small drill bit.


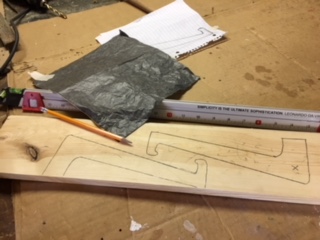
The first thing I did was to draw a star onto a piece of cardboard.   If you are good at drawing you could just draw it onto your piece of wood.  Size is up to you.  My star measures about 10" wide and tall


Then I transferred the design onto my wood piece and cut it out using the proxxon band saw.


I used the kapro measure mate 313 to mark off some lines at 1/2" intervals.  I am going to cut these into strips.  These will be the stripes on my "flag"  7 red and 6 white.  Check out the link above regarding the measuring device.  They have a short little video which shows all the neat stuff this device can do.  I like using it for all my measuring.


To cut my "stripes" I set the fence on my proxxon mini table saw to 1/2" from the blade then I simply ran my wood piece across it 13 times.   So easy and they come out all the same--exactly.

                                                                Now I have all my pieces

I sand everything...everything... using the proxxon OZI/E delta sander... because I love it... because it is so easy...does a fantastic job... and I hate splinters!


I drilled holes through the "stripes" and also at the ends of the side points of the star.


Time to Paint:
  I paint the star blue and the stripes I paint red and white.  I am using plaid paints for this.  They cover well and go on smooth.


I cut out a star shape from the sticky foam sheet and stuck it on a stick to use as a stamp on my star.  Worked well.  I stamped white stars on my big blue star.


I used dental floss and threaded my "stripes" onto the string  then I secured the strings to the arms of the star.  The stripes were like a little skirt.  😏  Finish it off with spray sealer and it is done.   YAY..

But...
Here I changed my mind and decided to go a little bit fancy.   I used the proxxon scroll saw to cut a smaller star out of the middle, then I painted it white and wrote peace and USA on it.  I secured it with wire and added glitter.   The wire goes through both stars and out the back of the big one to form a hanger.   Now I am done.  Time to hang it.


I hope you all have a fabulous 4th!  Thank you for stopping by.  Thanks again Proxxon tools,  the Plaid companyKapro tools with vision and Terry  Sproul.


Saturday, June 23, 2018

A Native American Themed Gourd Box


I've had the urge to create with gourds lately and that's what this post is all about. The designs used on this gourd box are ones which were first used by the Anasazi Indians about 2000 years ago, give or take. Very simple but which describe things which were part of their lives very well.

The Supplies Needed for this project are:

A canteen or tobacco box gourd
Assorted tools to clean the inside with
Wood burner
Alcohol Inks and Mixatives
Acrylic Paints
Mod Podge
Heishi beads
Embellishment for lid and embellishments to attach to the gourd all the way around.
Black Acrylic Paint mixed with glue
Mod Podge (outdoor)
Loctite Gel glue
Acrylic Spray Sealer


I first chose a gourd that I wanted to use for this job. It was the one in the front right, which I then cut opened and cleaned. There are various ways to clean a gourd on the inside, but I've found the best way is with good old fashioned elbow grease and a gourd cleaning tool. If you use the gourd cleaning balls be very careful to only take the yucky stuff out and not the inside actual gourd or you will end up with a very thin gourd. Use whatever tools you have on hand and finish off with a good sanding. Don't leave any bits that might flake off later.


Here's a close up look at me cutting a narrow and deep channel around the gourd to inlay the heishi beads into. I used a wheel to do the work, along with my Proxxon Rotary Tool with a Flex Shaft. I love, love, love using the Proxxon Flex Shaft! I produces less vibration to my hands which is such a blessing as I have arthritis in them and it's so easy to hold.


Can you see by looking at the edges of the gourd how thick it is? Awesome, and so sturdy! After I cleaned the insides I painted them with the black acrylic paint that I had mixed with Elmer's glue. It was a ratio of about 1/2 and 1/2 paint to glue. When that dried I brushed on two coats of the Plaid Mod Podge letting it dry completely between coats. The Plaid Mod Podge gave the gourd insides a nice smooth feel. I then wood burned the Native American symbols around the gourd and did a little highlighting with acrylic paints. I used the alcohol inks mixed with a copper mixative to color the outsides and then inlaid the heishi beads into the channel that I had carved using the Loctite Gel glue. I added the embellishment to the top so that it had a handle to lift the top with and sealed it all with an acrylic sealer. I used upholstery tacks and some faux Indian nickel tacks to embed around the bottom of the gourd and voila' it was finished!


I think that the tacks around the bottom really set it off don't you? And I think the heishi beads around the top half set it off also. What do you think? Would you like to make gourd art? There are gourd society's in a lot of states and they have chapters who will help you learn or they will know of individuals who will. I just got back from the "Cherokee Gourd Gathering" in Cherokee, NC and it was quite an event with a lot of "gourding" going on.

Let me know what you thought of this project by leaving me a comment below. I do read them all. I would like to thank Proxxon Tools ( Tiny Tools with Lots of Character) for all of their assistance.


Barbara

Friday, June 22, 2018

How to make a simple laptop computer stand


My friend has a bad neck, and she has a laptop computer that  adds to her misery by forcing her to look down.  And I have a problem that my computer is generating a lot of heat and I know that is not good for it.  So, let's make a simple laptop computer stand to solve these problems as we know computers are not going away any time soon.  At the beginning of the year my resolution was to find solutions for chronic and nagging or annoying issues.  So let's get on with it.

Supplies:
1"x 4"x16" piece of pine board
5/8" dowel approx. 15" long
approx. 6" electrical or duct tape
Plaid paint, I used black  (optional)
spray sealant
transfer/carbon paper
pencil


Equipment:
Drill with 5/8" spade bit

Optional supplies and equipment for small catch to hold dowel:
small grinding bit (see photo later)
2 shiny pennies
2 small wood screws
small drill bit


The first thing I did was to draw out a design.   Note, I used the red margin line on the paper as my bottom because I wanted to be sure the legs would sit flat.  This is one leg of the "stand".  Mine is approx. 10 inches long which was the width of my computer.  You may need to adjust it for yours.  You will need to cut 2 of these.


The "X" on my design is where I plan to cut my hole for the dowel.  I chose this place because it is the widest and will be the strongest.


I used carbon paper and the Kapro measuremate 313 to transfer my design to the wood and ensure that  my lines were straight.


I used the Proxxon mini band saw to cut out my 2 legs;


Next step is to sand everything using the proxxon OZI/E delta sander.
I like all my edges rounded over so they feel nice and smooth.  I love this little sander.


Next, with the spade bit, I drilled the holes where the dowel will slide through.


It's easy to put together now,  and....it is easy to take apart so it is portable too.  Slip it in your computer case and take it with you.


It's really all done now, but I chose to spruce it up a bit.  I painted it black to match the computer.  I used black ceramcoat made by plaid paint for this.  It goes on so smooth.   Then I wound a bit of electrical tape on the inside part of the dowel as a "stopping" point.

I think it looks nice and ergonomically it keeps your wrists straighter so less carpal tunnel (hopefully)


Anybody curious about the penny you see in the first photo?

Here comes the optional part.  
I thought over time the hole for the dowel might become slightly bigger with use and the dowel could slip out the sides.  Remember we put the tape on the inside so it is secure there but I wanted it to be portable so I needed to be able to remove the dowel.  Now when I'm using it I want it to stay.  So hence the next few steps......remember this part is optional.

I used the proxxon professional rotary tool to carve out a groove near the end of the dowel:


Now drill a small hole in the bottom part of a penny.  Use a small screw to fasten it to the leg so that when you turn it part of the penny will catch on the lip of the dowel.  This will keep it from sliding.  When you want to dismantle it just twist the penny to release it.   Easy peasy...👍  and cheap.  👀😏


That was longwinded directions for a really really simple project.  Forget the little penny securing device and you could whip it up in less than an hour.  My friend says she likes it a lot and her neck is feeling less abused at the computer.

Thanks for stopping by.   Thanks proxxon our sponsor.  Thanks Plaid and kapro for your support as well.  And thanks Terri Sproul our coordinator. 

Catch ya next time    Carol


Wednesday, June 20, 2018

4th of July SIgn by Steph

Hi everyone, Steph here to share a new 4th of July sign created with my Proxxon Tools.


Supplies:

I drew the design I wanted to cut on a piece of wood, then used the Scroll Saw to cut the design.  Next I used the Bench Drill Press to drill a hole in the top.


Once cut, I used the Delta Sander to smooth out the panel.  With it's angled head, it was easy to get into the little crevises.


Then I had fun decorating it.  I painted it with Plaid Ultra Dye in Infra Red, a beautiful color.  With it's rich color, I only needed one coat of dye.  Next, I cut Canvas Corp. 4th of July paper to fit the center panel. I matted it with cardstock, then adhered it to the panel.


Next, I die cut fireworks and sparklers and added them in place.


Then I die cut USA to fit across the panel.


Finally I added some jute and the sign was ready to hang.

What do you think?

Thanks for stopping by.

Steph


Sunday, June 17, 2018

How to Transform an IKEA Find into a Unique Lamp

It's easy to transform an IKEA lamp into a special home decor accent piece using Proxxon tools. You can make the perfect reading lamp!!

Supplies for Making a Book Lamp

  1. Cut the plug from the existing lamp cord. Carefully pry the top and bottom sections of the switch apart. Look closely at the way the wires are positioned in the switch. You will be reassembling this switch later. Remove the cord from the switch. (Note: You may wish to draw a simple schematic, or snap a photo with your phone for later reference.)
  2. Wrap the cut wires against the solid length with painter's tape to prevent any further splitting as you work with the cord.
  3. Measure the height of the book tower that the you want. Select books to match this height.
  4. Find the center of the book by marking diagonal lines from corner to corner.
  1. Drill a pilot hole for the scroll saw blade using a 5/32" bit in the bench drill press.
  2. Measure the diameter of the lamp post, and draw a circle around the pilot hole as a guide for the scroll saw.
  3. Thread the scroll saw blade through the pilot hole in the book, and cut around the circle. Using a spiral blade makes this job easier as a spiral blade cuts in all directions without your having to rotate the work piece.
  1. Repeat Steps 4 through 7 with each book.

Reassembling the Lamp

  1. Beginning with the book that you want on top of the stack, thread the lamp cord and lamp post through the center hole. Continue adding books until all of them are on the lamp post.
  2. Add the replacement plug to the end of the lamp cord.
  3. Unwrap the cords to expose the cut wires. Replace the wires in the switch and reassemble the switch housing. (Note: At this point—before you replace the top section of the switch—I recommend testing the lamp to be sure it lights. If it doesn't, chances are that you didn't press the wires firmly enough into the switch to make a connection.)  
  4. Let there be light!!
Carole