Showing posts with label Proxxon Scroll Saw DS 460. Show all posts

Thursday, December 30, 2021

How To Build A Chippendale Mirror


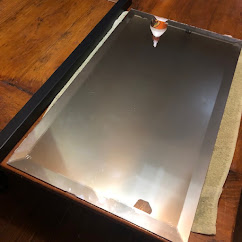
Hi everyone.  I've been wanting to build a Chippendale mirror for my dining room.  I've had an old beveled mirror in my basement for years.  I figured now would be the time to finally use it.  Follow along with me and I'll show you how I made it :-) .


SUPPLIES:

            Proxxon 2 speed scroll saw DS-460

            Proxxon Belt Sander BS/A

            Mirror    

            Wood Frame

             1/2" Birch Plywood

             Base paint and 1" paint brush

             Vinegar Paint

              Polyurethane


  My first problem was finding a frame to fit the mirror.  I went to Michaels craft store and was able to purchase a wood frame to fit the mirror.  Next I drew out the pattern for the pieces that would be attached to the frame.


Next taking the pattern pieces I then transferred them to scrap 1/2" birch plywood.


Using the Proxxon 2 speed scroll saw I cut out all 6 pieces.


I laid Everything in the floor to see how they fit.  The scroll saw does such a great job that very little sanding was necessary, but I did use the Proxxon Belt sander around some of the edges.


Next I painted all the pieces with a yellow base paint and let dry.


I then grain painted all the pieces using vinegar paint. Let dry.


After all the pieces were dry, I sprayed on a matt finish polyurethane.  Each piece I then glued and nailed to the frame.  This is not how a real Chippendale frame would be constructed but it's an easy way to get the same look.


Lastly I inserted the mirror into the frame and attached eye screws and picture wire to hang it.  I hope you enjoyed my project.  See you all next month..... Colleen


Sunday, November 18, 2018

How to Make a Relish Spear

Making a hardwood relish spear is easy with your Proxxon tools. This project is easy to do, and would make a great holiday gift.

Supplies and Equipment for the Relish Spear

Instructions for Making the Relish Spear

  1. Print the relish spear pattern.
  2. Cut out the pattern, and mount onto your wood blank. Or, trace the pattern onto the wood.
  3. Cut the basic shape using either the band saw or the scroll saw. You can vary the length of your relish spear. My finished relish s[ear is 8½" long.
    Cutting the relish spear on the scroll saw
    Cutting the relish spear on the band saw
  4. Sand the relish spear on the disc sander to perfect the shape and sand as smooth as possible. You'll want a sharp point on one end, and a nice curve on the other.
    Shaping the curve
    Shaping the point
  5. Polish the relish spear with a food safe oil. I used oil made for butcher block tables.
  6. Serve up your favorite relishes and admire  your work!!

Carole

Sunday, June 17, 2018

How to Transform an IKEA Find into a Unique Lamp

It's easy to transform an IKEA lamp into a special home decor accent piece using Proxxon tools. You can make the perfect reading lamp!!

Supplies for Making a Book Lamp

  1. Cut the plug from the existing lamp cord. Carefully pry the top and bottom sections of the switch apart. Look closely at the way the wires are positioned in the switch. You will be reassembling this switch later. Remove the cord from the switch. (Note: You may wish to draw a simple schematic, or snap a photo with your phone for later reference.)
  2. Wrap the cut wires against the solid length with painter's tape to prevent any further splitting as you work with the cord.
  3. Measure the height of the book tower that the you want. Select books to match this height.
  4. Find the center of the book by marking diagonal lines from corner to corner.
  1. Drill a pilot hole for the scroll saw blade using a 5/32" bit in the bench drill press.
  2. Measure the diameter of the lamp post, and draw a circle around the pilot hole as a guide for the scroll saw.
  3. Thread the scroll saw blade through the pilot hole in the book, and cut around the circle. Using a spiral blade makes this job easier as a spiral blade cuts in all directions without your having to rotate the work piece.
  1. Repeat Steps 4 through 7 with each book.

Reassembling the Lamp

  1. Beginning with the book that you want on top of the stack, thread the lamp cord and lamp post through the center hole. Continue adding books until all of them are on the lamp post.
  2. Add the replacement plug to the end of the lamp cord.
  3. Unwrap the cords to expose the cut wires. Replace the wires in the switch and reassemble the switch housing. (Note: At this point—before you replace the top section of the switch—I recommend testing the lamp to be sure it lights. If it doesn't, chances are that you didn't press the wires firmly enough into the switch to make a connection.)  
  4. Let there be light!!
Carole

Sunday, May 6, 2018

How to Make a Set of Nativity Silhouette Statues

It's never too early to plan for Christmas!! I try to make one Christmas decoration each month, and this month I'm making a set of nativity silhouette statues.

Supplies for the Nativity Silhouette Statues

Equipment for the Nativity Silhouette Statues

Instructions for the Nativity Silhouette Statues

  1. Using the band saw or table saw cut substrate to appropriate size. You can cut the pattern pieces apart to take advantage of better placement, or mount them on individual pieces of scrap lumber.
  2. Print the pattern. Cover the substrate with painter's tape; spray the reverse side of the pattern with spray adhesive; mount the pattern onto the covered substrate. The adhesive holds the pattern in place, and the painter's tape makes removal easy.

  3. Using the scroll saw, cut the silhouette shapes. When cutting the Christ child/manger piece, only cut a single line to separate the baby and the manger. A single cut ensures that the pieces will fit snugly after being cut.
  4. Sand any rough or uneven area on the disc sander. You may need to do some hand detail sanding on tight interior edges. 
  5. Paint the pieces and let dry. When painting the star piece, begin with a coat of the Brushed Gold Brushed Metal paint. When that is dry, add a coat of the Gold Glitterific paint to the star only.
  6. Now, you're ready for Christmas, even though it's not yet summer!!
Carole

Sunday, March 18, 2018

How to Make an Easter Napkin Holder

This clever Easter napkin holder is sure to be a hit with youngsters and oldsters alike. It adds the finishing touch on your dining table.

Supplies and Equipment to Make the Easter Napkin Holder

Instructions for Making the Easter Napkin Holder

  1. Select a pattern for your napkin holder. There are four different Easter-themed patterns included. I've selected the rabbit for this project.
  2. Using the band saw, cut your wood or MDF to size according to the pattern you select. 
  3. Adhere your pattern to the substrate using painter's tape and adhesive spray. Cover the substrate with painter's tape. Lightly spray the reverse side of the pattern with adhesive, and mount onto the covered substrate. The adhesive spray holds the pattern in place, and the painter's tape makes removal easy.
  4. Using the professional rotary tool and drill stand, drill a pilot hole for interior cuts. Make sure that the pilot hole is large enough to accommodate the scroll saw blade.
  5. Cut out the piece using the scroll saw.
  6. Sand any rough edges with the Delta sander.
  7. Gently insert a strong floral pin into the napkin holder to facilitate painting and drying.
  8. Coat the napkin holder with a layer of white gesso. 
  9. Hang to dry.
  10. When the gesso is thoroughly dry, decorate your napkin holder. I chose to napkin collage mine using matte Mod Podge. Alternatively, you could paint the napkin holder adding embellishments of your choice—be creative!!
  11. Enjoy your Easter napkin holder.

Carole