Thursday, January 20, 2022

How to build an "illusion" plant or anything stand

 Hi, It's me again.  I got an easy project for ya today.  We are going to make a plant or anything stand that looks miraculous and impossible (unless you look too close).  It's fun to sit it on a shelf somewhere out of reach of the little kiddies and wait for the comments of surprised people.


This is an easy project and highlights the use of the Proxxon mini chop saw.  This is a fairly new addition to my collection and I love it.  Perfect for cutting small wood pieces for construction.  You can count on getting the straight and miter cuts that you need for projects to go together smoothly.  Check it out at Proxxon.com. 


Supplies and Equipment needed
wood glue
fishing line
small screws
patience 😉
wood pieces


I started with some  1 x 2 pieces of pine.  I think it is called furring strips.   I used the Proxxon Mini table saw to cut them down to 1 x 1" long slats.  I will use these to make my pieces.  

Check out my drawing with measurements below.   This is one half of the "illusion"  You need to make 2 of these so the cutting list will be as follows.


 1" x 1" x 8"   (will need 4 of these)

 1 x 1 x 6 n  (2)

1 x 1 x 4   (4)

1 x 1 x 1 (4)


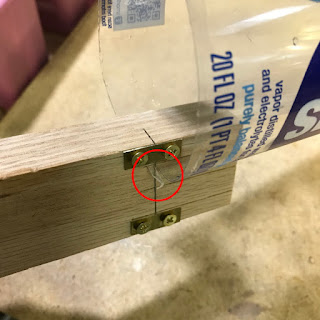
Using wood glue I first put the pieces that are on the same plane together then let them dry real well.


Next using the Proxxon mini drill press I predrilled some holes where I will insert screws for strength.


I then fastened the top piece using glue and screws and let it dry well.


Now comes the tricky part.  Add small screws as per the picture below then use fine fishing line attached as shown.  It took me a little while.  (clumsy fingers), but if I can do it, you can too.\


 Put a small shelf across the top two pieces and add a plant, or statue or ???   and amaze your friends.

From a small distance the fishing line cannot be seen and it appears the shelf is floating......ooooh.


Thank you all for visiting.   Try this cute little, easy peasy project, it's fun and a conversation piece.
Thank you Proxxon.  You make good tools so the making stuff is easy and fun.
till next time... be safe   Carol


How To Build A Paint Cabinet


Hi friends. It's January and I need to make some major changes in my workshop. My New Year's resolution Is to get more organized.  I desperately need a place to store my paint bottles so I can see what colors I have.  I had a cabinet door that I saved for future projects.  It seemed perfect for what I had in mind. Follow along with me and I'll show you how I built the wall cabinet.


SUPPLIES:


        Wooden Cabinet Door
        1x2" pine boards for outside frame
         1/2" scrap birch plywood
         Drill
         Screws
         Brad nails and nail gun


First I laid the cabinet door on the floor to get the exact measurements. Simple way was to just lay the 1" x 2" next to it and transfer the length.  


I cut 2 side pieces and then figured the measurement for the top and bottom pieces. Measure the top then deduct 1 1/2".  I cut these pieces to length with the Proxxon Scroll saw but I could have also used the Proxxon Table Saw FET.


Now with my 4 pieces cut I simply drilled tiny holes in the ends of the side pieces and screwed them together making a frame the same size as the door.


Next, I needed to make the shelves.  I used scrap 1/2' birch plywood.  I measured the inside distance between the 2 outer sides and also measured the depth.  I cut out as many shelves using the Proxxon    Micro Bandsaw as I could, remembering to leave a little head room so I could pull out each bottle with my finger. Measuring the height of each shelf, I attached them to the frame using the brad nailer.


Here's how it looks so far.  I decided to add one more piece of plywood inside at the top to have something to screw through to attach it to the wall


I drilled two holes at the top through the header piece and screwed it to the wall.


Next I attached the hinges to the cabinet door.  Held the door to the frame and attached the hinges to the frame.


Thats it!!!  All I needed to do was fill it up.  I did end up putting a hook and eye latch on it to securely close it


Depending on the width and depth of your wood this could be modified and used to store all kinds of stuff.  Thanks for following along with me.  Till next time....
Colleen :-)

.


Sunday, January 16, 2022

How to Make the Perfect Chess Set with Proxxon MICROMOT Tools

 A traditional chess set includes one king, one queen, two bishops, two knights, two rooks, and eight pawns for each of the two players. Some sets also include a second queen to be used when a pawn is promoted. One set is dark, the other light. Here is the set that I made using Proxxon tools.


Here are the supplies and equipment that you'll need to make your own chess set:

Let's make the chess set:

  1. You can purchase square dowels, or make your own. I made mine from scrap ¾" boards that I had. Using the scale on the table saw, I adjusted the longitudinal stop to ¾". 

  2. Then, I cut my boards on the table saw. Result was a ¾" square dowel.

  3. Next, I measured and marked the height of the individual chess pieces. Here are the height measurements that I used: king = 3"; queen = 2¾"; bishop = 2 3/8"; knight = 2¼"; rook = 1¾"; pawn = 1½".

  4. Since you need sixteen pawns in total, I set up a guide rather than measure each one. Just put the end of the dowel against the guide, cut, and repeat.

  5. Then, I cut the grooves on the king and queen on the table saw. I adjusted the blade height to make an appropriately deep groove without completely cutting through the piece.

  6. Mark the cuts for the bishop and rook, and cut on the bandsaw.
  7. For the knight, mount the pattern on the blanks. Cover one side of the blank with painter's tape. Mist the back side of the pattern with spray adhesive, and mount on the taped blank. The painter's tape makes removal of the pattern easy without leaving any sticky residue.

  8. Use the bandsaw to cut out the shape.

  9. Sand all surfaces of each chess piece using the disc sander.

  10. Do any necessary hand sanding.
  11. Apply your choice of finishes to the pieces, making one set light/white and the other dark/black. I used FolkArt Home Décor Waxes.

  12. Now, go for the checkmate!!

Carole

Thursday, January 6, 2022

How to make a unique picture frame

 Hi again.  I have a project today I think you might like.  I saw something similar somewhere but don't remember where.  I would like to give that person credit, but ... Anyway, I'm sure my memory is faulty so I'm sure there are several changes.  But I like how it turned out, and it was fun to make.  Thank you to whoever's design inspired me.

Supplies and Equipment

Proxxon mini table saw
Proxxon mini chop saw
Proxxon OZI/E delta sander
scrap wood 
wood glue
tape 
saw tooth picture hanger

I made this frame for a 6" x 8" painting.   The Cutting guide for that size is below.  Your picture may require different dimensions.


1st cut your scrap wood into 1" slats on the Proxxon mini table saw.   Then cut the sides to size. I cut them on the Proxxon mini chop saw.  We need 45 degree angles.  This is easy to set up on the Proxxon mini chop saw.  


Next I grabbed some more scrap wood that is basically the width I am looking for,  So using the Proxxon mini chop saw again, I can cut it to the sizes I need.   
Now that I have my basic window laid out, I glue it together and let it dry overnight.

It looks rough, but that was my intent.  I was aiming for a rough looking old window frame.

I added some paint.  I always use Plaid Paints ,  I painted the frame just like the windows on my house,  Then taped my picture to the back of the frame.

Now for the bricks.  Using the Proxxon mini chop saw again, I cut loads of little bricks roughly 2" long.  This is easy work using this tool.     I used approximately 50 long bricks, (3/4" x 2") and about 10 little short bricks.. (3/4" x 1")

 I glued them to the frame in a sort of random manner.  Put a picture hanger on the back and hung it on the wall.  


Hope you liked this project.  I had fun making it. 

Thanks for visiting.  Thanks you Proxxon for the tools that make it happen.   
Carol

proxxon.com

Sunday, January 2, 2022

How to Make a Plastic Bottle Cutter to Make Ropes and Ribbons

 I've been fascinated with plastic bottle cutters since I first saw them online. Proxxon tools made it easy to make my own bottle cutter.

Here are the supplies and equipment that you'll need:

Let's make the plastic bottle cutter:

  1. Measure and mark the three cutting slits and the blade slot following the diagram.
  2. Cut the lengthwise slits on the bandsaw.

  3. Measure the height of the replacement cutter blade that you are using. This measurement will be the depth of the blade slot. Mark that depth on the side of the blank. Cut the blade slot on the bandsaw.

  4. Cut two pieces of metal ¾" x ¼" for the clamps that hold the blade in place. Mark two screw holes on each.

  5. Use the micro-press to punch the screw holes.

  6. Position the clamps over the blade slot, and mark the holes for drilling.

  7. Drill the screw holes using the bench drill press. Use the adjustable fence to ensure accurate placement.

  8. Use the disc sander to sand the surfaces, removing any markings.
  9. Drop the blade, sharp edge down, into the blade slot.

  10. Screw the blade clamps in place.

  11. Cut the bottom from a plastic bottle.

  12. Slide the bottle into the appropriate slot, depending upon the width of the ribbon you want.

  13. Turn the bottle against the blade until you see the ribbon tab emerge.

  14. Then, pull on the tab to cut the ribbon. Continue pulling on the plastic ribbon until you reach the neck of the bottle. Snip the ribbon from the neck of the bottle. Ta-da!! You've just recycled a plastic bottle into several feet of usage ribbon!!


Carole