Thursday, September 30, 2021

How to make a kitty cat gourd bowl using Proxxon tools

 Hello again.  As promised I made another project using gourds and Proxxon tools.  I have been doing gourd projects for many years and have never found a better line of tools to do the work.  The tools are smaller and easy to handle yet have the power to tackle the job.  Anyway today we made a kitty cat gourd that I think you might like.  And it wasn't hard to do.  

Equipment and Supplies.

1 nice gourd that will sit well as a bowl.  (In other words it has a flat bottom or can be made to sit flat)

Proxxon mini jigsaw

Proxxon OZI/E delta sander and Proxxon mini bandsaw  (optional)

Plaid paints  Lots of different colors.

Proxxon mini torch or woodburner   + press abd seal + sharpie pen (optional)

Cat pattern or your choice of pattern that will fit the gourd.

gourd cleaning tools.   ie- any thing that works.  scrapers etc.

gloss spray sealer.


Let's get started.

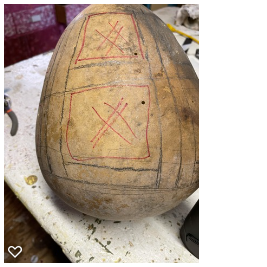
The first thing I did was to get my pattern onto my gourd.  I use press and seal plastic wrap, a sharpie pen and and proxxon's mini torch as a  wood burner to transfer my pattern.  I traced my pattern onto the press and seal with my sharpie pen then laid the press and seal on the gourd and woodburned my pattern otno the gourrd.  You could use a pencil and simply draw your pattern if you prefer. 


The next thing I did was to cut off the top of the gourd.,  I didn't do any fancy cutting yet because I will need to clean out the gourd and I don't want to break any small pieces off.   I cut the gourd top off using the Proxxon mini jigsaw.  Note the adjustable speed dial in the first photo below.  


Next I want to cut out the top of my bowl.  I used the Proxxon mini jigsaw again.   This works so well since I can slow down the speed at the intricate parts.  I have connected parts of the picture so as not to have to cut too deep into the bowl.

Using the Proxxon OZI/E delta sander and my new proxxon cordless belt I sander I can get in all the nooks and crannies and mke everything smooth.  


Next it is time to paint.   This took a little while but was fun.  Plaid makes so many colors sometimes it is hard to choose.  


That is it.  I sprayed it with a little krylon crystal clear gloss to make it shiny and help protect the paint.

thanks for visiting.   Thanks to Proxxon and Plaid for awsome products
Till next time play safe    Carol


Sunday, September 19, 2021

How to Make Wooden BOO Halloween Decorations

 Halloween will soon be here. Time to put the Proxxon tools to work making this BOO Halloween decoration.


Supplies and Equipment:

  1. Cut wood blank to appropriate size using the table saw.

  2. Print the BOO pattern. Cover one side of the blank with painter's tape.

  3. Mist the back side of the pattern with spray adhesive, and mount on the taped blank. The painter's tape makes removal of the pattern easy without leaving any sticky residue.

  4. Cut the shapes on the bandsaw using the extra narrow scroll saw band. Alternatively, the shapes can be cut on the scroll saw.

  5. Use the depth gauge on the bench drill press to drill identical indents for the ghost's eyes.

  6. Drill pilot holes for the cutouts in the letter B.

  7. Thread the scroll saw blade through the pilot hole, and cut out the holes.

  8. Sand the edges and surfaces of the shapes with the Delta sander.

  9. Sand the interior edges of the holes in the letter B using the precision rotary tool with the flexishaft and a sanding drum.

  10. Paint the shapes with acrylic paints.
  11. Enjoy the Halloween holiday!!


Carole

Thursday, September 16, 2021

Proxxon tools for gourd fun. Part 1 Easy to make bird feeder

Hi everyone.  Carol W  here.  I recently was blessed with the gift of gourds from a new friend of mine.   She was moving and clearing out stuff and thought of us when she came to her gourds.  OMG, she showed me her workshop and the things she had made from gourds and I left with new ambition.  BTW, I noticed she had quite a few Proxxon tools as well, but of course she was taking those with her.  Can't blame her.  Anyway,  today I want to show you how to make an easy bird feeder from a medium to big gourd.  Of course you could use a small gourd too.    Let's get started.


Equipment and supplies

1 nice gourd with medium to thick walls

a pencil  

tape measure (optional)

Proxxon tools,  You have your choice here, as you will see below.   I used the proxxon mini jigsaw, the Proxxon professional rotary tool with a cutting disk, Proxxon OZI//E sander with the cutting blade.  I tried them all to see how they worked for cutting the gourd and they all worked fine, so you have your choice of tools for this one

Proxxon OZI/E sander, and or Proxxon mini belt sander  (I used my new cordless mini belt sander and it works like a dream for sanding small places.

Plaid paints   (you know you gotta decorate!)

Strap, wire, twine or whatever you choose to hang your birdfeeder  (About 24 inches)

Proxxon Professional rotary tool with drill bit or rasp cutter.

Seems like a lot of equipment, but it really isn't.   I'm just giving you choices.  


Let's get started.   First thing to do is pick out a gourd.  I mentioned it above but you do want one that is fairly sturdy.  It is going to be outside in the weather after all. 


We  need to make some marks on it to guide us when we are cutting our gourd.  Things to consider:   I need to leave a "bowl" in the bottom to hold my bird seed.   I need to keep the top intact so that I can attach a hanger and also this will help keep the seeds dry.  Thirdly I need holes in the sides to the birds can get to the feed.   Mine below is a simple design but I could get fancy,  (but not today.  LOL)

So I am going to draw some simple windows on mine.   I am using a pencil because it can be washed off easily


Now to choose your cutting tool"


I chose the Proxxon mini jigsaw to do my cutting.   And I cut out all my windows.


My edges are sharp so I use my Proxxon OZI/E delta sander and my Proxxon mini belt sander  to smooth them.  I like rounder edges so as not to hurt the birdie's feet.   Check out the before an after photos below 


You can drill some holes in the top now and attach your hanger or you can do the added step below.

From a scrap of gourd (hopefully a cut off top or bottom, fashion a hole that will fit over the top of your gourd.  This will serve as an umbrella of sorts.
I made my hole just big enough to slide the bottom gourd's stem through.


It looks like a mushroom to me, so.... Using my plaid paints, I paint it like a mushroom.  After a quick coat of spray sealer, I hang it outside with seeds inside and wait for the birds to show, and they will.   Hey it is all done!   It should last a long, long time. 


Thanks for visiting,  Come back soon.  We always have something new to make here.  Thank you Proxxon tools       Catch you next time  Carol


Making A Crock Lid


Making A Crock Lid

Using Proxxon Tools


Hi everyone!  Today I'm featuring how to make a simple crock lid.  I have a large 20 gal. crock in my living room that I need a lid for.  I wanted to turn it into a makeshift end table.  I also have been wanting to try vinegar grain painting so I'll show you that also.  Follow along to see how i made it :-)


Supplies:

   Proxxon Micro Band Saw MBS/E
   Proxxon Disc Sander TSG 250/E
   Pine, Plywood, or MDF ( I used a bigger pine circle that I had on hand)
  
   Vinegar Paint ( recipes can be found online )
   Spar Varnish
   Various Brushes Or Sponges


First I laid my wood on top of my crock and took a marker and traced the crock top. I just happed to have this large circle of pine but it was to large for this project so I'm cutting it down


Next moving to my Proxxon Micro Bandsaw.  I cut out my circle.


After my circle was cut I moved to the Proxxon Disc Sander. I sanded around the outside edge of the circle then I tipped the table of the sander and sanded a curved edge on both sides.


I sat the circle on top of crock to see if it fit.


Now I'm going to show how I vinegar grain painted the top.  This is my first attempt at doing this.  There are many patterns you can do but I wanted to mimic tiger maple. There are many recipes for vinegar paint online.

First I put a base paint on the raw wood circle.  The base color was a yellow ocher. I used a good wall paint. Instead of buying a big can of paint you can have mixed up a sample jar.  I put on 3 coats sanding in between. 


After paint is completely dry you can move on to the vinegar painting. Mix up the paint and brush on over the base paint. You need to work fairly quick before the vinegar mixture starts to dry.


While the mixture is wet you can drag a brush or any tool to make a design in the wet mixture.  You can wipe off while wet and redo till you're satisfied. When completely satisfied let dry.


After vinegar mixture is dry, using a brush coat with a Spar Varnish and let dry. The varnish really  brings out the faux graining.


Here's my finished lid on my crock. I love the results and will be building other pieces that I can do this paint treatment on. 


Thanks to Proxxon Tools and thanks for following along with me .... Colleen :-)