Showing posts with label easy project. Show all posts

Sunday, December 3, 2023

Easy Reindeer for kids to paint

 Hey happy holidays to all of you!!

This is an easy to make on purpose so you can make a dozen.  The idea is to give these to kids to paint and this might keep them busy for a little while.  Its best with a small group so it doesn't get out of control.

I used Proxxon tools to make these and I admit it was fun for me too.  Some of the kids enjoyed watching the process and having me change a few things so there's was a little different.  It's easy to personalize this little reindeer.  

For a little nicer reindeer if you are aiming for pretty instead of fun look at the last blog before this for step-by-step directions.  

Equipment and supplies.   Thin Plywood, short pieces of 1 x 3 board, pencil, Proxxon mini scroll saw, Plaid paints glue, clamps.   Add a few kids and this is going to be fun!

1-Firstly, draw your easy design onto your plywood piece.  

Make 2 of these per reindeer


\


Cut these out using the Proxxon mini scroll saw.
\


Use a little wood glue and glue the two pieces together and clamp then till dry.


Using the Proxxon mini table saw set the fence about 1" from the sawblade and set the saw blade at about 1/4" high.  You will run the short piece of 1 x 3 across the saw blade.  (You must remove the blade guard to do this), This will make a groove that the reindeer feet will sit in so it will stand upright.


Get the kids and let them paint their new little project.  Use Plaid paints for good coverage.


Add a little bling bling if desired and your done,
The kids had a blast. and I think they came out cute.  Wish I had a picture before they took them home.

Merry Christmas everyone.  I'll be seeing you in the new year.  
Play safe!
Carol W


Thursday, December 15, 2022

How to make a continuous calander

Merry Christmas to all of you.   Hope your all warm safe and with family and friends.

 The days have flown by, and it is soon to be another new year.  What do we need to do?   Oh yeah, we do need a new Calander, don't we?   Every year.   I have a solution, we can make a Calander to last forever and it's easy, and kind of cute.   Best of all, everyone has little piece of wood to make it with.  

Not sure if you can see the tiny little Calander in front of the books there, I should have made it bigger.  But it is a little whale.  I made it for a kid's room.   The concept of blocks for days and months can be used to make it into almost anything or any size.  Maybe even an adult something.  

Let's see how easy this is.    I used the following:   A piece of 1" thick cedar that was cut off of a fence rail in the making.  It is about 7" long and maybe 2 1/2"wide.  If your wood is a different thickness you need to multiply your measurements by that number.  (for instance, If your wood is 2" thick make the whale twice as big and the blocks cut out will be 2 x 2 instead of 1x1   The  cut out of his back would be 2 2/3 x 4. etc)  I used 1" wood because 1st of all it was there, secondly it makes the calculations easy.   Here is the pattern below that works for 1" wood.     

The whale is cut out as a whole from the 1" cedar.  I used the Proxxon mini bandsaw to do this. And to cut the 2 vertical parallel cuts (Those should be 1 1/3" deep)


Then I switched to the Proxxon mini scroll saw to make the corners on the squares as it was a little too tight for the bandsaw.   

 The top 1/3" is cut from this piece we just cut out.  This will be the pieces used for the months.   Now after you get that piece it needs to be cut into thirds so there are 3 pieces which are 1/3"  x 1/3" and 2" long. 

 I used the Proxxon mini bandsw,  BUT, that is a little close for the fingers.  I recommend using the Proxxon mini scroll saw.    Now cut the remaining rectangle in half.  This gives you (2)  1" x 1" pieces.  These will be the days.

Now it is time to sand this pretty cedar wood.  

I used the Proxxon OZI/E delta sander for most of it.  


And the Proxxon cordless rotary tool to drill some eyes

I sanded the parts really well and then I wrote the numbers on them.    You need to know which numbers to put on the cubes.   On the first cube put the numbers 0-5.  On the second cube put the numbers 0,1,2,6,7,8,9.  Now you can make any number from 01-31
On the long skinny pieces write you months.

If I did it again, I would glue (2) 1" thick whales together and make it twice as big.  Also make sure you get a pen that won't run when you apply finish.  Or better yet wood burn those numbers and months in.  Then stain it or paint it.  
This thing is All done.   


I picked a warm day on purpose! 

It's been fun, sure glad you visited, and give this one a try.  It's a super easy one and let the kids help with the math. 

 
Take care everyone and have an awesome New Year!
See ya all next year...........Carol


Friday, June 17, 2022

How to make a Proxxon tool caddy to keep things organized

 Hi again.  It's time I got my act together in the shop.   I have a lot of tools and when I get to working, they end up all over, which I don't mind, but...in between projects I like to get things back in order so that in my next flash of creativity I know where to find them.   Also, if you are like me, 4 or 5 corded tools can get so tangled up together it sort of slows projects way down.   Anyhow, today I am going to fix all that, so that my tools will be at my ready and not cluttering up all my free space at the workbench.

Let's make a Proxxon tool caddy for all our hand held Proxxon tools.   


Supplies needed

1/2" pine or plywood   Need a width of about 6"  I used a dog-erred fence board for part of this hat had been planed very smooth.  (very inexpensive wood that looks great if you spend a little time cleaning it up

1/16" or 1/4' thin plywood or paneling pieces.   Likely you have appropriate scraps for this part.

wood glue,

Proxxon mini table saw

Proxxon mini drill press with drill bits

Proxxon mini bandsaw

Proxxon ozi/e delta sander 

small screws and screwdriver

Proxxon rotary tool with rasp cutting bit.

masking tape.


Let's get started.    Cutting the wood is the trickiest part.  Be careful and, measure and cut accurately and it will go together like a puzzle in the end.    see the cutting dimensions below


I began by cutting some pieces using my proxxon mini table saw  Remember we need the 30 degrees on the long edges of the bottom and sides so I set the gauge on my Proxxon mini table saw to 30.   This way I can cut that angle on both my sides at the same time.    I want the  sides to lean out a little bit.


Next I lined up my sides and bottom and made my lines where I will cut my small slots for the inserts.  The best way to make sure they will fit well is to set the fence for the first cut and run them all through.  Then change the fence for the next cut and run them all through again.


Remove the blade cutter and splitter from the Proxxon table  saw and set the blade height to about 1/8 to 1/4"   Then set the fence and run the boards through making a slot that fits the inserts.


I cut the slot for my inserts using the Proxxon mini bandsaw.   I stacked them up and cut them all at once.

I remembered the cord problem and decided to cut some notches  where I can pass the cord through, then I cut a couple slots out where I plan to put some velcro straps to hold the cords on the outside of this box.   I used the Proxxon mini drill press to start my holes then cut them using the proxxon rotary tool with the rasp cutter to join the holes.


I applied glue to the angled cuts on the sides and bottom, then inserted a couple of my inserts to maintain the shape and taped in using masking tape to hold it until it was dry,  I will reinforce things later with some small screws.  


I finished by gluing in the rest of my inserts and securing the sides with some small screws.


This is going to sit in the center of my workbench.  My tools have a place to be and wont be all over the workbench now.   I will add a handle later but I was anxious for you to see this project.  Looks like I have room for a couple more hand tools.  hint hint.   

I had a good time making this.  I hope you enjoyed the journey.  Till next time have fun and be creative.  Carol     Thanks Proxxon.   I love your tools!


Sunday, May 15, 2022

How to Make a Summer Bouquet with Proxxon Tools

 My summer flowers are blooming early this year, thanks to my Proxxon MICROMOT tools. You can easily create a similar bouquet to brighten your days, too.


Supplies:

Instructions:

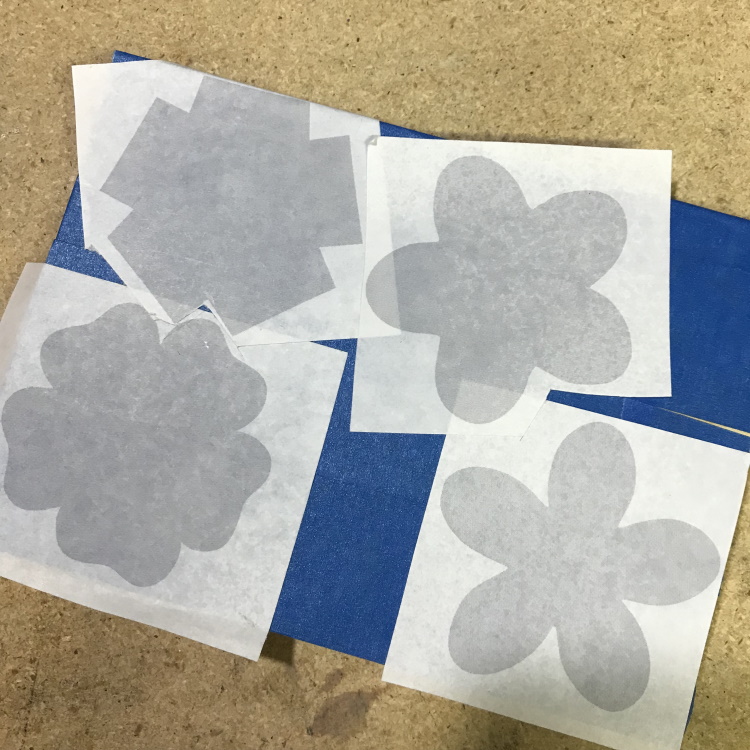
  1. Draw a few basic flower shapes. Here are the ones I used.

  2. Cut a blank large enough to accommodate your flower shapes. You will also need a base. Mine is 4½" x 4½".

  3. Mount your flower shape patterns on the blank. Cover one side of the blank with painter's tape. Mist the back side of the pattern with spray adhesive, and mount on the taped blank. The painter's tape makes removal of the pattern easy without leaving any sticky residue.

  4. Cut out the shapes on the bandsaw. The extra narrow scroll saw blade makes cutting on the bandsaw almost like using a scroll saw. Alternatively, you could use the Proxxon Scroll Saw DS 460.

  5. Sand all surfaces with the Delta Sander.

  6. Using the bench drill press, drill holes for the dowel rod stems on each flower shape.

  7. Drill random holes in the base. Drill a few of the holes on an angle. Drilling a random pattern and number of holes, as well as drilling angled holes, allows for added options when arranging the flowers.

  8. Cut dowel rods to length. Mine ranged between 5½" and 8".
  9. Paint the flowers, base, and dowel rods with acrylic paints.

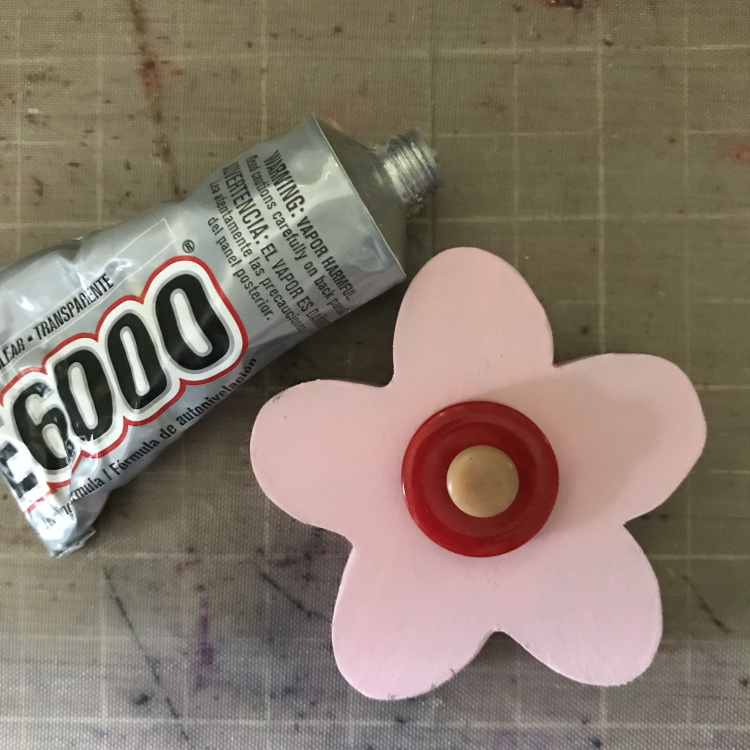
  10. Glue buttons onto the center of each flower.

  11. Arrange your flowers, and enjoy!!

Thursday, March 31, 2022

How to make a glassy eyed cat

 Hi everybody.   Spring is here yay!  Time to start getting out and having some fun in the yard.  Today, purely for fun lets make a cat to stick wherever I want to in the yard.   I'm going to show you how easy it is to cut some metal and make a cat stake using Proxxon tools.


Supplies
Proxxon mini bandsaw
Metal cookie sheet
wood chisel or wide straight screwdriver
hammer.
scrap wood for stake
2 screws.
pliers
2 glass marbles

  First things first.  Lets draw our design.


The next thing I did was go to the Dollar Tree and bought a cheap cookie sheet.   I wish it were a little stouter but it will work.


I drew the pattern onto the cookie sheet then I proceeded to cut it out using the Proxxon mini bandsaw.  Truthfully, I usually only cut wood but I read the back of the blade packages and found out they cut all kinds of metal, including steel!  Wow!   So I cut it out.  It works, it cuts like butta.   :)

Here comes the tricky part, (not real tricky, just a little tricky), the eyes.  I decided I would use a little wood chisel to cut the eyes.   What we need is to cut an X or something similar.  It is going to hold the eyes.  


I used some spray paint I had on time to color the kitty.  

The next step is to bend the Xs.  Use a pair of pliers, this metal is very sharp.  I bent the horizontal ones backward and the vertical parts towards the front.  I messed with the angles until I had them where they would hold the marbles secure.


I used the Proxxon mini bandsaw to cut a scrap piece of wood into a stake and screwed the cat onto it.   There you have it.  The glassy eyed kitty stake.  It's going to look good in the yard.


Thanks for visiting.   This was a quick and fun project.  I learned that I can now cut various metals using the Proxxon mini bandsaw.     See you soon   Carol


Thursday, September 30, 2021

How to make a kitty cat gourd bowl using Proxxon tools

 Hello again.  As promised I made another project using gourds and Proxxon tools.  I have been doing gourd projects for many years and have never found a better line of tools to do the work.  The tools are smaller and easy to handle yet have the power to tackle the job.  Anyway today we made a kitty cat gourd that I think you might like.  And it wasn't hard to do.  

Equipment and Supplies.

1 nice gourd that will sit well as a bowl.  (In other words it has a flat bottom or can be made to sit flat)

Proxxon mini jigsaw

Proxxon OZI/E delta sander and Proxxon mini bandsaw  (optional)

Plaid paints  Lots of different colors.

Proxxon mini torch or woodburner   + press abd seal + sharpie pen (optional)

Cat pattern or your choice of pattern that will fit the gourd.

gourd cleaning tools.   ie- any thing that works.  scrapers etc.

gloss spray sealer.


Let's get started.

The first thing I did was to get my pattern onto my gourd.  I use press and seal plastic wrap, a sharpie pen and and proxxon's mini torch as a  wood burner to transfer my pattern.  I traced my pattern onto the press and seal with my sharpie pen then laid the press and seal on the gourd and woodburned my pattern otno the gourrd.  You could use a pencil and simply draw your pattern if you prefer. 


The next thing I did was to cut off the top of the gourd.,  I didn't do any fancy cutting yet because I will need to clean out the gourd and I don't want to break any small pieces off.   I cut the gourd top off using the Proxxon mini jigsaw.  Note the adjustable speed dial in the first photo below.  


Next I want to cut out the top of my bowl.  I used the Proxxon mini jigsaw again.   This works so well since I can slow down the speed at the intricate parts.  I have connected parts of the picture so as not to have to cut too deep into the bowl.

Using the Proxxon OZI/E delta sander and my new proxxon cordless belt I sander I can get in all the nooks and crannies and mke everything smooth.  


Next it is time to paint.   This took a little while but was fun.  Plaid makes so many colors sometimes it is hard to choose.  


That is it.  I sprayed it with a little krylon crystal clear gloss to make it shiny and help protect the paint.

thanks for visiting.   Thanks to Proxxon and Plaid for awsome products
Till next time play safe    Carol