Showing posts with label Proxxon rotary tool. Show all posts

Saturday, September 2, 2023

How to make a little bird feeder

 Hi folks !!  Time for another new project.  I'm thinking spring.  Why dont we  make a simple little birdfeede that will keep them coming back.  I love to watch the birds, dont you?     what I found appealing in this project was that every piece was scraps.


Let's get started.   Keep in mind this will be made with your scraps so your measurements might be different than mine.   But I will give you mine as an example.

I found 2 square pieces of 3/4" pine measuring 7.5 x 7.5   This will do for our roof and the middle piece.

My little feeder boxes are 3.5 x 4 x 1.5"  I will cut my scraps to size on my Proxxon mini table saw.

Additionally, I will need 4 small cup hooks and about a dozen small nails, and some leather  lacing.  .I will use my Proxxon cordless rotarty tool a small drill bit and my Proxxon OZI/E delta sander and, of course, paints by Plaid.  

Ok, so I made a line diagonally across the board I am going to use as my roof,  Then I laid a line of glue down and placed my second board vertically on it and let it dry.  I reinforced it later with some small nails  


Setting that aside I moved on to make my small feeder trays.  I cut 4 identical pieces approximately 1.5 x 4" to be the long sides of my little boxes and 4 similar pieces but only measuring 3.5 " in length.  My bottom pieces measured 4" square   I cut them on my Proxxon mini table saw then glued them together to form the two feeder trays. ( In the picture below the hammer is just a weight while the glue dries the bottom to the sides) When the glue dried, I reinforced all the junctions with small nails after drilling my pilot holes with my Proxxon cordless rotary tool.


Now I have 2 little trays.  Of course, I sanded everything well using my Proxxon OZI/E delta sander

Next, I put small cup holder hooks on two sides of the trays and on the ceiling part of the roof so I can hang the little trays.  I made loops in my leather hangers.  


Now find someone to paint it.   Hello kiddies next door.  👀  Then hang it and let the birds enjoy it. 

🐦🐦🐦🐦🐦🐦🐧


It's been fun.  I love spring!  Catch ya next time.  Carol


Friday, June 17, 2022

How to make a Proxxon tool caddy to keep things organized

 Hi again.  It's time I got my act together in the shop.   I have a lot of tools and when I get to working, they end up all over, which I don't mind, but...in between projects I like to get things back in order so that in my next flash of creativity I know where to find them.   Also, if you are like me, 4 or 5 corded tools can get so tangled up together it sort of slows projects way down.   Anyhow, today I am going to fix all that, so that my tools will be at my ready and not cluttering up all my free space at the workbench.

Let's make a Proxxon tool caddy for all our hand held Proxxon tools.   


Supplies needed

1/2" pine or plywood   Need a width of about 6"  I used a dog-erred fence board for part of this hat had been planed very smooth.  (very inexpensive wood that looks great if you spend a little time cleaning it up

1/16" or 1/4' thin plywood or paneling pieces.   Likely you have appropriate scraps for this part.

wood glue,

Proxxon mini table saw

Proxxon mini drill press with drill bits

Proxxon mini bandsaw

Proxxon ozi/e delta sander 

small screws and screwdriver

Proxxon rotary tool with rasp cutting bit.

masking tape.


Let's get started.    Cutting the wood is the trickiest part.  Be careful and, measure and cut accurately and it will go together like a puzzle in the end.    see the cutting dimensions below


I began by cutting some pieces using my proxxon mini table saw  Remember we need the 30 degrees on the long edges of the bottom and sides so I set the gauge on my Proxxon mini table saw to 30.   This way I can cut that angle on both my sides at the same time.    I want the  sides to lean out a little bit.


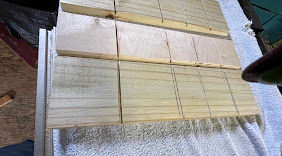
Next I lined up my sides and bottom and made my lines where I will cut my small slots for the inserts.  The best way to make sure they will fit well is to set the fence for the first cut and run them all through.  Then change the fence for the next cut and run them all through again.


Remove the blade cutter and splitter from the Proxxon table  saw and set the blade height to about 1/8 to 1/4"   Then set the fence and run the boards through making a slot that fits the inserts.


I cut the slot for my inserts using the Proxxon mini bandsaw.   I stacked them up and cut them all at once.

I remembered the cord problem and decided to cut some notches  where I can pass the cord through, then I cut a couple slots out where I plan to put some velcro straps to hold the cords on the outside of this box.   I used the Proxxon mini drill press to start my holes then cut them using the proxxon rotary tool with the rasp cutter to join the holes.


I applied glue to the angled cuts on the sides and bottom, then inserted a couple of my inserts to maintain the shape and taped in using masking tape to hold it until it was dry,  I will reinforce things later with some small screws.  


I finished by gluing in the rest of my inserts and securing the sides with some small screws.


This is going to sit in the center of my workbench.  My tools have a place to be and wont be all over the workbench now.   I will add a handle later but I was anxious for you to see this project.  Looks like I have room for a couple more hand tools.  hint hint.   

I had a good time making this.  I hope you enjoyed the journey.  Till next time have fun and be creative.  Carol     Thanks Proxxon.   I love your tools!


Tuesday, December 1, 2020

How to make a decorative box for your domino game pieces

 Hi again.    Carol W. here and as promised today we are going to make a decorative box for the dominos we made 2 weeks ago.  This is going to transform our little game into something that can be given as a gift.   I think it turned out well and I enjoyed making it.   Proxxon makes quality smaller tools that are perfect for this sort of project.

Where we left off last time


Let's get our stuff together

Proxxon rotary tool with small drill bit
1/4" wood stock
stain or sealer of your choice
Hardware-2 small hinges, 1 latch set
phillips screwdriver
masking tape
wood glue
small wood clamps, (optional)


Looking back to last time.  We made 28 domino tiles each measuring 1/4" x 2" x 1".
I want to make a box that will hold 4 stacks 7 tiles high.  


 I figure the inside of the box needs to be about 2" high;  width  2- 1/4" and length  about 4- 3/4 "

So we need 2 long sides measuring 4- 3/4 x 2- 1/2"
2 short sides measuring 2-1/2 x 2-1/2"
2 (top and bottom pieces) 4-3/4 x 2-1/2"'


I setup the Proxxon mini table saw with the fence to rip my wood pieces to the proper width then used the miter guide to cut them all to length.      Now I have 6 pieces cut according to the above measurements.

We are going to continue with the Proxxon mini table saw to make some half-lap joints that will help hold our "box" together 

First we must remove the blade guard/splitter.  This is easy and facilitated by a hinged table top.  
Step 1  Remove the small screw from the front of the saw.  It is yellow in color and easily located.  (figure 1),   
Step 2   Lift up the top, there is a locking device that will keep it there. (figure 2) , 
Step 3  Using a short Philips screw driver on the underside, remove the top screw (see figure 3) .   This will release the blade guard // splitter that you can pull off from the top.  Return the table top to it's original position and replace the locking (yellow screw)   You don't want to lose pieces.


Now we are going to work from the top (of the saw) 😀

Lower the saw blade to 1/8" in height  (1/2 the thickness of your wood)

Place the fence 1/4" from the saw blade.   
Run all 4 sides of both long sides and top and bottom  (flat sides down) across the saw blade.  Do Not do the short sides  This will leave a kerf cut 1/4" from the sides.   Now, move the fence just a smidge closer to the blade and run them all through again.   Move it just a little again .... Keep doing that until you have a half lap.   see below


Now we can put it together. I use masking tape to help hold it while I get all the pieces set. Put glue into the half laps. Then it sort of rolls together.    Then I add some clamps.   Check and make sure it is squarish.   when we add the short end pieces that will square it up even more.  I added some clamps to keep it until it dries.  

e


Now we have a closed box.   Let us sand it really smooth using the Proxxon O/ZIE delta sander.   I ended with 240grit.  Note, I used cedar which really lights up when it is sanded well.  


Time to open her up.

I set the fence about 1 " high and 3/4" from the saw blade then simply ran all 4 sides through it to cut the top off. 


Next I used the Proxxon rotary tool to predrill my hardware and added  2 hinges on the back and a latch for the front.


A little stain and we are done.😄

Looks like they fit!


Trust me this is an easy project.   Hard to explain but easy to do.   You can customize any box!!   You ought to give it a try.   AND  don't forget to check out Proxxon tools.  Easy to use, Great for crafts, Not scary.
That's it for today.  I had fun, but I always do!   Thank you Proxxon.   and Thank You for visiting!!!  Leave me a comment.  Let me know you visited!    Please be safe and stay well.   Carol