Showing posts with label birds. Show all posts

Saturday, September 2, 2023

How to make a little bird feeder

 Hi folks !!  Time for another new project.  I'm thinking spring.  Why dont we  make a simple little birdfeede that will keep them coming back.  I love to watch the birds, dont you?     what I found appealing in this project was that every piece was scraps.


Let's get started.   Keep in mind this will be made with your scraps so your measurements might be different than mine.   But I will give you mine as an example.

I found 2 square pieces of 3/4" pine measuring 7.5 x 7.5   This will do for our roof and the middle piece.

My little feeder boxes are 3.5 x 4 x 1.5"  I will cut my scraps to size on my Proxxon mini table saw.

Additionally, I will need 4 small cup hooks and about a dozen small nails, and some leather  lacing.  .I will use my Proxxon cordless rotarty tool a small drill bit and my Proxxon OZI/E delta sander and, of course, paints by Plaid.  

Ok, so I made a line diagonally across the board I am going to use as my roof,  Then I laid a line of glue down and placed my second board vertically on it and let it dry.  I reinforced it later with some small nails  


Setting that aside I moved on to make my small feeder trays.  I cut 4 identical pieces approximately 1.5 x 4" to be the long sides of my little boxes and 4 similar pieces but only measuring 3.5 " in length.  My bottom pieces measured 4" square   I cut them on my Proxxon mini table saw then glued them together to form the two feeder trays. ( In the picture below the hammer is just a weight while the glue dries the bottom to the sides) When the glue dried, I reinforced all the junctions with small nails after drilling my pilot holes with my Proxxon cordless rotary tool.


Now I have 2 little trays.  Of course, I sanded everything well using my Proxxon OZI/E delta sander

Next, I put small cup holder hooks on two sides of the trays and on the ceiling part of the roof so I can hang the little trays.  I made loops in my leather hangers.  


Now find someone to paint it.   Hello kiddies next door.  👀  Then hang it and let the birds enjoy it. 

🐦🐦🐦🐦🐦🐦🐧


It's been fun.  I love spring!  Catch ya next time.  Carol


Sunday, April 15, 2018

How to Make a Flock of Shelf Birds

Brighten your corner of the world with this flock of adorable shelf birds. I love the contrast between the painted bird bodies and the waxed beaks. This is a great project for learning more about your Proxxon Micromot tools.

Supplies and Equipment for Making the Shelf Birds

  1. Set the height of the table saw blade to accommodate the ¾" wood.
  2. Use the table saw to cut five 1" wide pieces of your ¾" wood. These will be the bodies of the birds.
  3. Cut out each of the birds and beaks from the pattern.
  4. Trace the shapes of the heads onto the ¾" lengths.
  5. Cut the head shapes using the scroll saw.
  6. Measure and mark the height of each bird, and cut to length using the band saw.
  7. Trace the shapes of the bird beaks onto a piece of the ¾" wood, and cut these using the scroll saw or band saw. The straight edges can be cut on the band saw; curves on the scroll saw.
  8. Sand each bird body and beak on the disc sander or the Delta sander.
  9. Measure and mark holes on the edges of the body and beak pieces for the dowel rods that will attach the beak to the body.
  10. Mount the rotary tool in the drill stand. Use the precision depth gauge on the drill stand to drill holes with the rotary tool that are no deeper than 5cm deep. Use a 1/8" brad point drill bit.
  11. Cut five 5/8" lengths of dowel rod. This length allows for a small gap between the beak and body when assembled.
  12. Paint the bird bodies with FolkArt Home Decor Chalk Paints.
  13. Coat the bird beaks with FolkArt Home Decor Wax. Let dry overnight and buff with a soft cloth.
  14. Paint the birds' eye using FolkArt Color Shift Black Flash paint. Use a stylus of end of a paint brush to dot the eyes in place.
  15. Apply a small amount of liquid glue to the end of a dowel rod piece, and insert in bird body. Apply glue to the opposite end, and insert in the beak.
  16. Enjoy your flock of shelf birds.
Carole

Wednesday, April 13, 2016

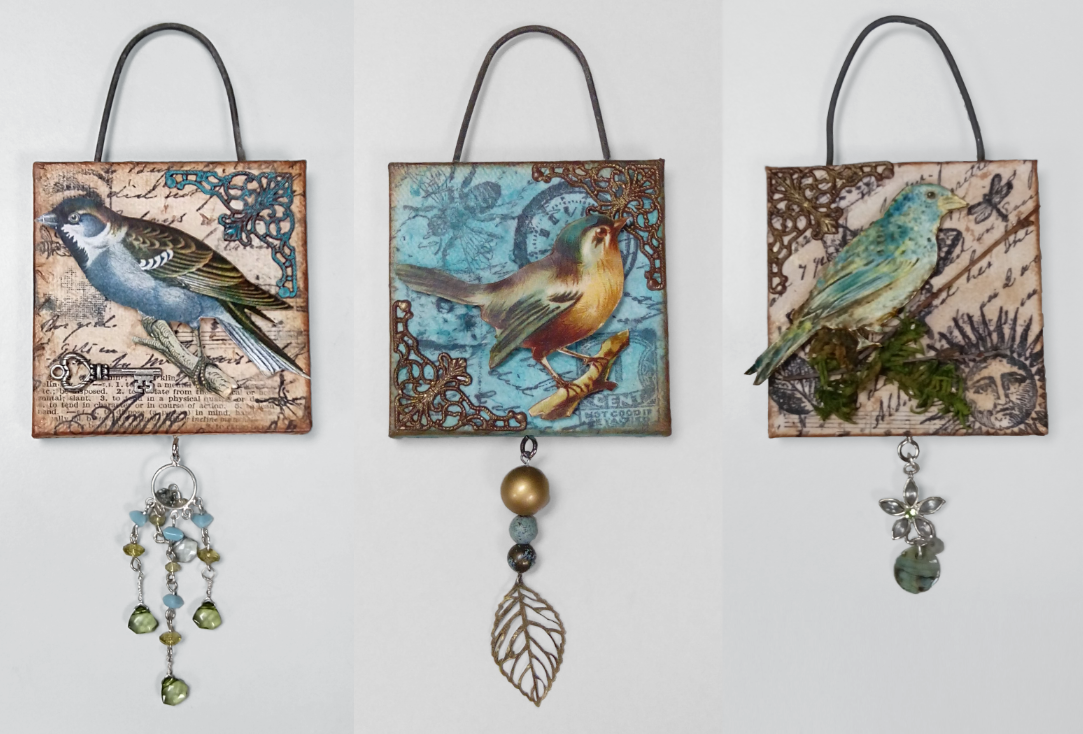
Tiny Birds on Tiny Canvases


These little canvases work great individually in a small space - like a cubicle or camper. Make a group of them, and a "flock" makes a great statement on any wall! I used birds, but you could easily use any images you like, for example butterflies, fish, sea horses, cats and dogs.

What You'll Need

Steps To Follow 

1) Carefully cut out (i.e., fussy cut) the bird you'll use on top of your canvas and set it aside.


2) Cut a length of wire about 6.5" long using the Proxxon Chop and Miter Saw KGS 80 fitted with the Cut-Off Wheel. The cut-off wheel is perfect for cutting non-ferrous metals, like aluminum, copper and brass. A non-ferrous metal does not contain iron, is not magnetic and is resistant to corrosion.


3) Measure the diameter of the wire. I used a metal drill bit gauge. It's one of my favorite tools!


4) Select the appropriate drill bit based on your measurement and make two holes in the top of the canvas. This is where the wire will go to make a hanger for your finished piece. I drilled the two holes while the canvas was still wrapped in plastic to protect the canvas from any tool marks (like from the vise).


5) Stamp images on the white tissue using the archival ink. Be sure you put something under the tissue while you stamp, just in case the ink goes through the thin tissue. You don't want to stain your work surface! Let these dry completely.

6) Collage the stamped tissue on to the canvas using the acrylic medium. Be sure you're collaging so the holes are on the top of your piece! Check out this YouTube video to see how you collage tissue thin materials (like napkins or tissue paper) using Perfect Paper Adhesive (PPA) from USArtQuest. The process is the same for this canvas as it is for the wood frame used in the video. Allow the collage to dry well. You can speed up the process with a heat gun.


7) Glaze the collage using the acrylic glaze. Let it dry completely. You can speed up the process with a heat gun. My favorite is the 360 watt gun made by Milwaukee.


8) Use a thumb-tack to pierce the canvas at the bottom of the frame. Insert the screw eye. You might need to use the pliers to twist it in, but you shouldn't need to drill a pilot hole. Attach charms, trinkets, beads, etc. to the screw eye.


9) Bend the wire in half around a cylinder (like the barrel of a flashlight) to get a smooth curve. Then insert the wire in to the two holes at the top of the canvas. Use the pliers to bend over a small bit of the wire in the back so the wire can't pull out of the top.

10) Attach the bird to the canvas with a pop-dot so it's raised above the canvas


Proxxon bench tools make it easy to create several of these at once so you can have a flock of birds on your wall!

Happy Crafting!
Joe

Sunday, December 20, 2015

Retro Birds Gift Tags

I've been making lots of Christmas decorations and gifts with my Proxxon scroll saw!! These sweet retro birds are easy to do, and can be used in several ways. I'm using them as gift tags. Of course, they would be great as ornaments, too. Or, how about a whole flock grouped together as a mobile?

I designed the pattern in Make-the-Cut, and used the print and cut feature to print the pattern. When I mount the pattern to the wood, I start by covering the surface of the wood with painter's tape. Next, I spray the back of the pattern with spray adhesive, and put that on top of the painter's tape. The spray adhesive holds the pattern in place, and the painter's tape makes removing it a breeze. Here is the pattern mounted on my piece of wood. 

Then, right to my Proxxon scroll saw to cut out the birds.

Next step is a light sanding with the Delta sander.

Back to Make-the-Cut and my Zing electronic cutter to cut out the papers for each side of the birds.

I drilled a hole in each bird for attaching a cord for hanging, then used burnt umber acrylic paint on the edges of the wood blanks. When the paint was dry, I glued the papers to the birds and added a twine hanger. They're already to fly away to a new owner attached to a Christmas gift.

Here's the pattern for the retro birds:

Carole