Showing posts with label Design Team. Show all posts

Wednesday, May 6, 2020

Birthday Gift Bags with Wood Scraps

Hi everyone, Steph Ackerman here today with showing you how to use scraps of wood to decorate gift bags.


While we are home bound and parties are put on hold, our lives go on and that includes birthdays.  So I decided to take this time to create gift bags for those individuals we can't see and celebrate with at this time.


Using some left over scraps of wood, I used the Scroll Saw to cut the wood into party hat shapes then used the Delta Sander to sand down the rough edges.


After painting each with Plaid paints, I stamped and embossed each with a party stamp.  Then I used the Bench Drill Press to put a hole in each through which I threaded twine.


After decorating the gift bags, I tied the wood scraps to the handles like gift tags.

Thanks for stopping by.


Wednesday, April 1, 2020

How to Create a floral wall hanging

Hi everyone, Steph Ackerman here today with a floral wall hanging.


I drew a jar on a scrap of wood then using the Scroll Saw, I cut the design.  Next, I sanded the jar with the Delta Sander.


I painted the jar with gesso and put it aside to dry while I worked on the background.


Using a stencil with modeling paste, I added dimension to a burlap panel.  Once dry, the burlap panel was painted with several colors of paint.


The jar was painted with a light layer of blue paint and twine was wrapped around the top.  For additional dimension, blue ink was rubbed across the jar and a metal tag was tied to the twine.


Once the jar was adhered to the canvas, flowers were added.  Since the flowers are not attached, you can easily change out the flowers for different seasons.


Thanks for stopping by.


Monday, October 28, 2019

Happy Halloween Ghost

Hi everyone, Steph Ackerman here today sharing a new project created with Proxxon Tools just in time for Halloween.   This ghost was not only fun but also quick to make using a variety of Proxxon Tools.


I drew the ghost on a panel of plywood, then used the Proxxon Scroll Saw to cut the pattern.


Next, I used the Delta Sander to sand the edges before painting the ghost with white paint.


I inked the edges and added a face with brown ink.  Then I used the Bench Drill Press to create a hole into which I tied a string.


I couldn't decide if I liked hanging it from the tree or my front fence.


Thanks for stopping by.


Wednesday, October 16, 2019

Happy Fall Sign

Hi everyone, Steph Ackerman here today sharing a new fall project.


The new sign was created with scraps of wood.  Using the Micro Bandsaw, I cut assorted sizes of blocks.  I wasn't too concerned with the sizes.


I used the Disc Sander to sand the edges of each block.


Next, I used Plaid FolkArt Paints to paint each block.


I needed a longer strip of wood to adhere the smaller blocks on, so I cut another strip of wood using the Micro Bandsaw again.


Next, I used the Bench Drill Press to drill holes in the ends of the strip.


I glued burlap to the panel, then glued the smaller blocks on top.


To decorate, I created assorted clay embellishments, inking each with Brilliance inks.


Placing the letters on each block, I adhered the clay leaves to each block.


Happy Fall.

Thanks for stopping by.


Wednesday, October 2, 2019

Fall Basket

Hi everyone, Steph Ackerman here today sharing a new fall project.


Taking a paper mache pumpkin, I used the Rotary Precision Tool to drill several contiguous holes in the pumpkin - long enough to get the Jigsaw blade inside the pumpkin.


The Jigsaw cut the pumpkin without issue.


Since I had raggedy edges, I used the Delta Sander to sand down the edges.


I ran a bead of adhesive around the edge of the pumpkin and placed a pleated strip of burlap.  I used paper clips to hold the burlap in place until the glue dried.


While waiting for the glue to dry, I used the Hot Wire Cutter to cut a circle from Smoothfoam that would be placed in the bottom of the pumpkin.


  Then I gathered some silk flowers and placed them inside the basket.


 Thanks for stopping by.


Wednesday, September 18, 2019

Review of the Pensander

Hi everyone, Steph Ackerman here today sharing a review of the Pensander.


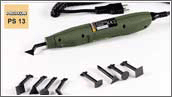
The Pensander is approximately 6" in length and is easily handled like a pen.  And weighing less than one half pound, there is no strain on your hand or wrist when used for extensive periods.  The Pensader is perfect for small areas or small projects.

This mini sander has a linear sanding motion and operates at 8,000 strokes per minute.  There are four sanding attachments with straight shanks and four sanding attachments with angled shanks.  Also included are 3 sheets of adhesive sanding pads in 3 different grits, enough for many projects.

The adhesive pads are cut to fit each shank so you simply remove the adhesive backing and adhere the sanding pad to the shank you are using.

An AC adapter is required and I use the NG 5/E.  It's speed can be controlled for a variety of projects.

Following are several projects on which I've used the Pensander.


Thanks for stopping by.


Wednesday, August 21, 2019

How to use Proxxon Tools for home improvement projects

Hi everyone, Steph Ackerman here today showing you how to use Proxxon Tools for home improvement projects.

 
I needed to add some shelves in a closet so I used the Band Saw to cut the shelves to size.

 
Then used the Delta Sander to smooth the edges.


I used the Scroll Saw to cut the firing strips to size.


3 new shelves were added to the closet.  Plenty of room to hold all my albums as well as crafting supplies.

 
On what home improvement projects will you use your Proxxon Tools?
 
Thanks for stopping by.