Showing posts with label Proxxon Scroll Saw. Show all posts

Sunday, December 3, 2023

Easy Reindeer for kids to paint

 Hey happy holidays to all of you!!

This is an easy to make on purpose so you can make a dozen.  The idea is to give these to kids to paint and this might keep them busy for a little while.  Its best with a small group so it doesn't get out of control.

I used Proxxon tools to make these and I admit it was fun for me too.  Some of the kids enjoyed watching the process and having me change a few things so there's was a little different.  It's easy to personalize this little reindeer.  

For a little nicer reindeer if you are aiming for pretty instead of fun look at the last blog before this for step-by-step directions.  

Equipment and supplies.   Thin Plywood, short pieces of 1 x 3 board, pencil, Proxxon mini scroll saw, Plaid paints glue, clamps.   Add a few kids and this is going to be fun!

1-Firstly, draw your easy design onto your plywood piece.  

Make 2 of these per reindeer


\


Cut these out using the Proxxon mini scroll saw.
\


Use a little wood glue and glue the two pieces together and clamp then till dry.


Using the Proxxon mini table saw set the fence about 1" from the sawblade and set the saw blade at about 1/4" high.  You will run the short piece of 1 x 3 across the saw blade.  (You must remove the blade guard to do this), This will make a groove that the reindeer feet will sit in so it will stand upright.


Get the kids and let them paint their new little project.  Use Plaid paints for good coverage.


Add a little bling bling if desired and your done,
The kids had a blast. and I think they came out cute.  Wish I had a picture before they took them home.

Merry Christmas everyone.  I'll be seeing you in the new year.  
Play safe!
Carol W


Saturday, June 10, 2023

Building An Arbor


Hi everyone!  We've had a lot going on here at the Colaizzi homestead.  We had a new deck put on our new pool.  There was a lot of scraps leftover of the treated lumber and I asked the builder to leave everything in hopes I could make something from them.  I thought I'd try building an arbor that will eventually be put in front of the gate to my garden.  Follow along with me and see how I built it with the help of my Proxxon tools.

Supplies:
 Treated lumber... 2x4s, 2x6s, 1x2s
 Lag Bolts  8 (3.5" long)
 Screws...1.25",  3"
 Brad Nailer and Brads

I had treated 2x4s that I cut with my miter saw but these could easily have been cut to size at the store you purchase the wood at.  I started with 2 pieces 7' long and 2 pieces 24" long.  I measured down 4" from the top and 8" from the bottom on the 2x4s.  These marks are where I put the 24" pieces and screwed them together. Using the Proxxon Table Saw, I then cut a piece of 1x2 lumber 63" long. I inserted it inside and nailed it in with the brad nailer.  This piece formed a ledge for all the lattice to lay on and get nailed in with the brad nailer.


I used the brad nailer for all the vertical and horizontal pieces but later I used small wood screws at the intersections.  Repeat this and make two sides.

Using the scroll saw I cut two 2x6s  60'long.  These will be the headers that will connect the two side panels. I drew a design on each end of the headers and cut out with the Proxxon Micro Band Saw.


I laid the two sides on end on the ground and laid the headers across measuring in 9" on each end.  These got attached with lag bolts.  Once one side was complete, I flipped it over and attached the back side.  Now the arbor was able to be stood up.


Next the corner brackets were cut out of 2x6s using the Proxxon Band Saw and attached with 3" screws to the upper corners.


At this point I ran out of 2x6 wood so I do have to add the back braces when I get more wood...I did attach the front corner braces with 3 1/2" screws.


Lastly I cut 8 pies of the 1x2" slats for the top using the Proxxon Table Saw.  These were spaced out across the top and attached with small screws.


For now It's finished until I can find the wood for the back corner braces. I am eventually going to stain or paint it, but treated lumber needs to dry before putting any finish on.  Thanks for following along with me as I made this fun project :-) 
Colleen


Sunday, November 21, 2021

How To Build A 3 Candle Wall Sconce


Hi everyone!  I wanted to share with you a wall sconce I built.  This is based on a tin sconce I've seen in a lot of stores that sell colonial lighting.  I thought using some scrap wood I could come close to making something that looked similar.  Follow along with me and I'll show you how I made it.


Supplies

  Proxxon 2-Speed Scroll Saw

  Proxxon Disc Sander

  Proxxon Power Carver

  Scrap 1/2" birch plywood

  Wood Glue

  Drill and drill bit

  3 Small tin candle holders

  Plaid Paint  Black

  Plaid Inspirations Varnish  Matte 


First I started out by drawing a paper pattern then transferred it to my scrap plywood.


Next using my Proxxon 2-speed scroll saw I cut it out.


I also cut out 3 small rectangles of wood to be glued on the bottom to hold the candle cups.


I sanded all the pieces using the Proxxon Disc Sander.


Next I glues and nailed those 3 pieces onto the notches of the base.


I drew some lines on the base and carved them out using the Proxxon Power Carver.


I lightly sanded everything and painted with Plaid Paint.  I chose black.


Using my drill I drilled a tiny hole at the top for hanging.


I gave it one coat of  Plaid Inspirations Matte Varnish.  Let dry then attached the candle cups with glue.


Here's my finished sconce. It can sit on a table or hang on the wall. I purchased 3 short battery operated candles to complete it.


Thanks for following along with me.  This was a fun and simple project. 
Colleen  :-)


Thursday, November 18, 2021

How to make a decorative snow stick.

 It's coming... You know it is.... Winter is coming. and that means snow...    Well, for most of us anyway.   Now that I am retired I enjoy snow.  Used to hate to drive in it but now, staying home cuddled up and warm, looking out the window.  Yeah I like snow.  

 Today I have an easy project.  We are going to make a snow stick so that we know just how much snow is out there, without having to go out there.  😎


Project Supplies and equipment.

1 piece of scrap board, preferrably outdoor wood.   I am using a piece of 3/4 inch treated yellow wood that was once part of a dog-earred fence board. 

Proxxon mini bandsaw, or Proxxon mini scroll saw

Proxxon cordless mini belt sander

yardstick or ruler.

Plaid paints and other decorative tidbits if desired, glitter, etc. 

Outdoor sealer. 

My wood piece is approxamately 24 inches x 3 inches

I need a pointy end so I can hammer it into the ground,  I use about 7" for that.  I used the Proxxon mini bandsaw to cut the spike it but you can use the Proxxon scroll saw if you prefer.

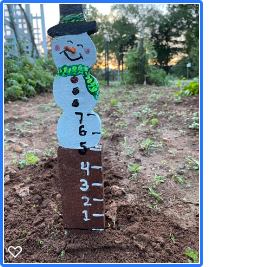
Next I drew a rudimenttary snowman on top.   (Like the woodcarvers do fancy canes), and cut it out using the Proxxon mini scroll saw.  ↙


I painted it white for a first coat then painted my snowman on top with beautiful plaid paints. I painted  the stick brown.


I made a ground line then measured off my inches and painted them on my stick.

After a quick spary of sealer, he is ready to go live outside.
 

🎝🎜🎝🎜🎝Let it snow, let it snow, let it snow.   🎝🎜🎝🎝
(We rarely get more than a few inches)
   
Thanks for visiting.   Catch you next time.   Carol W,    


Thursday, March 18, 2021


Hi everyone!  Today I'm working on a wooden keychain using some of my scrap wood . Follow along with me and I'll show you how simple it was to make using my Proxxon tools.


Supplies:

  Proxxon 2-speed Scroll Saw

  Proxxon Bench Drill Press

  Proxxon Longneck Angle Grinder

  Scrap 1/2" wood

  Wood Stain

  Spring Ring

                                              First I drew out a pattern on my scrap wood.


Next using the Proxxon Scroll Saw I cut out may pattern.


This is my cut out pattern.


Next using the Bench Drill Press I drilled a 1/4" hole at the top of the key for a spring ring.


Next using the Longneck Angle Grinder I sanded the entire piece and tapered the sides.


Lastly I stained the piece, let dry and inserted the spring ring.


Heres my finished key ring. I attached my car keys to this one but I'm going to be making more for other keys.


Thanks for following along with me..... Colleen :-)