Sunday, January 31, 2021

Make Your Own Whistle

Use your Proxxon tools to make this timeless childhood favorite toy—the whistle. 

Supplies and Equipment

Instructions

  1. Measure and mark the lengths of the dowels.

  2. Cut dowels on bandsaw.

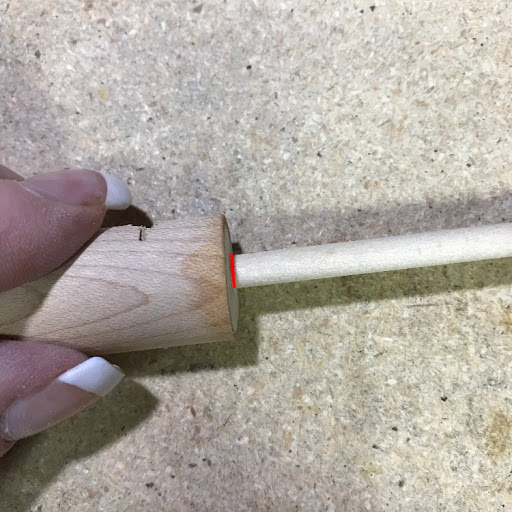
  3. Measure and mark the ¾" dowel for the length of the whistle hole.

  4. Use a center finder to mark the center of the dowel.

  5. Attach the drill chuck to the tailstock of the lathe, and insert a 13/64" bit. Mount the dowel in the chuck. Center the drill bit on the marked center of the dowel and drill a 1½" hole. Drill slowly, and frequently pull the drill bit out of the hole to empty accumulated sawdust.

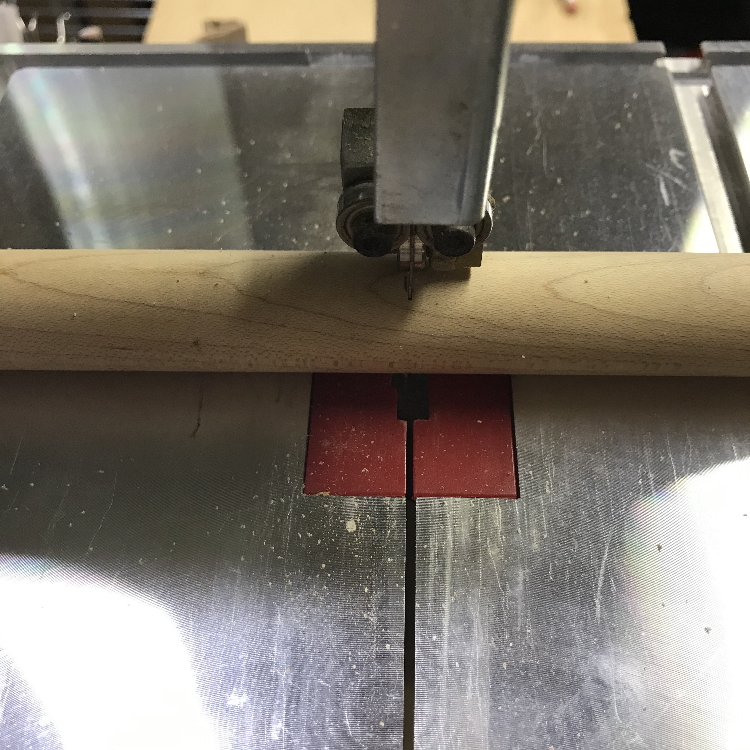
  6. Cut the whistle notch. Measure ½" from the top of the hole end. Make a cut on the bandsaw approximately half way through the dowel. Next, cut the diagonal notch line.

  7. Smooth the edges on the disc sander.

  8. Using the Delta sander mounted in the precision vice, sand down one side of the 3/8" dowel a bit less that half way and about 1½" long.

  9. Insert this plug into the drilled hole with the flat side facing the open notch. Now, experiment. Rotate the plug bit by bit, and move it in and out of the hole until you get a good sound. Mark the cut line on the excess plug.

  10. Glue the plug in place with liquid wood adhesive. When the glue is dry, cut off the excess plug and sand the end smooth.

You can also use these same steps to make whistles out of square pegs :)

Carole

Thursday, January 21, 2021

How To Make A Tiny Bench


Hi everyone!  I've been building tiny houses with my Proxxon tools. I've been selling them as fast as I can make them.  I need some little props with my houses for photo shoots.  I found some tiny crocks and thought a little bench would be nice to set them on.  Follow along and I'll show you how I made it  :-) 


Supplies:

  Proxxon Micro Bandsaw 

  3/16" basswood

  Wood glue

  Plaid Paint

  Fine sandpaper


I first sketched out a pattern and then transferred it to my basswood. Two legs, one top and two skirt pieces.


Next using my Proxxon Micro Bandsaw I cut out all five pieces.


I now have the five pieces cut out. I use a nail file to take off any burrs on the wood pieces or you could lightly use the Proxxon Delta Sander.

Next taking each of the leg pieces I applied a tiny bit of wood glue on the top edge and glued them to the underside of the top piece about 1/4" from the edge. Let dry.


Next take each of the skirting pieces and apply a line of glue to the top edge and a tiny bit on the top of the legs. Glue in place. 


After it was dry I set it in front of my cabin to see how it looked.  I thought it was a little to tall so I trimmed the legs down about 1/8" using the Micro Bandsaw.


Next I painted the entire piece with Plaid Burnt Umber Paint and let dry. 


Finally using my nail file I filed it on the edges to make it look old.


Here's my finished piece.  I think it looks cute in front of my cabin with the tiny crocks I found. Thanks for following along. .....Colleen


Sunday, January 17, 2021

Country Chic Shelf Sitter Chick

 Another installment in the County Chic series—a shelf sitter chick. Other Country Chic decor items include these wall hangings:


Supplies and Equipment

Instructions

  1. Mount the chick body pattern on the ½" blank, and the feet, beak, and comb on the ¼" blank. Cover one side of the blank with painter's tape. Mist the back side of the pattern with spray adhesive, and mount on the taped blank. The painter's tape made removal of the pattern easy without leaving any sticky residue.

  2. Cut the body on the bandsaw.

  3. Cut the feet, beak, and comb on the scroll saw.

  4. Paint the pieces with your choice of FolkArt acrylic paints.

  5. When the paint is dry, glue feet, beak, and comb in place. Add rhinestone eyes, or paint the eyes.
This shelf sitter will also perch on the top of a door frame.

Carole

Thursday, January 14, 2021

How to make a little band saw box

 Hi everybody.   I am back today with a neat little project I know you are going to like.   It was pretty easy to make and came out beautiful, if I do say so myself 😁  We are going to make a simple bandsaw box, made on the Proxxon mini bandsaw.   It is not big,(measuring in at 3" tall and 3 1/2" wide), but it sure is cute!

Tools and Supplies

2 pieces 3/8" x 4" x 4"  pretty wood.   (I used cedar with a pretty grain pattern)

2 pieces 5/8" x 4" x4"  soft wood  (I used pine scrap wood)

Proxxon mini band saw

Proxxon O/ZIE delta sander

wood glue

epoxy glue

polyurethane finish

smallish wood clamps


Ok let's get started.   

First step is to stack the wood.   Glue the 2 soft woods together then sandwich them between your 2 pretty wood pieces.  Then draw the pattern onto your wood.   I saw this pattern in a wood book then decreased the size to 70% to fit my needs.


Next using the Proxxon mini bandsaw cut around the outside of the pattern.  Do Not cut the inside yet.

Now we need to cut a slice off the back that will be the back of the box.    I used a piece of wood with a straight edge and a clamp to fix it to the bandsaw so that I can get a really straight cut.

Now we can cut out the middle.   Enter the middle through the purple line on the pattern. Follow the line around and remove the middle as one piece.


.   

Get the glue out.   First glue the entry lane where you cut the middle out and clamp it until it dries.   Next glue the back  back onto the large box.   Clamp it and let it dry well.
  

Now we are going to work with the piece you just cut out of the middle.   We are going to cut the back off of it just like we did with the big piece.  It is going to be the back of the little drawer. And then we are going to cut the front off just the same way and it will be the front

Now we will work on the drawer part.   Draw your sides and then cut it out.   Then glue the back and front pieces  back on and clamp it until it is dry.  


Attach a handle of your choosing.   I cut a little piece of aluminum off my exacto knife using a hacksaw then used epoxy to affix it to the front of the drawer.


Now sand sand sand.   Use the Proxxon O/ZIE delta sander to round off all the edges of the box and drawer.   When the epoxy is dry seal everything with polyurethane or other sealer of your choice.  


I am going to flock the inside of the box and drawer when I get my supplies.   Ugh.... waiting on the mail.    Well, that's it.    again it was one of those projects easier to do than to describe.  

PS.....
Oh goody the mail came.   So.... using painters tape I taped off what I didn't want flocked, then painted the inside of the drawer and box hole with adhesive (which turned out to be just be acrylic paint,  then dusted the insides with the flock.   I got bright blue.   I think it turned out nice.


Now I'm done! 😀🔨

Thanks for visiting!   Thanks Proxxon, I love using your tools!    
Till next time.   Carol