Showing posts with label toy. Show all posts

Sunday, January 31, 2021

Make Your Own Whistle

Use your Proxxon tools to make this timeless childhood favorite toy—the whistle. 

Supplies and Equipment

Instructions

  1. Measure and mark the lengths of the dowels.

  2. Cut dowels on bandsaw.

  3. Measure and mark the ¾" dowel for the length of the whistle hole.

  4. Use a center finder to mark the center of the dowel.

  5. Attach the drill chuck to the tailstock of the lathe, and insert a 13/64" bit. Mount the dowel in the chuck. Center the drill bit on the marked center of the dowel and drill a 1½" hole. Drill slowly, and frequently pull the drill bit out of the hole to empty accumulated sawdust.

  6. Cut the whistle notch. Measure ½" from the top of the hole end. Make a cut on the bandsaw approximately half way through the dowel. Next, cut the diagonal notch line.

  7. Smooth the edges on the disc sander.

  8. Using the Delta sander mounted in the precision vice, sand down one side of the 3/8" dowel a bit less that half way and about 1½" long.

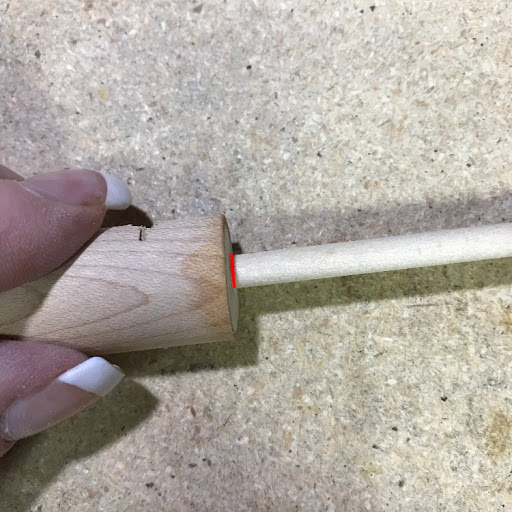
  9. Insert this plug into the drilled hole with the flat side facing the open notch. Now, experiment. Rotate the plug bit by bit, and move it in and out of the hole until you get a good sound. Mark the cut line on the excess plug.

  10. Glue the plug in place with liquid wood adhesive. When the glue is dry, cut off the excess plug and sand the end smooth.

You can also use these same steps to make whistles out of square pegs :)

Carole

Sunday, September 27, 2020

How to Make a Climbing Bear Toy

 This classic child's toy is the perfect project for Proxxon tools.


Supplies and Equipment

Instructions

  1. Mount the climbing bear pattern on the MDF. Cover one side of the blank with painter's tape. Mist the back side of the pattern with spray adhesive, and mount on the taped blank. The painter's tape made removal of the pattern easy without leaving any sticky residue.

  2. Cut the bear on the scroll saw.

  3. The hash marks on the bear's paw indicate the channel for the cord. Mark the center between the hash marks on the edge of the paw.

  4. Adjust the angle of the drill stand to 55°.

  5. Drill a hole in each paw to follow the direction of the hash marks.

  6. Cut hanging rod 7" long x ¾" wide. Measure and mark holes for cord.

  7. Drill holes in the hanging rod using a piece of waste wood under the rod to minimize tear out.


  8. If necessary, sand edges with Delta sander.

  9. Paint with FolkArt acrylic paints. Optionally, add facial features.
  10. Cut cord into two 25" lengths and on 6" length. Thread the 25" cords through the end holes of the hanging rod, bear's paws, and candle cups, tying knots to secure them in place. Thread the 6" cord through the center hole of the hanging rod and make a loop for hanging. Secure in place with knots.
  11. Make the bear climb—hang by the center loop and alternately pull one cord then the other. Continue until the bear has "climbed" to reach the hanging rod. Release the cords, and the bear slides back down.


Carole

Sunday, March 3, 2019

How to Make a Wheeled Wooden Toy Truck

What kid doesn't like a toy that moves??!! This wooden toy truck is sure to delight a little in your life.

Supplies and Equipment for Making the Wooden Toy Truck

Instructions for Making the Wooden Toy Truck

  1. Using the table saw cut a 4" x 8" blank from scrap Baltic birch plywood with the 8" length parallel with the grain of the wood.
  2. Mount the pattern on the blank. Cover the blank with painter's tape. This makes removing the pattern easy. Lightly coat the reverse side of the pattern with adhesive spray, and mount on the prepared wood blank.
  3. For the interior cut out, drill a pilot hole to pass the scroll saw blade through.
  4. Cut the truck shape on the scroll saw.
  5. Put a piece of painter's tape on the reverse side of the truck where the hole for the axles go. This helps to minimize tear out when the holes are drilled.
  6. Drill the axle holes using the bench drill press with a bit one size larger than the dowel rod. This allows the wheels to turn.
  7. Sand surfaces with the Delta sander.
  8. Paint the truck with acrylic paints, and let the paint dry.
  9. Calculate the length of the axle. Tape a spacer (a craft stick or tongue depressor) on each side of the truck so on the finished toy the wheels will not rub on the truck body. Dry fit the wheels, truck body, and dowel rod axle. Mark the length of the dowel.
  10. Cut the axles on the bandsaw.
  11. Glue one wheel on each axle. Let glue dry thoroughly.
  12. Cut four 2" x 2" pieces of paper each with a ¼" notch on one side. 
  13. With the spacers still in place thread the axle and wheel through the hole. Place two protective papers on between the truck body and the wheel to prevent glue from getting on the body.
  14. Glue the second wheels in place, and let glue set.
Enjoy the fun!!


Carole

Sunday, February 3, 2019

How to Make an Adirondack-style Lounge Chair for an 18" Doll

Any little girl will be thrilled to be the recipient of this doll-sized Adirondack-style lounge chair. Their dolls will enjoy hours of relaxation as they lounge on the chair.

Supplies and Equipment to Make the Doll-sized Adirondack-style Lounge Chair

Instructions for Making the Doll-sized Adirondack-style Lounge Chair

  1. All of the 1" x 2" pieces are cut at a 35° angle on each end. The angles are parallel with one another. If using the table saw, adjust the angle stop to 35° and set blade height. 
  2. If using the chop and miter saw, release the table and move to 35°.
  3. These are the pieces from the 1" x 2" length of lumber.
  4. Sand the lettering off the paint stir stick with the Delta sander. You will only need 6", so there's no need to sand the entire length of the stir.
  5. Cut the stirs into 6" lengths using the bandsaw.
  6. Use the Delta sander to sand any rough edges on the 1" x 2" pieces
  7. Assemble the chairs, keeping the slope of the 35° angle. Glue the 1" legs onto the bottoms of the 9¾" seat supports. Let the glue set.
    Legs glued to seat supports
    1. Glue the 7" back support to the top of the 9¾" seat supports.
       
    2. Glue the 6" stirs in place. A.) Begin at the back of the seat, then position the front seat slat followed by the center seat slat. Glue the last two seat slats in place. B.) Turn the chair so it rests on the back. Begin where the back meets the seat, then position the top slat followed by the center back slat. Glue this in two stages, letting the glue set after the seat slats are positioned.
    3. Glue the last stir to the front of the chair.
    4. Paint the lounge chair.
    5. Plan a picnic or a pool party!!

    Note: I found the pattern for this doll furniture at 100 Things 2 Do.
    Carole