Showing posts with label drill press. Show all posts

Thursday, February 18, 2021

Making A Little Brown Jug


Hi everyone!  I'm continuing to make small accessories for the tiny houses I'm building (which I'm selling as fast as I can make them).  I thought a little brown jug would look cute along side the little bench I built.  I'm going to show you how to make one using the Proxxon Micro Woodturning Lathe.  follow along to see how I did it.


Supplies and Equipment

  Proxxon Micro Woodturning Lathe

  Proxxon Five Piece Chisel Set

  Proxxon Micro Bandsaw

  Proxxon Bench Drill Press

  1 1/4" round wood dowel

  Plaid Paint

  Sand Paper


Attach the dowel rod to the lathe.


Turn the lathe on and cut in a few reference lines.


Using the chisels begin shaping the jug.  Try different chisels to get a feeling for what each one is capable of.


Once I was satisfied with the shape I removed it from the lathe.


Using the Proxxon Mini Bandsaw, I carefully cut it away from the rest of the dowel.


Using the Proxxon Bench Drill Press, drill press I drilled a small hole in the top.


I sanded lightly with a small piece of sandpaper and painted with Plaid paint.


This is my finished product.  I think they look cute sitting on the tiny bench.  Can't wait to display them with my next cabin.  Till next time .... Colleen


Friday, December 20, 2019

Homemade Christmas tree

πŸŽ„πŸŽ…Ho Ho HoπŸ€ΆπŸŽ„

Once again it is the season for all things jolly!!   Merry Christmas to all of you!!!  
Today I want to show you how to make a cute little Christmas tree.    And the good news is...it isn't going to hardly cost a thing.   We are going to use some scraps and yard waste.  

               From this↓                                                                                                                     to this ↓


Equipment and supplies

cut offs from pruning trees  Pieces approx 12" long and 1/2" in diameter
Sturdy wire 12 -  14 gauge   approx 18 "
scrap wood 1/4" thick (for star)
2 square pieces approx. 4" x 4" for stand
decor of your choice  (think dollar tree for small ornaments)

First thing I did was to collect quite a few straight pieces of limbs that I had pruned off a hydrangea bush.

Using a measuring tool I measured 4 each of 14" 12" 10" 8" 6" 4" and 2" and cut them to size using my Proxxon mini scroll saw.

I laid them out in the shape of a Christmas tree then used a straight edge to draw a line down the middle of them all   (see picture below)   Using white paint (my pencil line did not show) I made a dot at the center of each little limb.


Now using the Proxxon mini drill press I drilled a hole (the same size as my wire) into the center of each limb piece.
1

3


Note the brad point bit in picture 1 above.   This keeps the drill bit from skipping off the rounded surface of the twig.   Proxxon makes a nice set of these (HSS twist drill set with brad point  No 20 876) to go with this mini drill press
In the middle picture I was holding the twig but I found it much easier to let the Proxxon machine vise MS 4 do the holding for me.  This keeps it absolutely steady during the drilling process.


Next I took a slightly larger limb and cut it to about 2 " as this will be the trunk of my Christmas tree.  I used the Proxxon mini drill press to drill a hole down the middle of it as well.

I cut out my star and my 2 pieces of 4" x 4" pieces for the stand using Proxxon's mini scroll saw.    The star gets a hole drilled half way though it and one piece of the stand gets a hole in the center.  I do all this on the Proxxon mini drill press.  The piece of the stand with the hole gets a slot where the wire will fit.

Thread the wire up through the first stand piece then the "trunk" piece and up through the branches starting with the largest to the smallest.  End with putting the wire into the star and gluing it there.  Push all the branches up tight to the star then bend the remaining wire at the bottom.  Cut it off and let it slip into the slit you cut in the base piece.

glue the second 4 x 4 base piece over the first one.  This will cover the wire and keep it secure and it is a nice flat surface for the tree to sit on.

Spread out the branches so it looks nice.
Now paint and decorate your tree.   I used Plaid Paints for the bright colors.  Green for the tree then I added some white to the ends as snow.     I added small Christmas ornaments I got at the dollar tree store.

How's that for a homemade Christmas tree?   It looks cute on a table.   Could be used as a center piece.   It can be made whatever size you like.

Ok, now I am ready for Christmas.   It is always fun to make something.  It helps me get in the mood.  You all have a great Christmas now.  Ya hear...…   Thanks for visiting.  Thanks Proxxon and Plaid!
          See you next year...Carol

Sunday, May 19, 2019

How to Make a Cribbage Board from Reclaimed Wood

Sometimes things just come together at the right time and with the right materials. That's the case with this cribbage board made from reclaimed wood. I needed a birthday gift for my son who enjoys all kinds of games. I had been hoarding a couple slabs of reclaimed olive wood, and he didn't have a cribbage board, so, as they say—the rest is history.

Equipment and Supplies to Make a Cribbage Board

Instructions for Making a Cribbage Board

  1. Paint four of the rivet heads with Liquid Leaf Gold and four with Liquid Leaf Silver (or paint colors of your choice). I found it easiest to dip the heads in the paint rather than try to use a brush. Set aside to dry.
  2. Print the board template. 
  3. Cover the piece of wood with painter's tape. Spray the reverse side of the template, and adhere to the taped wood. Using painter's tape protects the wood from adhesive residue and makes for easy removal of the template.
  4. Select a brad point drill bit slightly larger than the shaft of the rivets. 
  5. Set the drilling depth of the drill press so the holes do not penetrate the back surface of the wood slab. Drill the holes according to the template.
  6. My piece of wood is irregularly shaped, so the drill bit needed to be manually positioned for each holes. However, if you are using a piece of wood with a flat edge, you can set the adjustable fence to drill each line of holes.
  7. Keep the flutes of the drill bit clean to ensure accurate drilling.
  8. Use the Proxxon Delta sander with progressively finer grits of sandpaper to sand the surfaces of the wood.
  9. Use olive oil to buff and polish the sanded piece.
To complete the gift presentation I embroidered a sleeve for the board. Yes, his birthday is on the fourth of the month :)


Carole

Wednesday, May 15, 2019

How to Create a Sewing Panel

Hi everyone, Steph Ackerman here to show you how to create a sewing panel for that special someone who enjoys sewing.


I started by drawing a circle on a panel.  Using the Micro Bandsaw, I easily cut out the circle.


Next, I used the Disk Sander to quickly sand the edges of the panel.


Finally I used the Bench Drill Press to put a hole in the panel for the hanger.


Now that the panel was ready, I used a stencil with molding paste to add dimension to the panel.  Once dry, I painted the panel with Plaid paint.


For more dimension, I used the stencil again on the painted panel.  Then I pulled assorted sewing elements and arranged them on the panel, painting them with Plaid paints.


Create and Sew were die cut from Rinea Foiled Paper.  A piece of burlap was draped over a hanger and a sewing machine added on top.  


Twine was wrapped around the 2 spools and threaded through the 2 needles.  

What do you think?


Wednesday, May 1, 2019

Review of Bench Drill Press

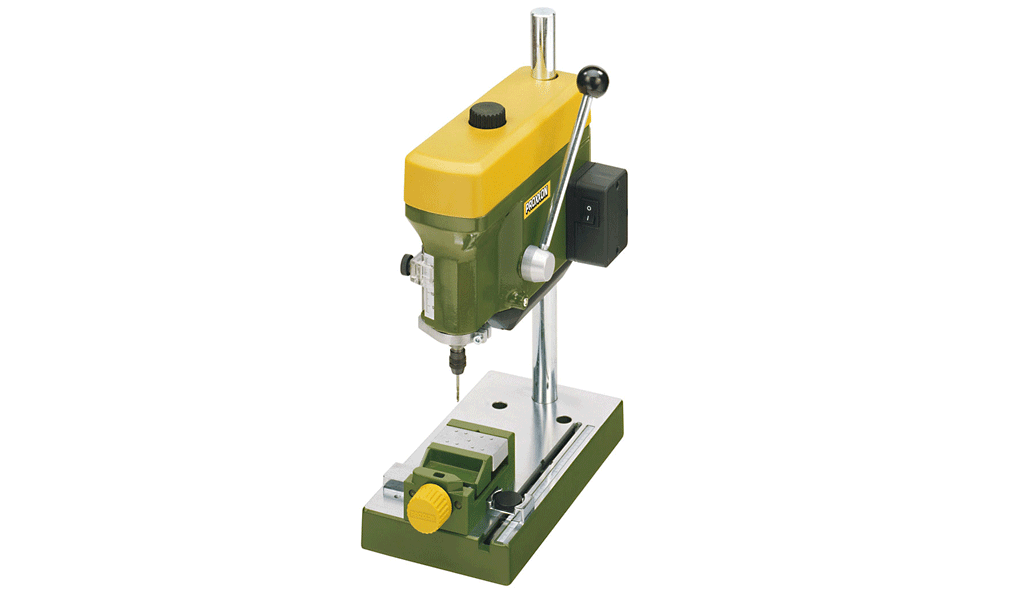
Hi everyone, Steph Ackerman here again.  Today I'd love to share with you another of my favorite go to tools from Proxxon - the Bench Drill Press.


The Bench Drill Press is a compact unit sized at 11" tall with a based of 8 1/2" x 4 3/4" making it easy to fit on any work table.  The motor is housed in the die-cast machine head and runs very quiet so even drilling late at night or early in the morning does not present a noise issue.

You can quickly change the height adjustment with the attached clamp lever.

As noted on the website: 
The power transmission by 3-step aluminum pulleys and flat belt provides 3 spindle speeds of 1,800, 4,700 and 8,500rpm allowing triple torque at lower speeds. The chrome feed lever has a practical adjustable drilling depth gauge.

The spindle is essentially free of play as a result of the three high quality ball bearing assemblies. It is recessed for the insertion of MICROMOT steel collets, but also threaded for attaching drill chucks with 3/8" thread. The spindle has an extremely high rotational accuracy and a 1 3/16" (30mm) feed. The quill diameter is 1 1/4" (32mm) with return spring, the throat depth (column to drill spindle) is 5 1/2" (140mm). The unit provides quick coarse height adjustment of the headstock via clamp lever. The max. height (worktable surface to spindle end) is 5 1/2" 140mm).


I have used the Bench Drill Press for an assortment of projects.  Some of those projects are plain unfinished wood items and some of those projects are completed projects.  I get the same results with no touch up needed on my completed projects.

Here are some of the projects which I've created using the Hot Wire Cutter.  Click on the links for the complete project details.


Thanks for stopping by.


Sunday, April 14, 2019

How to Make a Wooden Bobbin Holder

In addition to being a wood worker, I am a bobbin lace maker. And, like any other art form it has its own tools and gadgets unique to lacemaking. I'm thrilled that I can make some of my own lace tools using my Proxxon tools.

Tools and Supplies for Making the Bobbin Holder

Instructions for Making the Bobbin Holder

  1. Measure and mark a 6" length of the hardwood.
  2. Cut the hardwood to length using either the bandsaw or the Proxxon Table Saw FET.
  3. If you are making more than one bobbin holder, use painter's tape to hold the pieces together while completing the Steps 4 through 7. This helps ensure consistent cuts and drilling so the pieces are exact duplicates. It also eliminates repeated measuring and marking.
  4. Sand the ends using the disc sander.
  5. Measure and mark the notches and holes using this schematic.
  6. Cut the notches on the bandsaw by making two or three parallel cuts for each notch. The notches can also be cut using the Proxxon Scroll Saw DS 460.
  7. Use the drill press to drill the holes for the elastic cord and the anchor pins. Use a 1/64" Proxxon HHS brad point drill bit for the anchor pin holes, and a 9/64" Proxxon HHS brad point drill bit for the threading holes for the elastic cord.
  8. Remove the painter's tape, and sand each bobbin holder using the Delta sander. Use progressively finer grits of sandpaper, starting with 150 and ending with 330 or 400. You want to achieve a glass-like finish so the fine threads used in lacemaking will not catch on the wood.
  9. Polish with paste wax.
  10. Thread the elastic cord through the holes, and tie the ends in a secure knot.


Carole