Showing posts with label Disk Sander. Show all posts

Wednesday, June 3, 2020

How to Mend a Broken Heart

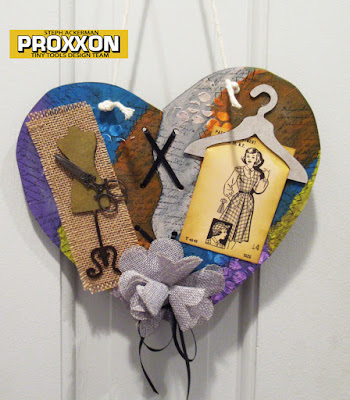
Hi everyone, Steph Ackerman here today with showing you how to mend a broken heart.


For today's project, I used the 2 Speed Scroll Saw to cut a a heart, then used the Band Saw to create the zig zag pattern while cutting it in half.


The Disk Sander made easy work of sanding the pieces.


Next, I used the Bench Drill Press to add holes in both pieces of the heart.


I began by painting the heart with Plaid black paint.  Next, I used modeling paste through a stencil to give the heart some depth.


I added an assorted of Plaid paints to give my heart life, then painted cross stitches where the colors met giving the illusion of a patchwork piece.  Using StazOn Ink, I stamped a script stamp randomly about the heart.


To "mend" the heart, I threaded ribbon through the holes and tied  it at the bottom.


Finally, in keeping with the patchwork/stitching theme, I added assorted embellishments.


Thanks for stopping by.


Saturday, December 7, 2019

Let It Snow Banner

Hi everyone, Steph Ackerman here today using Proxxon tools to create a snow panel.


There are so many options with scraps of wood so I decided to create a winter themed banner.
Using the Micro Bandsaw, I cut up strips of left over plywood into irregular squares.


I quickly sanded each piece with the Disk Sander.


Using Plaid Paints, I painted each piece and adhered each square to a strip of plywood.


I created a snowy effect using a stencil with modeling past, then added the letters on top.  To complete my snow theme, I added clay elements.

Using the Bench Drill Press, I drilled a hole in the top and added ribbon to hang the panel.

Happy Holidays.

Thanks for stopping by.


Wednesday, May 15, 2019

How to Create a Sewing Panel

Hi everyone, Steph Ackerman here to show you how to create a sewing panel for that special someone who enjoys sewing.


I started by drawing a circle on a panel.  Using the Micro Bandsaw, I easily cut out the circle.


Next, I used the Disk Sander to quickly sand the edges of the panel.


Finally I used the Bench Drill Press to put a hole in the panel for the hanger.


Now that the panel was ready, I used a stencil with molding paste to add dimension to the panel.  Once dry, I painted the panel with Plaid paint.


For more dimension, I used the stencil again on the painted panel.  Then I pulled assorted sewing elements and arranged them on the panel, painting them with Plaid paints.


Create and Sew were die cut from Rinea Foiled Paper.  A piece of burlap was draped over a hanger and a sewing machine added on top.  


Twine was wrapped around the 2 spools and threaded through the 2 needles.  

What do you think?


Wednesday, April 3, 2019

How to Create Easter Eggs

Hi everyone, Steph Ackerman here to show you how to create Easter Eggs with Proxxon Tools.


I started by drawing egg shapes on some scrap plywood I had.


Using the Micro Band Saw, I easily cut an assortment of eggs.  I still have a lot of practicing to do, but I am pleased with how quick I was able to cut the eggs.


I used my newest tool, the Disk Sander, to quickly and easily sanded the eggs. With the speed variations, I could choose how fast (or how slow) I wanted the sander to spin.


Using an assortment of Plaid paints, I painted the eggs.


I also painted some little Easter baskets I had in my stash, then glued the eggs to each basket.


Finally, I added Robin's Nest Dew Drops on the eggs so each egg became very unique.


Then I filled the baskets with raffia and added assorted candies.

Thanks for stopping by.