Showing posts with label sander. Show all posts

Sunday, June 16, 2019

How to Make a Country Gift Basket

This cute little country gift basket makes a unique gift presentation piece. It would also make a sweet home decor display piece.

Supplies and Equipment for Making the Country Gift Basket

Instructions for Making the Country Gift Basket

  1. Measure and mark the 1/8" plywood for the basket sides and slats according to schematic. Mark for two sides and four slats. Measure and mark the ¼" plywood for the basket bottom according to schematic.
  2. Set the blade height on the table saw so the teeth of the blade are just above the wood. 
  3. Cut the pieces. The pieces can also be cut on the bandsaw.
  4. Measure ½" down from the top center of the basket sides, and mark for drilling the hole for the dowel rod. Placing a piece of painter's tape on the reverse side before drilling helps minimize tear out.
  5. Using the bench drill press, drill the holes for the dowel rod. Set the adjustable fence to ensure that both pieces are drilled in the exact same spot.
  6. Sand the edges of all pieces on the disc sander.
  7. Sand the surfaces with the Delta sander.
  8. Glue the side pieces to the bottom, and let the adhesive dry. Then, glue the slats in places.
  9. When the adhesive is thoroughly dry, paint with FolkArt Milk Paint.
  10. When the paint is dry, coat with Milk Paint Finishing Oil.
  11. Load your country gift basket with goodies and present to your lucky recipient.

Sunday, June 2, 2019

How to Make a Hot Glue Gun Stand

Every crafter needs a hot glue gun stand!! Now you can make your own using Proxxon MICROMOT tools.

Supplies and Equipment for the Hot Glue Gun Stand

Instructions for the Hot Glue Gun Stand

  1. Set the blade height on the table saw so the blade is barely exposed above the height of the wood.
  2. Cut each wood piece to size using the table saw (or the band saw). Use the band saw to cut the dowel rods to length.
  3.  Sand the ends using the disc sander.
  4. Measure 3½" from one end and 1" from each side, and mark for drilling holes for the ¼" dowel rods. Measure 4½" from the other end and 1" from each side, and mark for drilling holes for the 1/8" dowel rods.
  5. Set the adjustable fence for the ¼" set of holes. Using appropriate size bits, drill one set of holes into the base. 
  6. Reset the adjustable fence for the 1/8" set of holes, and drill them into the base.
  7. Mark the center line of the ½" width of the 2¾" x 1¼" x ½" piece of wood. Measure ½" from each side and mark for drilling holes for the 1/8" dowel rods. These short pieces of rod help to stabilize and strengthen the small support piece.
  8. Sand all surfaces with the Delta sander, using progressively finer grits of sandpaper.
  9. Use wood glue to glue the supporting pegs and dowel rods in position.
  10. When the glue is thoroughly dry, paint the stand with FolkArt Ultra Dye and seal with Ultra Dye varnish.
  11. When the dye is thoroughly dry, use E6000 adhesive to glue the ceramic tile in place with one end flush against the vertical support.

Carole

Wednesday, April 3, 2019

How to Create Easter Eggs

Hi everyone, Steph Ackerman here to show you how to create Easter Eggs with Proxxon Tools.


I started by drawing egg shapes on some scrap plywood I had.


Using the Micro Band Saw, I easily cut an assortment of eggs.  I still have a lot of practicing to do, but I am pleased with how quick I was able to cut the eggs.


I used my newest tool, the Disk Sander, to quickly and easily sanded the eggs. With the speed variations, I could choose how fast (or how slow) I wanted the sander to spin.


Using an assortment of Plaid paints, I painted the eggs.


I also painted some little Easter baskets I had in my stash, then glued the eggs to each basket.


Finally, I added Robin's Nest Dew Drops on the eggs so each egg became very unique.


Then I filled the baskets with raffia and added assorted candies.

Thanks for stopping by.


Sunday, March 31, 2019

How to Make a Minimalist Phone Stand

A phone stand can offers two major benefits. First: it transforms your phone into a hands-free device since you don't have to hold the phone. Second: your phone always has its own home, and you know where to find it. This minimalist phone stand was make using Proxxon MICROMOT tool.

Supplies and Equipment to Make the Phone Stand

Instructions for Making the Phone Stand

  1. Print pattern and mount on a piece of Baltic birch plywood. Cover the blank with painter's tape. This makes removing the pattern easy. Lightly coat the reverse side of the pattern with adhesive spray, and mount on your prepared wood blank.
  2. Cut the exterior sides of the phone stand using the bandsaw.
  3. Cut the cord notch using the scroll saw.
  4. Cover the reverse side of the blank where the holes for the dowels will be drilled with a piece of painter's tape. This will help to minimize tear out when the holes are drilled.
  5. With a ¼" bit drill the two holes for the dowel supports. Use the stop to ensure accurate placement.
  6. Sand any rough edges on the base using the disc sander.
  7. If desired, stain any or all parts of the phone stand. I chose to keep the base natural, and stained the dowels.
  8. When the stain is dry coat all pieces with paste wax and buff.
  9. Use a strong liquid adhesive to glue the dowels in place.
  10. Enjoy hands-free use of your mobile phone!

Carole

Sunday, September 2, 2018

How to Make a Halloween Cat from Lumber Scraps

It will soon be time for witches, pumpkins, and black cats. Halloween is right around the corner, and I've got an easy decorative project that you can make from scraps. Isn't this Halloween cat fun??!!

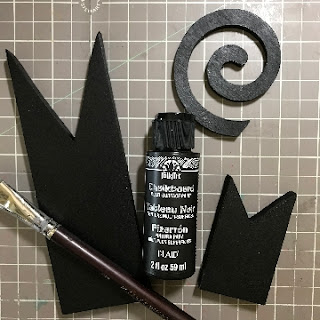
I used ½" birch plywood for my cat body and ¼" birch plywood for the tail.

Instructions for the Halloween Cat

  1. Start by measuring and marking the width and height of the cat and the depth of the ears. This can vary depending upon the size of your scrap lumber and you desired finished size of the cat. My cat measures 7" high and 2¼" wide. For the ears I marked a point in the center of the width and 2½" from the top. Then, I marked diagonal lines from the top corners to the marked point.
  2. Cut the shapes on the Proxxon MICRO Bandsaw MBS/E.
  3. Save the triangle from the ears. It will make a great Christmas tree!!
  4. Sand any rough edges on the Proxxon Disc Sander TSG 250/E.
  5. Paint the pieces with black FolkArt Chalkboard Multi-Surface paint.
  6. When the paint is dry, distress the edges with 150 grit sandpaper.
  7. Glue the tail to the back of the cat. Glue googly eyes in place, and finish with a raffia ribbon bow.
A note about my cat's tail: It was a scrap the was already cut that I retrieved from a trash bind at a local makers' space. But it could easily be cut on a scroll saw, so I've included a pattern for the tail.
Carole