Showing posts with label Steph Ackerman. Show all posts

Monday, August 24, 2020

How to Make Decorative Flip Flops

Hi everyone, Steph Ackerman here today showing you how to create a set of decorative flip flops to  remind you that summer is still ongoing even if we are summering in place this year.


I drew the shapes on a sheet of plywood, then used the Scroll Saw to cut them out.  I found it easiest to cut the plywood panel first so I could work with a smaller panel.


The Scroll Saw makes easy work of cutting the flip fops.


Next, I sanded the edges with the Delta Sander.  This is my go to sander.  With it's shaped sanding surface, I can get into the smallest of areas.


The Bench Drill Press easily cut the holes in each flip flop.


I used Plaid's Folk Art Paint to paint the flip flops.  Once dry, I used a stencil with Plaid Folk Art Paint to create the design on the flip flops.


To finish, I inserted ribbons in the holes and added a flower.  Now, I just need to hang these on my wall to remember that summer comes every year.


Thanks for stopping by.


Steph


Wednesday, July 8, 2020

Hello Summer Plaque

Hi everyone, Steph Ackerman here today showing you how to create a Summer plaque.


Draw a pattern on a piece of plywood.  I wanted a large summer shell.  Use the Scroll Saw to cut out  the design.  


Use the Disc Sander to sand the edges of the panel.   Then use the Delta Sander to sand any remaining edges.


Paint the panel with Plaid paint.   Allow to dry then randomly dry brush on some white paint.  Decorate with inked mesh.  While waiting for the glue to dry, add assorted shells created from Makin's Clay.   Ink the shells in assorted colors.  You could even add some real shells if  you had some available.


Stamp a script stamp with black ink randomly about the edges of the panel.  


Die cut palm trees and Hello Summer from Rinea Foiled Papers and adhere to the panel.


Finish by adding a stamped, colored and fussy cut Prima doll to the panel.


Thanks for stopping by.


Wednesday, June 3, 2020

How to Mend a Broken Heart

Hi everyone, Steph Ackerman here today with showing you how to mend a broken heart.


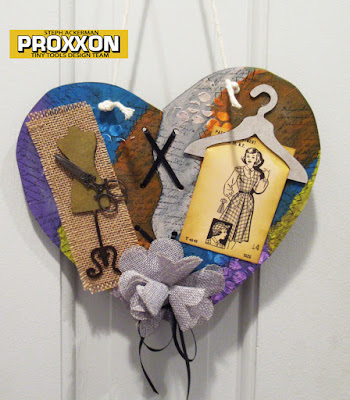
For today's project, I used the 2 Speed Scroll Saw to cut a a heart, then used the Band Saw to create the zig zag pattern while cutting it in half.


The Disk Sander made easy work of sanding the pieces.


Next, I used the Bench Drill Press to add holes in both pieces of the heart.


I began by painting the heart with Plaid black paint.  Next, I used modeling paste through a stencil to give the heart some depth.


I added an assorted of Plaid paints to give my heart life, then painted cross stitches where the colors met giving the illusion of a patchwork piece.  Using StazOn Ink, I stamped a script stamp randomly about the heart.


To "mend" the heart, I threaded ribbon through the holes and tied  it at the bottom.


Finally, in keeping with the patchwork/stitching theme, I added assorted embellishments.


Thanks for stopping by.


Wednesday, May 6, 2020

Birthday Gift Bags with Wood Scraps

Hi everyone, Steph Ackerman here today with showing you how to use scraps of wood to decorate gift bags.


While we are home bound and parties are put on hold, our lives go on and that includes birthdays.  So I decided to take this time to create gift bags for those individuals we can't see and celebrate with at this time.


Using some left over scraps of wood, I used the Scroll Saw to cut the wood into party hat shapes then used the Delta Sander to sand down the rough edges.


After painting each with Plaid paints, I stamped and embossed each with a party stamp.  Then I used the Bench Drill Press to put a hole in each through which I threaded twine.


After decorating the gift bags, I tied the wood scraps to the handles like gift tags.

Thanks for stopping by.


Wednesday, April 1, 2020

How to Create a floral wall hanging

Hi everyone, Steph Ackerman here today with a floral wall hanging.


I drew a jar on a scrap of wood then using the Scroll Saw, I cut the design.  Next, I sanded the jar with the Delta Sander.


I painted the jar with gesso and put it aside to dry while I worked on the background.


Using a stencil with modeling paste, I added dimension to a burlap panel.  Once dry, the burlap panel was painted with several colors of paint.


The jar was painted with a light layer of blue paint and twine was wrapped around the top.  For additional dimension, blue ink was rubbed across the jar and a metal tag was tied to the twine.


Once the jar was adhered to the canvas, flowers were added.  Since the flowers are not attached, you can easily change out the flowers for different seasons.


Thanks for stopping by.


Wednesday, March 4, 2020

How to Create a Shamrock

Hi everyone, Steph Ackerman here today creating a variety of tools to create a shamrock.


Drawn a pattern on a piece of plywood then use the Scroll Saw to cut the design.  Use the Delta Sander to sand the rough edges.


Paint the shamrock with 2 shades of green paint.


Decorate as desired.  I used Rinea Foiled Paper to die cut the pattern for the center of the shamrock.  A large brad finished off the design.


Thanks for stopping by.


Wednesday, February 5, 2020

How to make a sweet Home plaque

Hi everyone, Steph Ackerman here today using Proxxon tools to create a sweet home plaque for yourself or perhaps to give to a friend.


Start by drawing the house pattern on wood using the Kapro Measure Mate.


Use the Proxxon Scroll Saw to cut the design.  The Scroll Saw makes quick work of the wood panel.


Next, I used the Bench Drill Press to drill a hole in the roof so I could add a  rope so it would hang.


Finally, I used the Delta Sander to sand the panel.


Then it was time to just decorate.  I used Plaid paints to paint the house, windows and door.  Then I used modeling paste with a stencil to create the roof.  Assorted embellishments were added to complete the panel.


Place a chipboard key across the door, add string for the hanger, some flowers and a new home plaque is ready to hang wherever you want it.


Thanks for stopping by.


Wednesday, January 8, 2020

How to Make a Vacation Album

Hi everyone, Steph Ackerman here today using Proxxon tools to create a customized vacation album.


You can purchase all kinds of albums, but why not create your own?  With assorted Proxxon Tools you can create any type of album you want.


I found this pallet sign.  It's basically layers of compressed chipboard with a layer of melamine on top and I wanted to see how the Band Saw would cut this sign.  Begin by using the Kapro 313 Measure Mate to size out the album.


The Band Saw easily cut through the pallet sign.  There was no shredding or distortion.

.
While I didn't need to, I used the Disc Sander to sand the edges of the album.


Use the Bench Drill Press to drill 2 holes in the album.


Paint the covers with FolkArt Acrylic Paint in Blue Echo.  Randomly dry brush on FolkArt Acrylic Paint in Windsor Blue.


Cut assorted pattern papers to fit.

Decorate the front cover with assorted left over elements.  Add Alaska 2019 to the corner.

Thanks for stopping by.