Showing posts with label Bench Drill Press. Show all posts

Tuesday, October 20, 2020

How to Create Halloween Decorations

Hi everyone, Steph Ackerman here today showing you how to use Proxxon Tools to create an assortment of Halloween Decorations.


I drew the designs on scraps of plywood.


Using the 2 Piece Scroll Saw I cut each piece.

Once I had all the pieces I wanted, I used the Delta Sander to sand each piece.

I used the Bench Drill Press to drill holes in each piece so I could hang them on a tree.


Next, I used Plaid Paints to add color to each piece.


I left the black cat and white ghost as is, but I decorated the Witch's shoe and the Candy Corn with assorted colors of Robin's Nest Dew Drops.


I tied twine to each piece and then hung them on a tree.  


I did use scraps to create these ornaments, but just think how fun they'd be in a variety of sizes, perhaps standing outside your door or fence.

Thanks for stopping by.

Steph


Monday, August 24, 2020

How to Make Decorative Flip Flops

Hi everyone, Steph Ackerman here today showing you how to create a set of decorative flip flops to  remind you that summer is still ongoing even if we are summering in place this year.


I drew the shapes on a sheet of plywood, then used the Scroll Saw to cut them out.  I found it easiest to cut the plywood panel first so I could work with a smaller panel.


The Scroll Saw makes easy work of cutting the flip fops.


Next, I sanded the edges with the Delta Sander.  This is my go to sander.  With it's shaped sanding surface, I can get into the smallest of areas.


The Bench Drill Press easily cut the holes in each flip flop.


I used Plaid's Folk Art Paint to paint the flip flops.  Once dry, I used a stencil with Plaid Folk Art Paint to create the design on the flip flops.


To finish, I inserted ribbons in the holes and added a flower.  Now, I just need to hang these on my wall to remember that summer comes every year.


Thanks for stopping by.


Steph


Wednesday, June 3, 2020

How to Mend a Broken Heart

Hi everyone, Steph Ackerman here today with showing you how to mend a broken heart.


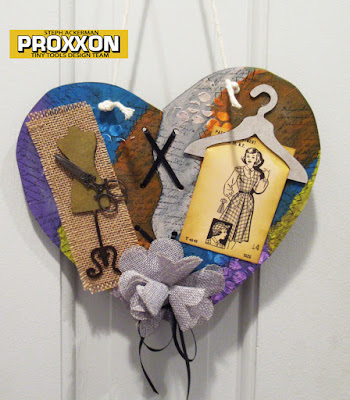
For today's project, I used the 2 Speed Scroll Saw to cut a a heart, then used the Band Saw to create the zig zag pattern while cutting it in half.


The Disk Sander made easy work of sanding the pieces.


Next, I used the Bench Drill Press to add holes in both pieces of the heart.


I began by painting the heart with Plaid black paint.  Next, I used modeling paste through a stencil to give the heart some depth.


I added an assorted of Plaid paints to give my heart life, then painted cross stitches where the colors met giving the illusion of a patchwork piece.  Using StazOn Ink, I stamped a script stamp randomly about the heart.


To "mend" the heart, I threaded ribbon through the holes and tied  it at the bottom.


Finally, in keeping with the patchwork/stitching theme, I added assorted embellishments.


Thanks for stopping by.


Tuesday, March 31, 2020

How To Make A Colonial Toilet Paper Holder Using Proxxon Tools


Hi friends! I stated in my last project that I'm making a few things for my tiny powder room. I designed a toilet paper holder that is similar to the frame on my mirror. Follow along with me and I'll show you how I made it.

Supplies:
 Proxxon Micro Band Saw
 Proxxon Drill Press
 Proxxon Delta Sander
 1/2" Birch Plywood
 Wood Dowel Rod
 Brad Nailer
 Wood Glue
 Plaid Paint  (black)
 Plaid Inspirations Wax  (clear)

1. First I figured out a pattern, keeping in mind the size of the roll of toilet paper. Transferred my pattern to my wood.


2. Cut out all the pieces with the Proxxon Micro Band Saw. Just want to mention that because the band saw throat is small, the pattern may have to be drawn on both sides of the wood. When in a tight spot while cutting, turning it over and cutting from the other side usually works.

3. Line up all the pieces to see how they fit then sand with the Proxxon Delta Sander.

4. Using the Proxxon Drill Press, drill holes for the roller on each side piece.

5. Using the band saw I cut a length of dowel rod for the roller. I notched each end to make it easy to grab then sanded.

6. I then glued and nailed the sides to the back.

7. I painted my holder with Plaid paint in black and let dry. I lightly sanded the edges then waxed with clear wax by Plaid Waverly Inspirations.


    Its all finished and ready for me to hang up using two black wood screws.  Thanks for following along with me.... Colleen :)


Wednesday, February 5, 2020

How to make a sweet Home plaque

Hi everyone, Steph Ackerman here today using Proxxon tools to create a sweet home plaque for yourself or perhaps to give to a friend.


Start by drawing the house pattern on wood using the Kapro Measure Mate.


Use the Proxxon Scroll Saw to cut the design.  The Scroll Saw makes quick work of the wood panel.


Next, I used the Bench Drill Press to drill a hole in the roof so I could add a  rope so it would hang.


Finally, I used the Delta Sander to sand the panel.


Then it was time to just decorate.  I used Plaid paints to paint the house, windows and door.  Then I used modeling paste with a stencil to create the roof.  Assorted embellishments were added to complete the panel.


Place a chipboard key across the door, add string for the hanger, some flowers and a new home plaque is ready to hang wherever you want it.


Thanks for stopping by.


Wednesday, September 4, 2019

How To Create a Fall Sign

Hi everyone, Steph Ackerman here today showing you how to create a fall sign.


Drawing a leaf on Smoothfoam, I used the Hot Wire Cutter to cut the leaf. 


I wanted the leaf a little thinner so I cut the leaf  in half with the Hot Wire Cutter.


I painted the leaves and the plaque with Folk Art Paint.


Using a Plaid stencil, I added a design with modeling paste


 Once dry, I used the Bench Drill Press to add holes in the top of the sign.


For additional colors, I spritzed the sign with Fireworks Shimmery Craft Sprays and used a baby wipe to remove some of the colors.  I also spritzed the leaves to make them more realistic.


String was added in the holes.  The phrase was stamped with brown ink and die cut.  The phrase was matted with a larger die using Rinea Marigold Foiled Paper.


Finally, I added Gold Stickles as the veins.

Happy Fall.

Thanks for stopping by.