Showing posts with label proxxon Delta Sander. Show all posts

Thursday, May 5, 2022

How to make a little bird feeder

Welcome back.  Yesssss I am talking to you, and the flowers and the warm sunshine and the little birds.  I am so happy to be defrosted and ready for spring.  I noted the birds have come back, and to look at my birdfeeders they are hungry.  Little birds were getting rude treatment at my big feeders so I decided to make a little one that would be just for them. See below the instructions on how to build this cute little bird feeder using Proxxon tools.


Equipment and supplies

Proxxon mini table saw

Proxxon OZI/E delta sander

Pine boards 1/2" to 3/8" thick

2 small pieces of 1/8" plexiglass

wood glue

small screws

16" of rope or strong twine.   

6 x 1" wood slat

See the cutting pattern below I used the Proxxon mini table saw to cut my pieces.

The first thing I did was to build the fence that I am going to put around the bottom of this feeder.  This will help keep all the seeds from spilling out.

I have my two longer pieces and 2 of the shorter ones.  The long pieces will go on the long side of the bottom with slight overhang on each side. The shorter pieces will go inside of the longer pieces on the short sides of the bottom.  Confused yet?  👀  see picture below


Now I have glued it in place.  I add a few nails along the bottom of the fence just to be sure.  And I sand my edges smooth using my Proxxon OZI/E delta sander.   I love this sander!


Next I need to make a slot in the wooden sides so that the plexiglass front and back can slide in.

I need to remove the blade cover and splitter for the next step and set my blade height to about 1/4"  I want to cut only about half way through the wood, making a slot.


I set the fence about 1/2" from the saw blade and run both long sides of each of the side pieces over the blade.  It is not quite wide enough to insert the plexiglas yet so I move it just the tiniest bit either way and run those boards through it again.  Now I have a slot that will accommodate the plexiglass pieces.


Glue the bottom supports to the bottom of the sides. 
Then, glue the sides to the short side of the base then secure it with a couple of screws.  The plexiglas should slide in easily.  Note at the bottom the support acts as a stop so there is space for the seeds to fall through.   I've taken the protective plastic off the glass now.  Look how clear. 


A couple of screws or i-hooks on the side to tie the piece of rope to, then up through the top holes and  you are finished.  Now we can fill it with seed and hang it outside.  


This works good for the little birds because the big birds have a hard time holding on and eating from the narrow trough.  It is easy to fill because the lid lifts up.  

Poor angry bird too big for the new feeder.


This is a fast and easy project.  Proxxon tools are just the ticket.   Give it a try.
Thanks for visiting.   Love my Proxxon tools.
till next time....   Carol


Thursday, December 2, 2021

How to make a whistle

 Hope you all had a great Thanksgiving.   Ours was quiet and I enjoyed it.   Today I have a quick and easy project, but one the kids will love.   Take it on a hike... just in case you get lost or find yourself in trouble.  I enjoy making things with and for kids.  Call me a big kid, and I won't argue the fact.  🐐


Step 1-   I started with a piece of hardwood measuring 1" x 1" x 4"  (A pen blank for woodturning is just about the right size)   If I had needed to cut it I would have used Proxxon's mini table saw.

Step 2-  Using the Proxxon vise clamp to hold my wood piece vertical I drilled a 3/8 inch hole down the center, stopping 1" short of the end.

Step 3- Using the Proxxon mini band saw I made a 90 degree cut approx 1 inch down from the hole side of the wood just deep enough to meet the hole we made in step 2.

Step 3.  Starting approx 3/4" down from the 90 degree cut, I used the Proxxon mini band saw to make a cut at about 45 degrees that met up with the 90 degree cut. to take a wedge out of the top of the soon to be whistle.  


                              hope you can follow my drawing 🠞🠞🠞🠞🠞🠞🠞


Step 4.Take a 3" piece of 3/8" dowel and cut the top so that it has a flat top.  Insert it into the hole in the whistle.  Moving it in and out find the sweet spot.  You will know when you find it because it will whistle loud and clear.  Hold it in place and drop a couple drops of super glue around the dowel. where it meets the wood.  Let it dry then cut it flush with the end of the whistle.  The whistle is now complete.       

But wait... there is more.  Just for fun lets doll it up a bit.    I am still learning my new Proxxon engraving device, so I set it up and engraved on the little whistle.

Then I took it over the Proxxon disc sander and rounded all my edges.

Then more smoothing with the OZI/E delta sander

And a coating of butcher block, which is non toxic and a key ring.   Now give it to the
 boy or girl scout of your choice.


Again, this was easier to make that to describe.  Give it a shot, it won't take but about an hour.

Thanks for visiting.   Thanks Proxxon, Your tools are the best!

Catch you next time.   Carol


Thursday, September 16, 2021

Proxxon tools for gourd fun. Part 1 Easy to make bird feeder

Hi everyone.  Carol W  here.  I recently was blessed with the gift of gourds from a new friend of mine.   She was moving and clearing out stuff and thought of us when she came to her gourds.  OMG, she showed me her workshop and the things she had made from gourds and I left with new ambition.  BTW, I noticed she had quite a few Proxxon tools as well, but of course she was taking those with her.  Can't blame her.  Anyway,  today I want to show you how to make an easy bird feeder from a medium to big gourd.  Of course you could use a small gourd too.    Let's get started.


Equipment and supplies

1 nice gourd with medium to thick walls

a pencil  

tape measure (optional)

Proxxon tools,  You have your choice here, as you will see below.   I used the proxxon mini jigsaw, the Proxxon professional rotary tool with a cutting disk, Proxxon OZI//E sander with the cutting blade.  I tried them all to see how they worked for cutting the gourd and they all worked fine, so you have your choice of tools for this one

Proxxon OZI/E sander, and or Proxxon mini belt sander  (I used my new cordless mini belt sander and it works like a dream for sanding small places.

Plaid paints   (you know you gotta decorate!)

Strap, wire, twine or whatever you choose to hang your birdfeeder  (About 24 inches)

Proxxon Professional rotary tool with drill bit or rasp cutter.

Seems like a lot of equipment, but it really isn't.   I'm just giving you choices.  


Let's get started.   First thing to do is pick out a gourd.  I mentioned it above but you do want one that is fairly sturdy.  It is going to be outside in the weather after all. 


We  need to make some marks on it to guide us when we are cutting our gourd.  Things to consider:   I need to leave a "bowl" in the bottom to hold my bird seed.   I need to keep the top intact so that I can attach a hanger and also this will help keep the seeds dry.  Thirdly I need holes in the sides to the birds can get to the feed.   Mine below is a simple design but I could get fancy,  (but not today.  LOL)

So I am going to draw some simple windows on mine.   I am using a pencil because it can be washed off easily


Now to choose your cutting tool"


I chose the Proxxon mini jigsaw to do my cutting.   And I cut out all my windows.


My edges are sharp so I use my Proxxon OZI/E delta sander and my Proxxon mini belt sander  to smooth them.  I like rounder edges so as not to hurt the birdie's feet.   Check out the before an after photos below 


You can drill some holes in the top now and attach your hanger or you can do the added step below.

From a scrap of gourd (hopefully a cut off top or bottom, fashion a hole that will fit over the top of your gourd.  This will serve as an umbrella of sorts.
I made my hole just big enough to slide the bottom gourd's stem through.


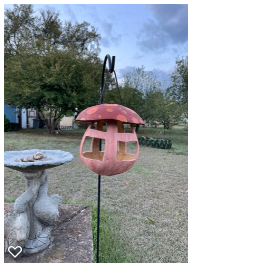
It looks like a mushroom to me, so.... Using my plaid paints, I paint it like a mushroom.  After a quick coat of spray sealer, I hang it outside with seeds inside and wait for the birds to show, and they will.   Hey it is all done!   It should last a long, long time. 


Thanks for visiting,  Come back soon.  We always have something new to make here.  Thank you Proxxon tools       Catch you next time  Carol


Thursday, August 19, 2021

How To Build A Window Shelf


Hi friends. I've been working on my spare bedroom. I just finished making new curtains and I wanted to build window shelves for the curtains to hang from. Follow me and I'll show you how I made them.


Supplies:

     Proxxon Micro Band Saw

     Proxxon Table Saw

     Proxxon Delta Sander 

     1 x 6" pine boards. 

     Paint of your choice

     Screws

     Wood Glue

I started by measuring my window casings to determine the length of my shelves.  I cut the length with the Proxxon Table Saw.  Next I drew a pattern for the brackets under the shelf and transferred it to my wood. I also cut these partially out with my Proxxon Table saw.


I cut the brackets out with the Proxxon Micro Band Saw.


Next I drilled a 1" hole in the bracket for my curtain rod and sanded everything with the Proxxon Delta Sander.


                  I positioned the brackets under the shelf and glued and screwed them together.


I painted them with the same color paint as my window trim. Mounted them above my window casings and tapped a tiny nail in each side of the bracket into my casings to secure them. I put my rods up through the holes on each side of the brackets and hung my curtains.  This was an easy project and I love how they look on my windows.  Thanks for following along with me.  Till next time ... Colleen :-)


Thursday, August 5, 2021

How to make a handy paintbrush holder

 Hi everyone,   This is for the artists and makers out there.  It is an easy but useful project.   Let's make a paintbrush holder.  Ive seen these in plastic, but I think we can do better.   I know we can because we have the tools, thank you Proxxon, for the job.  


I am going to start with a short piece of 1/2" by 4" piece of cedar board, left over from another project.

When I measure it out it is about 8" long, this will work well for what I have in mind.  First thing to do is to cut it in half.   I use the Proxxon mini bandsaw to do this.  


Square is ok, but I want to fancy it up a little bit, so I cut off the corner to make an octagon shape.

The Proxxon mini bandsaw makes that a simple and easy task.


I next used the Proxxon disk sander to smooth the edges.  Note- make sure the second piece keeps the shape of the first piece.


Now draw some dots where you want to drill your holes for the paintbrushes.  I plan on some holes being bigger to hold my bigger brushes.


Stack the two pieces together and tape them or use nails to keep them together.  (If you use nails make sure to put them where you will be drilling a hole for a paintbrush.)  Don't want any stay holes  Then using the Proxxon mini drill press make pilot holes through the top layer to just deep enough to mark the bottom layer.  


Separate the 2 pieces.
Using standard size drill bits drill holes where you want them in the size to suit your needs all the way through the top piece.  
On the bottom piece, use a large drill bit to make a small dip into the wood.  this will keep the paintbrush from sliding around. 


Use the Proxxon OZI/E delta sander to make everything smooth and pretty.   I started with 80 grit to remove my markings then moved on the 240 grit to smooth everything out.  


Drill 4   5/8" holes half way through the bottom of the top piece and the opposing top of the bottom piece.    Cut 4 4" pieces of dowel rod. and inset these into those drilled spots.   If it fits well, then add some glue and allow it to dry well


The only thing left is to apply a sealing finish to the wood.  I love how cedar looks when finished.   That is all there is to it.  This makes a nice little gift to give to your artist friends.   I think I will make a few for the girls in my art class, for Christmas.    Trying to get a head start this year.   I will wood burn their names in it to make it personal.   Yup, that will work. 


Hope you had fun, I did!   I always do when working in my wood shop with my Proxxon tools.   
Thanks for visiting.   Will catch you next time.    Carol.