Thursday, December 30, 2021

How To Build A Chippendale Mirror


Hi everyone.  I've been wanting to build a Chippendale mirror for my dining room.  I've had an old beveled mirror in my basement for years.  I figured now would be the time to finally use it.  Follow along with me and I'll show you how I made it :-) .


SUPPLIES:

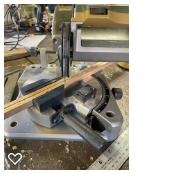
            Proxxon 2 speed scroll saw DS-460
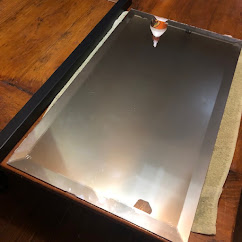
            Proxxon Belt Sander BS/A

            Mirror    

            Wood Frame

             1/2" Birch Plywood

             Base paint and 1" paint brush

             Vinegar Paint

              Polyurethane


  My first problem was finding a frame to fit the mirror.  I went to Michaels craft store and was able to purchase a wood frame to fit the mirror.  Next I drew out the pattern for the pieces that would be attached to the frame.


Next taking the pattern pieces I then transferred them to scrap 1/2" birch plywood.


Using the Proxxon 2 speed scroll saw I cut out all 6 pieces.


I laid Everything in the floor to see how they fit.  The scroll saw does such a great job that very little sanding was necessary, but I did use the Proxxon Belt sander around some of the edges.


Next I painted all the pieces with a yellow base paint and let dry.


I then grain painted all the pieces using vinegar paint. Let dry.


After all the pieces were dry, I sprayed on a matt finish polyurethane.  Each piece I then glued and nailed to the frame.  This is not how a real Chippendale frame would be constructed but it's an easy way to get the same look.


Lastly I inserted the mirror into the frame and attached eye screws and picture wire to hang it.  I hope you enjoyed my project.  See you all next month..... Colleen


Sunday, December 19, 2021

How to Make a Center Finder Perfect for Using with Proxxon Tools

In my last blog post I showed you how to make a circle center finder. Now I'll show you how to make a center finder to use with boards and rectangular pieces of lumber. 

Supplies and Equipment:

How to make the center finder:

  1. Cut the ¾" wood blank to size using the table saw. You'll need to use a piece of solid wood—plywood and MDF aren't appropriate for this project.

  2. Draw two diagonal line on the bottom of the blank to mark the center.

  3. At this center mark, drill a hole through the blank for the pencil. I used a 9/32" bit, but you can test the fit of your pencil by drilling a hole in any scrap.

  4. Mark and drill the holes for the dowels ½" deep into the blank, and centered to match the hole just drilled for the pencil.
  5. Mount the pattern on the blank. Cover one side of the blank with painter's tape. Mist the back side of the pattern with spray adhesive, and mount on the taped blank. The painter's tape makes removal of the pattern easy without leaving any sticky residue.

  6. Use the band saw to cut the top curves. NOTE: Step 3 and 4 are optional and do not affect the way the center finder works. The top curves are only aesthetic. You can skip them and go right to Step 6.

  7. Using the mounted pattern as a guide, drill a hole for the eye screw that holds the pencil in place.

  8. Sand the surfaces on the disc sander.

  9. Cut two 1½" lengths of ¼" dowel. Glue the dowels in place.

Here's how it works:

  1. Insert a pencil into the center finder with the point extending just enough to mark a line.
  2. Place the board between the dowels, and angle the center finder so the each dowel is snug against the sides of the board. Slide the center finder along the board so it scribes a pencil mark in the center.


Carole

Thursday, December 16, 2021

How to make a wooden 3 tiered Christmas tree cookie dish

Hi everyone.   I know it is getting late for making things Christmas, but, I thought this project was cute and quick enough to get ready by Christmas.  Besides, New Years is coming and this makes for great party decor, especially when filled with food!

Supplies and Equipment
1 x 2" pine board
Wood glue
small screws
Staple gun

The first thing I did was cut my 2 x 1 board lengthwise  on the Proxxon mini  table saw to make 2 lone 1 x 1 slats.  Note, I have set my fence to direct my wood properly.

I am going to cut these long pieces into the sizes I need to make my tree.
See below the cutting guide.
I need to cut 4 of each piece on the left.  The right side of the diagram is showing how each side (there are 4) is put together.  

There are only 2 angles we are going to use.  90 degrees, (marked 0 on the chop saw) and 30 degrees.


.  
⇈Above   This is the Proxxon mini chop saw, star of this project.  It is accurate and fun to use.  ⇈

Now we have all our piece cut we can start putting them together.   The joints are going to butt up to each other and this creates a really weak joint.  I tried several ways to strengthen the joints and finally decided that staples worked pretty well.   So, I glue my joints first, let them dry then added staples across the joints on both sides and this seemed to work well.


I started putting sets of 2 together,
then I added the next level, leaving a 2" overhang in the middle.
This is 1/4 of the Christmas tree.  


I predrilled holes using the Proxxon professional rotary tool in the lateral pieces where I will fasten them end to edge using a screw.  This makes a corner in the middle.  I do that to the other side as well.  


Now it is a tree.  Decorating it is up to you.  You can use it for cookies and candies or just decorate it like a tree.  


I know that was kind of sketchy directions, however I think that if you look at the finished tree picture you should be able to pop it out in time for Christmas.

You'ya take care and have a great Holiday Season.  I will catch you next year.  
Carol

Thank you Proxxon...   I love love love that Chopsaw!!!


Sunday, December 5, 2021

How to Make a Circle Center Finder Perfect for Using with Proxxon Tools

Finding the center of a circle is particularly important when working with a lathe. This is an easy-to-make circle center finder made with Proxxon tools.


Supplies and Equipment:

How to make the circle center finder:

  1. Print the circle center finder template. Select pattern size of  your choice. Cover one side of the blank with painter's tape. Mist the back side of the pattern with spray adhesive, and mount on the taped blank. The painter's tape makes removal of the pattern easy without leaving any sticky residue.

  2. Cut the selected shape on the bandsaw or scroll saw.

  3. Use the bench drill press to drill holes for the dowel rods. Use a piece of waste wood under the center finder shape to minimize tear out.

  4. Sand the edges on the disc sander.

  5. Finish detail and surface sanding with the Delta sander.

  6. Cut two 1" lengths of the dowel rod. Glue the dowels in the drilled holes.
  7. Finish the center finder with wood oil.

Here's how the circle center finder works:

  1. Position the center finder on the end of any circular shape with each of the dowel rods held snug against the item.

  2. Draw a line along the straight edge.

  3. Rotate the item and draw a send line. Repeat for a third line.

  4. Where the lines intersect marks the center of the circle.