Friday, October 27, 2023

 ~Vintage Story Telling Blocks~


by Sherri Welser

I love everything Vintage and when I had purchased some blocks I had something fun in mind! Follow along with me as I take you on a "story telling adventure"!

Supplies

Proxxon OZI 115/e

 6 Square wooden blocks

White crackle paint( Ranger  brand is what I used)

Copper acrylic paint

Sepia stamp pad

Brown stain wax (craft)

Tim Holtz Victoriana paper cut outs and ephemera

Mod Podge 

Large buttons or jewelry components

E6000 glue

Sepia Stamp pad


I started by taking the Proxon Ozi with sand paper  on the attachment and  rounding off the corners so they weren't so square. 


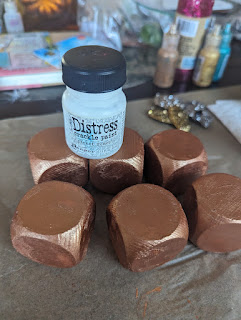
After rounding them over I painted on a base coat of the copper acrylic paint covering each block 


I then applied the  Distress White Crackle paint in a thick layer over the copper paint.


 Let completely dry... To deepen the cracked look I applied some brown stain wax to get in all cracks and give that" vintage look"


I then added fun little Victorian ephemera such as flowers, butterflies and  old fashioned children
I used the distress Sepia ink pad to age the edges of the papers . 


I previously had chosen the jewelry "tops" for the blocks so at this point I was ready to apply them with the E 6000

After attaching the paper ephemera and gluing the Jewelry items on top I added some inspirational words " as to tell a story"


I always enjoy finding  unique and different ways to create from every day items! I hope you have been inspired to create your own "story"....




Wednesday, October 18, 2023

How to Recycle an Old Frame into the Perfect New One

I needed a specifically sized frame to display one of my bobbin lace pieces. Yes, in addition to creating with my Proxxon tools, I make bobbin lace. With no read-made frame available, I decided to make my own using Proxxon MICROMOT tools and an old frame that I found at a local thrift shop.


These are the supplies and equipment that I used:

Here's how I transformed an old frame into a perfect new one:

  1. Here's the thrifted frame with dimensions of about 20" x 16". I needed the picture area for my new frame to be 15" x 4".

  2. The first thing I did was to tear away the backing and remove the old mat and picture. When the backing was removed, I could see that the frame was held together with corner staples—ones that there was no way I could remove.

  3. I used the bandsaw with the miter gauge set to 45° to cut away the stapled section at each corner. I was left with ­four lengths of picture framing.

  4. Next, I used the chop and miter saw to cut each side using the 45° pre-set stops and the longitudinal fence stop to insure accurate lengths.

  5. Now I was ready to glue and clamp the sides together forming my new frame.

  6. I used a glass cutter to cut the glass from the thrifted frame to fit the new frame.

I'm thrilled with my new frame. It cost a small fraction of what a purchased custom frame would have, and I have the satisfaction of knowing I made it myself!!


    Carole

    Sunday, October 15, 2023

    Building A frame For A Trade Sign


    Hi everyone!  This is part 3 of building my trade sign.  This is the final step aside from painting it, which will come at a later time.  Follow along with me and I'll show you how I built the frame. 


    Supplies:
      Clamps
      Wood Glue
      Brad Nailer and Brads
      Pine Trim Molding


    First, I needed to cut, glue and clamp the trim across the curved top of the sign.  Using the 6table saw I cut a length of trim with excess on both sides. Knowing that this piece had to be flexible, I needed to soak it in water.  I wish I had taken a photo, but I forgot.  I soaked it in our pool for two hours. Removed it and bent it across the top curve.  Using clamps, I held it in place till it dried.


    Once it was dry, I removed it. I cut it to size with a tiny bit extra. I then glued it and re-clamped it.  Next came the sides. I held a piece of trim up to figure the angle I needed to cut it. I wanted that piece to slide up under the top trim.  I marked it and cut the angle with the band saw. Checked for length and trimmed using the table saw.  I applied glue and attached the side. I repeated for the other side.


    I measured and cut the bottom trim. When all the pieces were glued, I used the brad nailer and brads to secure everything.


    Lastly, I used the Belt Sander to sand off each corner for a perfect fit.


    My project is complete, except for painting.  That's coming at a later date. I'll be sure to post a picture when its painted!  Thanks for following along  :-)
    Colleen