Saturday, December 22, 2018

How to make a Christmas tree ornament hanger


Supplies Needed For This Project:

Drill Bits
Sanding burr
Plaid Paint, Kelly green, Bright green
Kapro Leveler
Paint Brush
Wood
Base
Screws
Small Hook
1/2" birch plywood
Freezer Paper
9"X13" Graphite Paper (black)
Pencil


This project just jumped out at me as I was just surfing the web for ideas for this post. I found at least three different pictures of Christmas trees holding ornaments and I thought,"I can do that"!

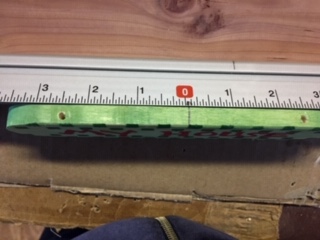
To begin with I used some Freezer Paper and a pencil to draw my pattern out. The tree itself is approximately 9 1/2" Wide and 11 1/2" High.  I thought my first drawing was too fat so I cut it down the approximate middle and taped it back together again but in a slimmer design.


I placed my graphite paper underneath my pattern and taped it to the piece of birch that I had. I then traced over my pattern and transferred it to the piece of birch.


Once the pattern was transferred, I then used my Proxxon Band Saw to carefully cut my tree out. The Proxxon Band Saw did an awesome job of cutting out the tree. 


Once the tree was cut out I used my Proxxon Professional Rotary Tool to smooth all of the edges and painted it with the Plaid Kelly Green and Bright Green Folk Art paint. I then used my Proxxon Professional Rotary Tool to distress the edges.


I used my Proxxon Professional Rotary Tool to drill pilot holes into my tree after marking the spots through the bottom of my base piece. I then screwed the base onto the tree and screwed a hook onto the curved inside of the tree and hung an ornament.


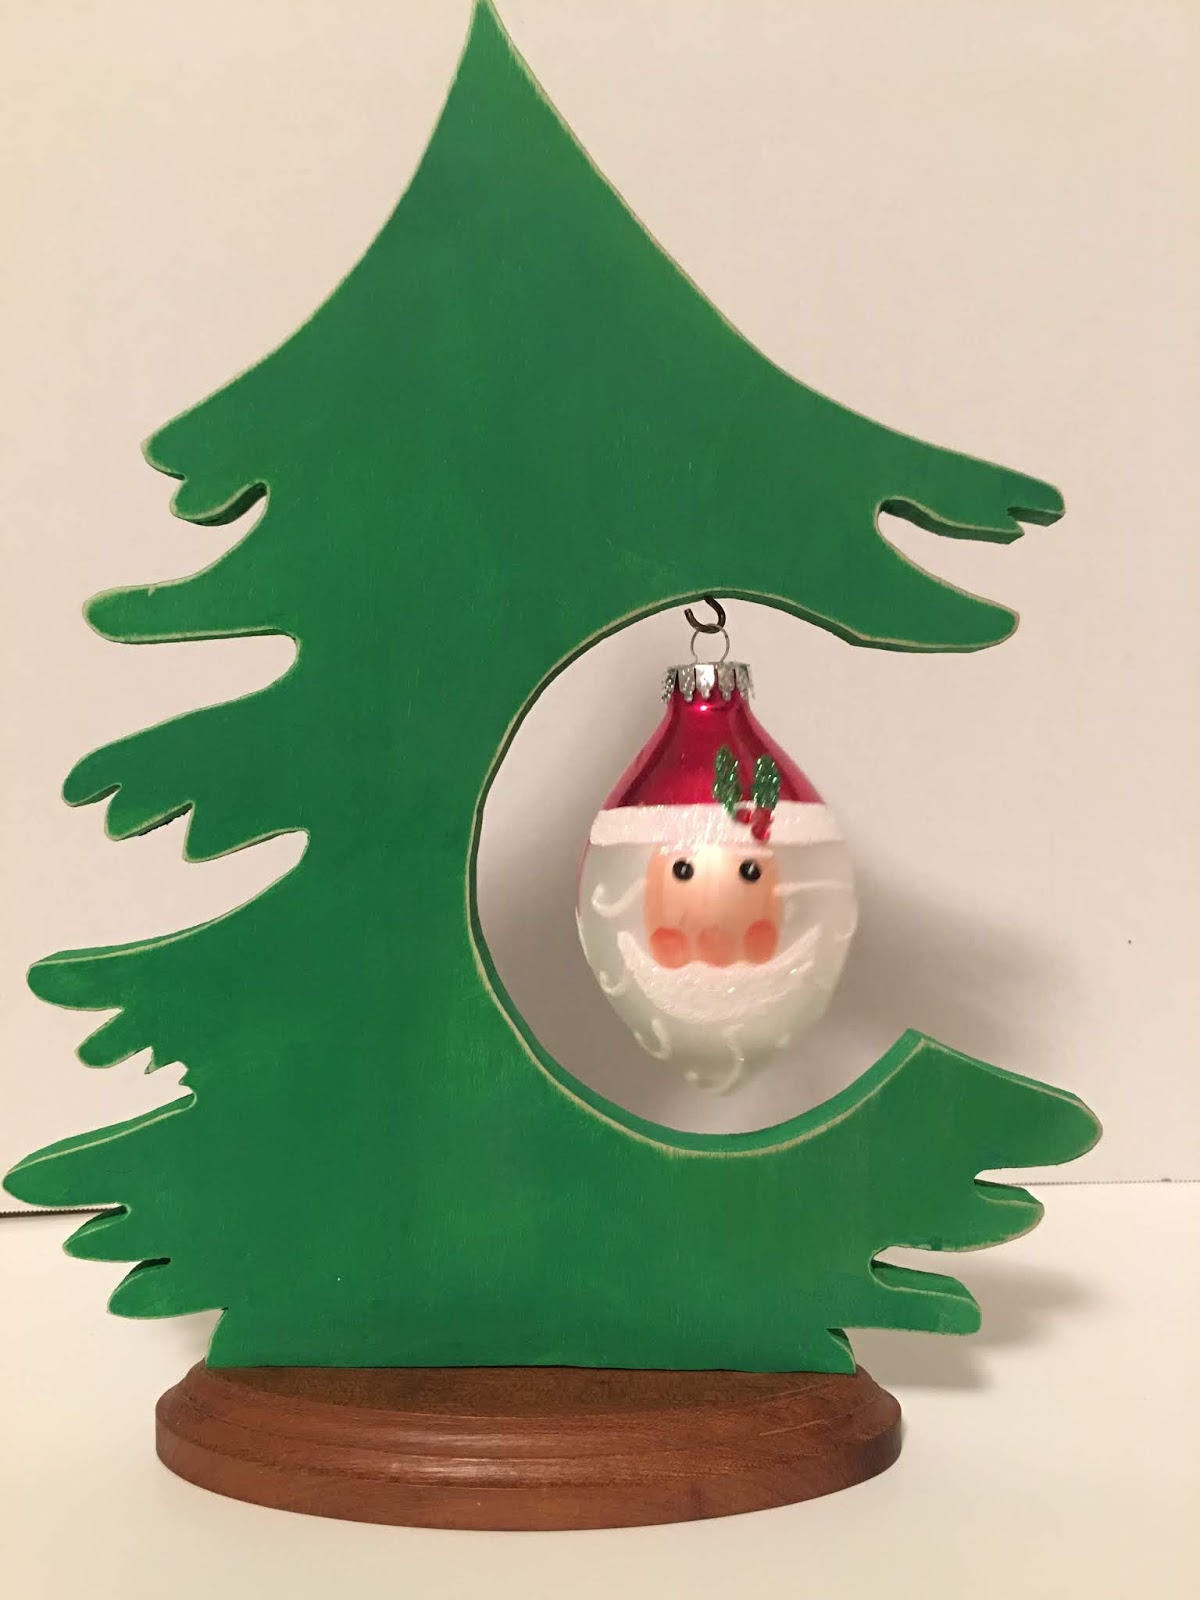
Voila' there you have it! I think this tree would be an excellent decor piece to show off a special ornament at Christmastime don't you?  Please leave me a comment and go check out the www.proxxon.com site, the www.plaidonline.com site and the www.kapro.com site to check out the  814 laser level and all of the other wonderful products that each one of these companies have to sell. Hopefully someone is going to give you a gift card that you can purchase just what you want! 


Barbara


Friday, December 21, 2018

How to make a spinning top

Hi kids of all ages, thanks for visiting.   Let's make a super simple fun project today that all ages will enjoy.  With Proxxon tools and Plaid paints this was super simple and I think it came out great!   I plan on giving it to the little girl next door but I have been playing with it since I made it!  No doubt, I am a kid at heart and still love to play, I think we all do!


Equipment and Supplies

Drill 
5/16"   1/4"  and   1/16"   drill bits
compass for drawing circles
scrap wood-  I used 1/2 inch pine
1/4" dowel approx. 5" long
string or dental floss

Let's get started:
The first thing I did was to draw 3 circles on my piece of wood.  I made mine 2"  1 1/2" and 1" diameters. They can be bigger or smaller, your choice but should be descending in size.   Be sure to note the exact center on each circle. 

 Next I cut them out using the Proxxon band saw which I had fitted with their thinnest blade.  This makes cutting tight corners and arcs super easy.  You could also cut these out using the scroll saw if you prefer.  I just love using the proxxon mini band saw whenever I can.  Truthfully it cuts like butter!

Next, using the proxxon mini drill press I drilled a 1/4"  hole in the center of each circle
(just for fun I made another top from an acorn cap, that is what is seen in the picture below.)  Same principle for both and BTW the acorn spins well too.


I wanted my tops to spin fast so I made a launcher for it.  See the pattern below.  It was also cut on the proxxon mini bandsaw.  


Drill a 5/16"  hole through the upward fork tongs (side to side) so that the dowel piece easily fits through the hole.  The dowel needs to slide in and out easily.


Paint it all pretty.   I used Plaid paints, blue pink and purple as a base coat then painted it with Plaid's glitterific colors for crazy sparkle and bling.  Boy does that paint sparkle!!


Sharpen one end of the 1/4" dowel.  Not too sharp... remember the kiddies will be playing with it.
Then shove the dowel through the holes in the 3 circles.  The smallest circle will be nearest the point.  They should fit very tight.   If not use a dab of glue to hold them.  


Slip the launcher onto the dowel (opposite side of the point) and mark the center.  Using the proxxon mini drill press and vise gripper, make a 1/16" hole through the dowel.  To begin winding the top you first slip the string through this hole.


Tie a loop onto the end of the string as a finger hold.    Wind it up and it is ready to go.  Holding the launcher with your left hand slip your right finger into the loop.  Hold the launcher tight, pull the string quickly and watch the top go.  It spins a long time and the glitterific looks really cool!  Watch the video below.


Was that fun? or what?   I love it and I think the kids will too.   And trust me it was a whole lot easier to make it than it was to write these instructions.    😁


Thanks again for visiting.  Thank-you ProxxonPlaid, and Terri.  
See ya next time.    Carol

Wednesday, December 19, 2018

Oh Christmas Tree

Hi everyone, Steph Ackerman here with a Christmas Tree to share.    Who doesn't love decorating for Christmas?  Using assorted tools, you can create an amazing decorative element that is perfect for smaller spaces. 


Supplies:
Proxxon Scroll Saw
Proxxon Bench Drill Press
Plaid Ultra Dye

 I began by drawing the pattern on plywood, then used the Scroll Saw to cut the pattern.


I painted the tree with white paint then used the Bench Drill Press to drill holes around the tree for Christmas lights.


To create texture, I adhered gauze to the tree, then painted with Plaid Ultra Dye.


 I had to redrill some of the holes that I covered with the dyed gauze.


 Then I inserted lights from behind.


Thanks for stopping by.


Sunday, December 16, 2018

How to Make Cheese Markers with Proxxon Tools

Make your own cheese markers for your next party using Proxxon tools and FolkArt chalkboard paint.

Supplies and Equipment for Making the Cheese Markers

Directions for Making the Cheese Markers

  1. Download and print the pattern for the cheese markers. Mount on the wood.
  2. Cut the straight lines using the band saw.
  3. Cut the curved corners using the scroll saw.
  4. Sand any rough edges and do any final shaping using the disc sander.
  5. Use painter's tape to tape off areas where you do not want paint.
  6. Paint the tops of the cheese markers with FolkArt chalkboard paint. Use two coats of paint, allowing the first coat to dry thoroughly before applying the second coat.
  7. Allow the paint to cure for 24 hours, then condition the chalkboard surface.
  8. Lay a piece of chalk on its side and rub the chalkboard surface on the cheese marker . Dampen a paper towel with water, and wipe the surface to remove the chalk dust.
  9. Label each marker, and serve up a plate of your favorite cheeses. When finished, wipe with a damp paper towel.

Carole

Saturday, December 8, 2018

Yep I'm at it again with the Proxxon Engraver GG12


I have really gotten bitten by the bug with the Proxxon Engraver and I'm really enjoying having fun with it and creating new pieces.

Supplies Needed for this project:

A candle jar that you have cleaned when used up
ribbon
flannel or some type of cloth
LED candle
Pattern for the Proxxon Engraver
tape
scissors
glass of water to use with the engraver


I started out by printing out a pattern that I thought I would like to engrave on the outside of the glass. I chose what I imagined to be a Winter scene. I used my Proxxon Engraver to first go around the edges with my diamond ball bur and then used one of the stone burs to fill in the areas. The ending result was just what I had imagined.

I really love this engraver. It's so lightweight and easy to use. I'm going to have to come up with some more ideas and different types of glass to use. This candle holder is just another thing I saved because I just knew a use would come up for it.


I then got out the Bowdabra Mini Bow tool and made a small bow to go on it, along with putting the ribbon around the top, I attached the bow to the top edge. I then cut a small piece of red flannel material and put it in the bottom of the jar and set an LED candle in to give off a glow. You can see the engraving in the first picture the best. The candle looks beautiful when it is on but is difficult to photograph. 


You could also use this jar to hold holiday candy during the holidays without the candle but I like the look of the candle. Use your imagination and get a Proxxon Engraver GG12 to start creating some amazing pieces to give as gifts this Christmas.

Check out all of the tools that Proxxon has to offer and maybe ask Santa to give you one! Please leave me a comment as I read them all.

Barbara  


Friday, December 7, 2018

How to make a climbing santa

Greetings!!
        🎅Christmas is on the way now and it is time to decorate the house. 🎄  Once upon a time I saw a little toy lizard that would crawl up the wall when you pulled on it's strings.  In my Christmas mind I imagined Santa crawling up the wall to my house.  That is what we will be making today.  Proxxon makes the perfect tools for crafting  Good sturdy tools sized down just perfect for crafting.  Follow that link above and check out those tools...……..Christmas is coming.....hmmm perfect wish list items can be found there.🎁🎁🎁


 Supplies and Equipment:
1/4" plywood scrap (big enough for your Santa pattern)
Stick or piece of wood for "my house piece"  top anchor
2-3 yards of string, twine, or yarn
plastic straw
4 wood beads  (optional)
hot glue gun and glue
scissors,
eye bolt, string or piece of wire for the hanger.


I chose this simple Santa picture because his arms were stretched upward and I felt this would work well with him climbing.

I used some spray adhesive to affix the picture to the wood then I used the proxxon scroll saw to cut it out.  the pattern is easily removed.  If it gets stubborn a shot of hot air from a hair dryer or heat gun will do the trick.


Sand all the edges well.  This is easy with the Proxxon OZI/E delta sander  the triangle shaped head gets into all the tight places.


Time to Paint


I first painted the santa all white.  I have found this make the colors more vivid.   🖌           It is always fun to paint for Christmas.  Plaid makes beautiful colors and they go on really smooth. 


Use the glue gun to glue your straws to the back of Santa's packages.  Tip the straw about 20 degrees pointing in at the top.
.


I painted "my house" on a piece of wood I had on hand.  In the center I used an eye bolt.  this is where it will hang on the wall.   You can use string or a piece of wire but it needs to be in the center.  This top piece will rock when the strings are pulled and this is what makes santa climb.    I used the Kapro measure mate 313 to find the center of the hanging piece.  This measuring tool makes finding center and even spacing easy to lay out.  The other two holes will be for santa's strings.

Tie the two strings to the top piece, thread them through the straws and attach a bead at the bottom.  (so santa won't fall off).     Alternately pulling the strings will cause santa to climb to the top, relaxing the string and he will slide back to the bottom.  Wrap the string around the package and he will stay put.

That is it.   Little kids seem to love it.   But isn't that part of Christmas? getting Santa to do what you want?   Thanks for visiting.   I hope you and all yours have,  a wonderful Christmas.   Thanks ProxxonPlaidKapro , and Terri.         Catch ya next time......Carol