Friday, July 28, 2017

How to make a Table Nightlight with a gourd

How to make a Table Nightlight with a gourd


How to make a table night light or Christmas decorations using  Proxxon Mini tools.

This is a fun project and not  too difficult.  The Proxxon tools make this an enjoyable project for even newbies with gourds.

First decide on a gourd you want to use. It helps and removes the step of sanding and leveling the gourd, so it sets flat on a table.  You are going to create a scene inside the gourd. Topic is your choice, only limited by the size of the gourd. Choose holiday, everyday life, fantasy, your imagination is the only limit for the design.


So lets get started.

Material List


1.Gourd of appropriate size
2.Tools to clean inside of gourd/ can be a scraper a cleaning ball, sandpaper of variable grit,
3.Jigsaw to cut the gourd with. I use my Proxxon.( Makes cutting a breeze)
4.Large Tea light, mine changes colors @hobby Lobby
5. Glue to secure the tea light.
6.Paint ( I used Plaid Folk Art on this Gourd. It's rich in pigment and provides good coverage.
7.Sealer, matt or fixative I use Krylon spray for outside of gourd.  Use after painting and before making scene inside. (prevents damaging paints prior to completing.
8.Whatever material you plan on using to place in the interior of the gourd.

Safety Tips

When working with gourds always use a face mask or a respirator to protect your lungs when cutting or sanding.  


 Steps to complete this project:

1. Decide what is the front of your gourd and where it sits best. I use a white pencil to draw a axis line down the middle of the gourd. This keeps the opening in line with the front. Then draw a line though the middle of the axis line as to how wide its going to be. Draw  the shape for the opening.


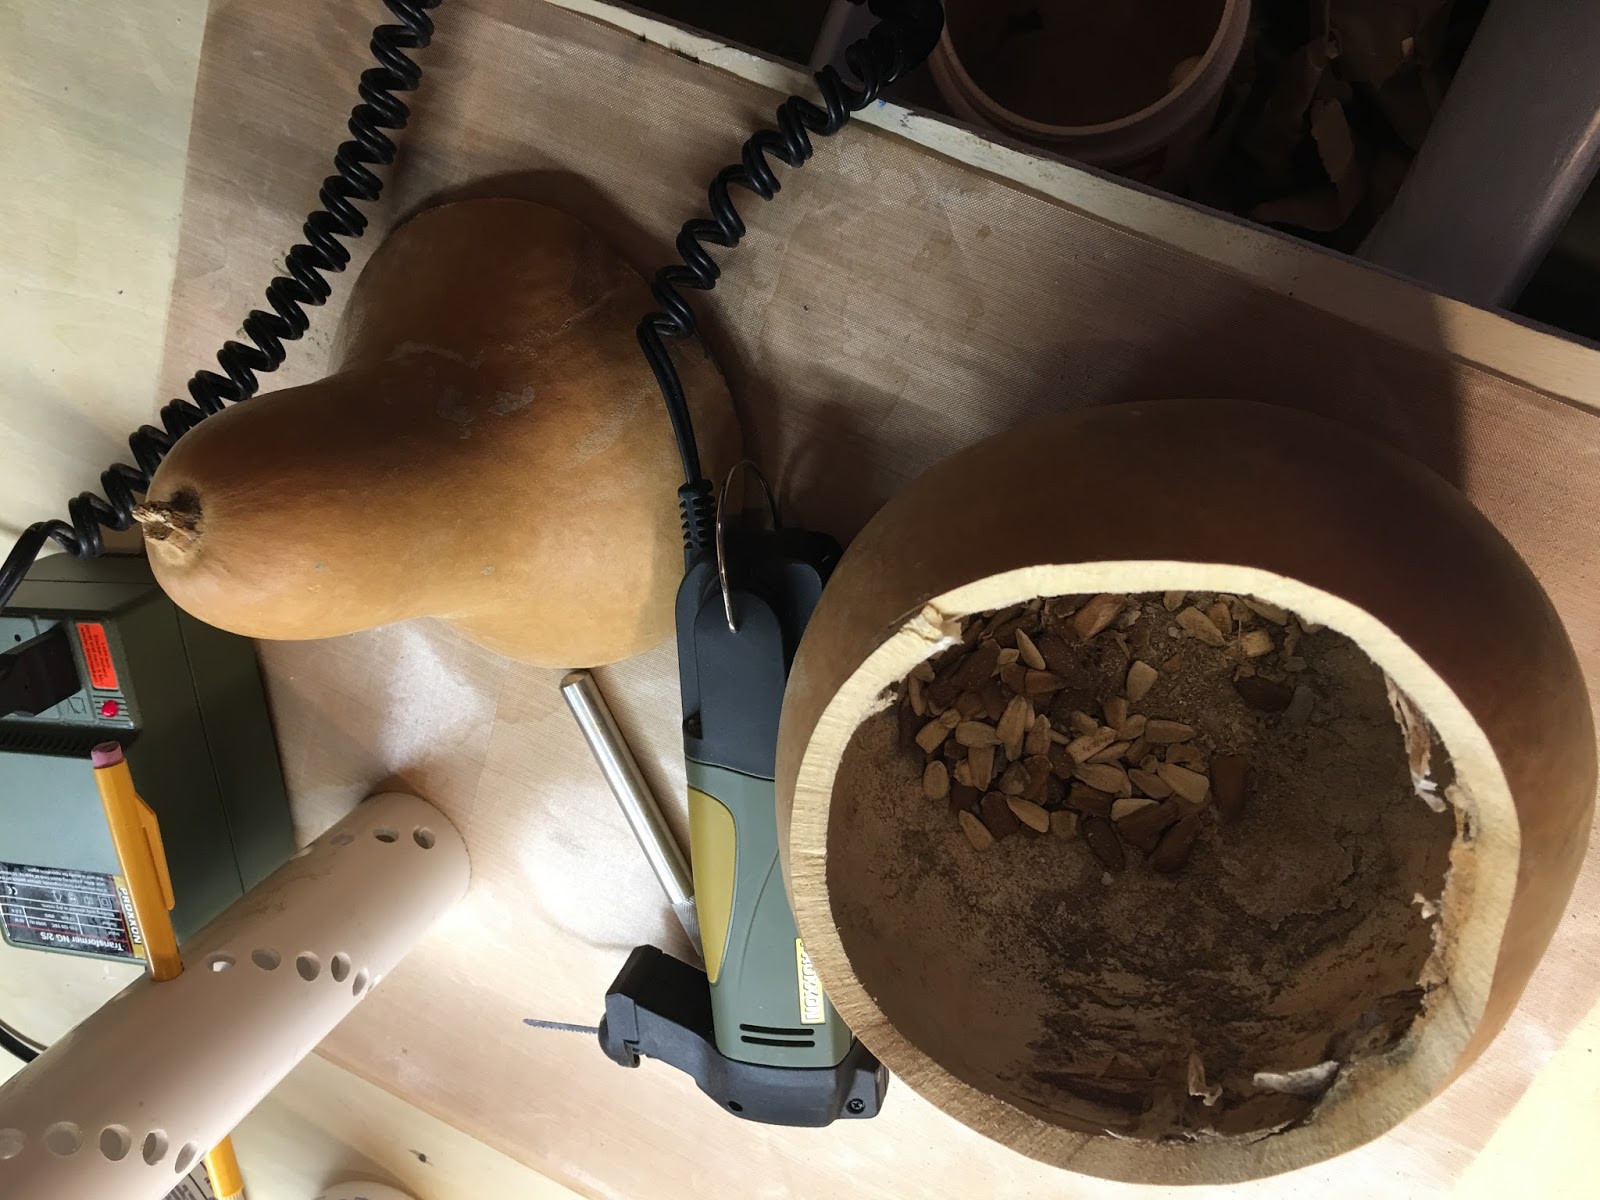
2. Ok you're ready to cut.  With the Proxxon Jig Saw it is a breeze. This tool is so light and easy to use. Being an older female, it is perfect for me.   Drill a small hole inside of the cut out of the opening then you can use your Proxxon Saw to cut out the opening


2. Clean out all of the seeds and skin or fluff on the inside of the gourd. I use a ball sander or any scraper and or sandpaper that will help me loosen and remove the inside mess until it is smoothed to the shell of the gourd..
                                                             

3. Choose where you are going to place the tea light on your gourd.  This gourd made that easy for me as I could place it on the bottom and it still sat perfectly. ( I have had to place them on the side .)
To cut the hole draw a ring around the bottom of light that is the size hole you are going to want. you can cut it with your Proxxon mini jig saw or you can purchase a hole cutter to go on the end of a drill if you don't already have one.

TIP  Paint the tea light with the same color as the gourd will make it less intrusive if you are placing it on side or top of gourd.
I chose a nativity for this lamp's story, and am going to paint the inside and outside to convey the lamps story.

4. I paint the inside and outside of the gourd. For this gourd I am using a very dark blue both inside and out.  I used Ink spot 2925 for the blue base and all over the entire gourd. I then use a fixative or matte spray to protect the paints while I work on the next steps.


5. Free hand or put pattern for wise men on gourd.


6. Then using Plaid Folk art paints  on the outside I painted three wise men traveling to visit the newborn Jesus. I  used Plaid Steal Gray2561 on the wise men for shadow figures on the back of the gourd. Looks great on the dark background.


7. You are now ready to place the scene inside of the gourd I either use WelBond or Gorilla glue (white or brown depending on outside color of gourd.) You don't want the glue to distract from the gourd. Place the scene on top of the glue you have  placed in the gourd where you want the scene to sit.  Let dry good to make sure the item is good and secure.  


I used white Gorilla glue.
One thing about this lamp is you can replace the batteries, and the light does not get hot.


When this dried I added some straw to cover the glue.


Friday, July 21, 2017

Repurposing and Reusing a Window frame with Proxxon Tools

I really don't know what I did without my Proxxon Tools , oh yes I do, I didn't create as many things!
I have had two very old four pane windows in my possession for around 25 years and when we made our recent move they came to the new house with me. I had the thought the other day that it was time for me to do something with one of them as a project.

Supplies needed for this project:

Proxxon Delta Sander
Proxxon Micromot Rotary Tool
*New* Plaid Outdoor Paint
Plaid "Coastal" Paint
Plaid "Stencils"
Hanger if wanted
Backer if wanted
Paint Brush
Pouncer for Stenciling
Putty Knife
Painter's Tape

This was the window prior to starting this project, filthy, with very old paint on it. Now chances are this window was first painted prior to 1976 and therefore more than likely had lead paint used on it. (I wore a respirator for this project) That's just an FYI, if  you go removing paint from something that is
older than 1976 it will have lead paint on it and you definitely need to wear a respirator and of course protective clothing. I started out by scraping off all of the paint that I could with a putty knife and then smoothing out the rest with the Proxxon Delta Sander .
I use the Proxxon Rotary Tool to drill pilot holes for the hanger.


Once everything was cleaned and then sanded to my satisfaction, I proceeded to paint the window with the Plaid Outdoor Paint "Cabana".
I then taped the Plaid Stencils down and proceeded to pounce Plaid Coastal Paint "Sand Dollar" on the stencils. As each stencil got fairly dry I peeled off the tape and put my stencils in some warm water and washed them off. Good to use another day!
This is the finished project. I put black poster board behind it so that you could see how pretty the stencils turned out. I'm not sure if I'm going to hang this without a backer or use this one or another. I love the Plaid Paints and all of my wonderful Proxxon Tools. Maybe it's time you stepped outside your box and tried something different. If so, please check out the tools at www.proxxon.com and the paints and other products at www.plaidonline.com.

Barbara


Anchor's Away

Hi everyone Steph Ackerman here today.  Having just returned from a cruise, I wanted to create something that was cruise inspired!


I began by drawing an anchor on a sheet of plywood.  Then I cut it out using the Scroll Saw.  I first cut off the excess plywood.


Next, I began carefully cutting around the anchor.  Love how easy the Scroll Saw cuts even the rounded areas.  I just need to practice to get those finer edges!


For some trickier areas, I used the Jig Saw to help improve my cuts.


Since my cuts were a little rough, I used the Delta Sander to sand down the rough edges.


Next, I painted the anchor with Plaid Coastal Paint in Plaid Coastal Paint in Sand Dollar and High TIde.   


I added a third layer with Seal Grey and while still wet, I gently removed some of the paint to give the anchor an aged appearance.


Nest, I used a Plaid Stencil and the Sand Dollar Coastal Paint to add designs about the anchor.


Once dry, I wrapped twine around the anchor and added some gauze.


To finish, I created an assortment of clay elements using Makin's Clay and the Sea Shell Push Mold and adhered them about the anchor.  Finally I sprayed several colors of Tattered Angels Glimmer Mist to add a little shimmer.


I'm longing for another cruise.

Thanks for stopping by.


Sunday, July 16, 2017

How To Make Detail Sanding Pens for Fine Woodworking

While Proxxon carries great electric detail sanders (Pen Sander PS13 and Belt Sander BS/E), sometimes a woodworker still needs to use manual sanding. That's why I made these detail sanding pens for fine woodworking. They are wonderful for those tiny, hard-to-access areas, like in fretwork. The original pattern for these detail sanding pens can be found on the Scrollsaw Workshop blog.

Supplies and Equipment for Making the Detail Sanding Pens

Instructions for Making the Detail Sanding Pens

  1. Print the patterns and adhere to the wood. Cover the surface of the wood with painter's tape. Next, spray the back of the pattern with spray adhesive, and put that on top of the painter's tape. The spray adhesive holds the pattern in place, and the painter's tape makes for easy removal.
  2. Cut the outline shapes of both the large and small sanding pen and kerfs on the large sanding pen on the band saw.
  3. Cut the notch on the small sanding pen on the scroll saw. (See note below.)
  4. Using the professional rotary tool and drill stand, drill a 1/16" hole in the large sanding pen for the tack that will secure the sandpaper in place.
  5. Realign the rotary tool and add a sanding disc to sand the pieces.
  6. Insert the tack into the drilled hole. If it extends beyond the pen piece, trim with wire cutters.
  7. Cut lengths on fine grit sandpaper to wrap around the sanding pens, and secure with the tacks.
  8. Enjoy your completed detail sanding pens!!
Note: I was not pleased with the notch arrangement for securing the sandpaper on the small sanding pen, so I modified the pattern as show below. I eliminated the notch and used a tack to secure the sandpaper.

Used along with the Proxxon detail sanders, these will do the job for fine woodworking.

Carole

Friday, July 14, 2017

Easy clean bird feeder

Hi everybody, My name is Carol and I have been dying to share with you my new project, the easy clean bird feeder which I made with my new Proxxon table saw. If you are like me you enjoy watching the birdies at the feeder, but cleaning out the old seeds on the wood floor could be a bit yucky.  I think I got this problem solved with a ceramic floor.  Just wipe it out with a wet rag, dry and refill.   This was a fun project, first one for the Dusty ladies team!  In this project I was the builder and Misty did the decorating! 

Supplies:
Proxxon table saw
Proxx on delta sander
Drill press with hole cutter (optional)
assorted clamps
wood glue
(1)12 x 12 " ceramic tile.
(1) 1 x 4 x 24" pine board
(1) 1/4 x 4 x 24" cedar board
(2) 12 x 16 x 1/4" plywood pieces (for roof)
post size optional   I used cedar but you can use treated lumber.
metal L brackets (pkg of 4 with screws)
acrylic paints

I started by laying out my cutting patterns on my various pieces of wood.  As you can see I try to lay it out so as to get the most from each piece of wood. 


I cut out my pieces using the really cool Proxxon table saw.   It is so easy to use!😉


And then I sanded all my pieces using the Proxxon delta sander   This is my new best friend.   It gets into all the corners, and smooths all my curves.   Best of all, I can switch back and forth between coarse and fine grits reusing them over and over. They attach with hook and loop like Velcro only better. It has an adjustable speed too.  


Ok, I got my pieces ready now.   So next I glue my cedar fence to my ceramic floor and clamp it up.  I leave it overnight to dry good and solid.


I had given my walls and roof pieces to Misty to paint up pretty.  She did a nice job and they look great!    I glued my corner pieces in and clamped  them and let dry. Next I  glued on my roof and secured it with rubber bands. 


  • The way I used to attach the post is this:  I took some scrap pieces of wood and arranged them on the underside of the floor so that it would leave a hole for the post to fit it fairly snugly.  I glued them like that and let them dry.  Then I attached the L brackets, drilled pilot holes and secured first the bracket to the bottom and then to the posts.  For added flair I made some supports to cover the brackets which I would glue on later. 


    Check out the final piece.   I just need to plant it in the ground and the birds will love it. 


    Friday, July 7, 2017

    Have you ever seen pine needle coiling?

    My project this time is about using my Proxxon Tools to make a gourd bowl with a pine needle rim. I'm sure you have all figured out by now that making gourd art is my primary art to work in. However I am trying to branch out quite a bit lately.

    The Supplies Needed for This Project:

    Proxxon Jig Saw
    Proxxon Rotary Tool and burrs
    Pine Needles
    Artificial Sinew
    Acrylic Paint (Dark Green)
    Alcohol Ink (Green)
    Paint Brush
    Soft cloth
    Embellishment

    I started out with a gourd that was actually kind of leaning at the top but which set very nicely. I measured a level line all the way around the gourd to give me a line to cut on.
    I used my Proxxon Jig Saw to cut out the bottom along the line that I had drawn.
    This is how it looked once it had been cut. See how nasty it looks inside? I used my Proxxon rotary tool and a sanding wheel to smooth out the top edge after I scraped out all of the insides.
    I then drew another line in a curve in the front and cut it out also. I thought it was just too plain like that. I then smoothed that out with the sanding wheel also. I painted the inside with the dark green acrylic paint.
    Once that was done, I coated the outside of the gourd with the green alcohol ink. I used my Proxxon Rotary Tool and a drill bit to drill holes all around the top of the gourd and coiled three rows of pine needles around it.
    The pine needles that I used , I had dyed a turquoise color and they really complimented the green of the gourd. Once I had finished all of the coiling I tied the embellishments on the front.
    I thought it turned out really lovely. I use my Proxxon Tools a LOT when I'm working on gourds. You need to take a look at all of the tools that they have at www.proxxon.com

    Barbara