Showing posts with label MICRO Bandsaw MBS/E. Show all posts

Saturday, July 17, 2021

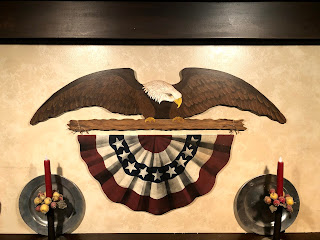
How To Make A Eagle Wallhanging Part Two


This will be the directions for making the bunting that hangs below the eagle.  For supplies you can refer to Part One.


I drew the pattern for the bunting then transferred it to the MDF. 


Due to the size of this sheet of MDF I needed to cut off some excess before I could cut it out with the Proxxon MICRO bandsaw.  For this I used the Proxxon Micro Jig Saw.


Now with a lot of the excess wood eliminated I was able to finish cutting out the bunting with the  Proxxon MICRO Bandsaw.


Using red, white and blue Plaid paint I painted the stripes and stars. Let dry


Now is kind of where the magic happens. Using scrap paper and black spray paint I made it look like it was ruffled. Finding the center spot at the top make a mark. Then using two sheets of paper cover all the paint except for a small wedge coming from that center mark. LIGHTLY SPRAY with the black spray paint.  Move the paper around from the center point out and lightly spray wedges. I gives the illusion of it being ruffled. Let dry.


I screwed two small eye screws into the top of the bunting.  I took twine and wrapped twice around the eagles branch going through the eye screws to hang the bunting. I coated both pieces with the varnish (back, front and all edges).  I also tapped in two picture hangers behind the eagles wings for hanging.


Hope you enjoyed my wall hanging!  Thanks for following along with me :-)...Colleen

Thank you Proxxon!


Thursday, January 21, 2021

How To Make A Tiny Bench


Hi everyone!  I've been building tiny houses with my Proxxon tools. I've been selling them as fast as I can make them.  I need some little props with my houses for photo shoots.  I found some tiny crocks and thought a little bench would be nice to set them on.  Follow along and I'll show you how I made it  :-) 


Supplies:

  Proxxon Micro Bandsaw 

  3/16" basswood

  Wood glue

  Plaid Paint

  Fine sandpaper


I first sketched out a pattern and then transferred it to my basswood. Two legs, one top and two skirt pieces.


Next using my Proxxon Micro Bandsaw I cut out all five pieces.


I now have the five pieces cut out. I use a nail file to take off any burrs on the wood pieces or you could lightly use the Proxxon Delta Sander.

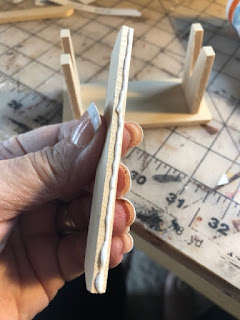
Next taking each of the leg pieces I applied a tiny bit of wood glue on the top edge and glued them to the underside of the top piece about 1/4" from the edge. Let dry.


Next take each of the skirting pieces and apply a line of glue to the top edge and a tiny bit on the top of the legs. Glue in place. 


After it was dry I set it in front of my cabin to see how it looked.  I thought it was a little to tall so I trimmed the legs down about 1/8" using the Micro Bandsaw.


Next I painted the entire piece with Plaid Burnt Umber Paint and let dry. 


Finally using my nail file I filed it on the edges to make it look old.


Here's my finished piece.  I think it looks cute in front of my cabin with the tiny crocks I found. Thanks for following along. .....Colleen


Thursday, September 17, 2020

How To Make A Whirligig Phase 2


Hi Friends!  Last month I showed you all how to make a wood sculpture using Proxxon tools.  That was phase 1 of this project.  Today I'll show you how I added to it, turning it into a whirligig.


Supplies:

 Proxxon Micro Band Saw

 Proxxon Longneck Angle Grinder

 Proxxon Delta Sander

 Fan Blade Hub (Ebay)

1/2" poplar

 Scrap 3/4' pine

 Wire Coat Hanger

 Wood Glue

 Plaid Paint


I ordered a fan blade hub from Ebay. I drew out a pattern for the fan blades on the 1/2' poplar and cut out 8 of them. I had to sand down the edges with the Angle Grinder for them to fit in the hub.


I sanded around the edges of each blade.


Next I built the wood bracket that the blade would be mounted to out of scrap 3/4" pine.  Mounted it inside the wave portion of my project.  I then drilled holes in it to accept the wire (coat hanger) that the fan blade would spin on.


The wire had to be bent for the whale to have the  motion action of bobbing up and down. I drilled a hole in the side of the waves and straight through the whale. Another piece of the coat hanger was inserted through. This would enable the whale to move. 


I inserted a screw eye on the end of the tail. Another wire was attached from the screw eye to the bend in the coat hanger. Using a scrap of a large dowel rod and the longneck grinder I made a cap to disguise where the wire stuck out on the end of the blade.


Next I attached everything to see If it worked correctly.  It was suggested by a friend that I add another row of waves which I did. I also added a tiny boat that I cut out with the Micro Bandsaw and carved with the Longneck Angle Grinder.


I painted it with Plaid Paint. My project is complete. I love how it turned out. All that's needed is a little wind to see it in action! Thanks for following along with me...Colleen


Thursday, August 13, 2020

How to make a Halloween Pumpkin


 Oh it is hot!   Dog days of summer are upon us.  You know what that means...fall is coming and so is Halloween!!!     I know it's a bit early but with crafting we have to start early.  Today we are going to make a pumpkin.   I was going to say "little pumpkin", but you can make it as big or as little as you want.


Supplies and Equipment/

Wood of your choosing (enough to cut out 8-12  pumpkin ribs) plus 2 circles.   (I used 1/4" birch plywood because mine was going to be a small centerpiece)

Yard scrap (for pumpkin stem)

Wood glue

wood clamps or clothespins if small.

Proxxon mini bandsaw with scroll saw blade or Proxxon mini scroll saw.

Proxxon OZI/E delta sander

Plaid paints and or other embellishments

pencil and tracing paper.


Here is the pattern I started with.  I fit 2 ribs in a small square.   I will need to repeat this pattern 4 or more times to make 8 - 12 ribs.   cut 2 circles in proportion to your rib pieces.


I traced my pattern onto my wood piece then proceeded to cut them out.   I am using the Proxxon mini band saw in the picture below.   It cuts the tightest curves.  I am impressed.  This is the first time I have used this saw blade.   WOW!


I got all my pieces cut, and then I sand them using the Proxxon OZIE delta sander.  I love how it gets into all the curves.  It has adjustable speeds too.   If your cutting is not perfect don't worry.  Pumpkins are very forgiving.


Next comes the part that is a little bit tricky.  If I can do it, you can, it takes just a little bit of patience.   We are going to glue it all together.   Use enough glue.   Let it get just a little bit sticky before you position your piece so it will stick some.    I used clothes pins to hold mine.  

Glue the bottom of the "ribs" to underneath the circle piece  as in the picture below.   Let this dry.   (Note- the tops of the "ribs" are lining up)    I did this 2 at a time and let dry in between.  (takes some finger dexterity)


I glued the second circle to the underside of  the top of the pumpkin.
Then I painted the pumpkin using Plaid paints.  I got my stem ready to go when the paint dries.


All done.   I painted a little egg to sit on the circle.   If I had made my pumpkin a little bigger I would place a candle on the stand.   I plan to make one about 12"-14" tall to sit on the porch this year.

Thanks for visiting.   Thank you Proxxon tools and Plaid paints.   I work with the best!

Catch ya next time.   Take care, and please be safe!!!   Carol