Showing posts with label Wood Glue. Show all posts

Thursday, August 13, 2020

How to make a Halloween Pumpkin


 Oh it is hot!   Dog days of summer are upon us.  You know what that means...fall is coming and so is Halloween!!!     I know it's a bit early but with crafting we have to start early.  Today we are going to make a pumpkin.   I was going to say "little pumpkin", but you can make it as big or as little as you want.


Supplies and Equipment/

Wood of your choosing (enough to cut out 8-12  pumpkin ribs) plus 2 circles.   (I used 1/4" birch plywood because mine was going to be a small centerpiece)

Yard scrap (for pumpkin stem)

Wood glue

wood clamps or clothespins if small.

Proxxon mini bandsaw with scroll saw blade or Proxxon mini scroll saw.

Proxxon OZI/E delta sander

Plaid paints and or other embellishments

pencil and tracing paper.


Here is the pattern I started with.  I fit 2 ribs in a small square.   I will need to repeat this pattern 4 or more times to make 8 - 12 ribs.   cut 2 circles in proportion to your rib pieces.


I traced my pattern onto my wood piece then proceeded to cut them out.   I am using the Proxxon mini band saw in the picture below.   It cuts the tightest curves.  I am impressed.  This is the first time I have used this saw blade.   WOW!


I got all my pieces cut, and then I sand them using the Proxxon OZIE delta sander.  I love how it gets into all the curves.  It has adjustable speeds too.   If your cutting is not perfect don't worry.  Pumpkins are very forgiving.


Next comes the part that is a little bit tricky.  If I can do it, you can, it takes just a little bit of patience.   We are going to glue it all together.   Use enough glue.   Let it get just a little bit sticky before you position your piece so it will stick some.    I used clothes pins to hold mine.  

Glue the bottom of the "ribs" to underneath the circle piece  as in the picture below.   Let this dry.   (Note- the tops of the "ribs" are lining up)    I did this 2 at a time and let dry in between.  (takes some finger dexterity)


I glued the second circle to the underside of  the top of the pumpkin.
Then I painted the pumpkin using Plaid paints.  I got my stem ready to go when the paint dries.


All done.   I painted a little egg to sit on the circle.   If I had made my pumpkin a little bigger I would place a candle on the stand.   I plan to make one about 12"-14" tall to sit on the porch this year.

Thanks for visiting.   Thank you Proxxon tools and Plaid paints.   I work with the best!

Catch ya next time.   Take care, and please be safe!!!   Carol


Friday, March 22, 2019

How To Build A Colonial Candle Box


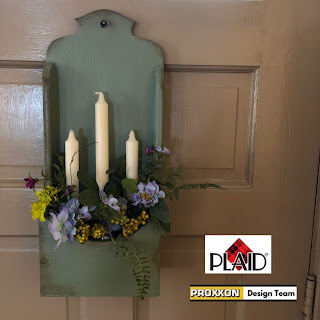
   Hi everyone!  With me being a lover of everything Colonial, I thought I'd build a Colonial Candle Box. This could hang on your wall or front door. I'm going to fill it with Spring flowers, but could easily change it out for other seasons.


Supplies And Tools Needed For Building This Project:

Proxxon Micro Bandsaw MBS/E
⦁ Proxxon Bench Drill Press TBM 115 with 1/2” drill bit
⦁ Proxxon OZI/E Delta Sander
⦁ 1/2" birch sande plywood
⦁ 3 wooden candle holder cups
⦁ Paper to draw pattern on
⦁ Scissors, pencil
⦁ Plaid Chalk Paint (Moss)
⦁ Plaid Waverly Inspirations Wax (clear & antique)
⦁ Paint Brush and Waxing Brush (Martha Stewart by Plaid)
⦁ Wood Glue
⦁ Wood Putty
⦁ 1’ brads and hammer

Instructions:

   Start by drawing the pattern out on paper. I use freezer paper or poster board. Cut out your pattern with scissors & transfer it to your birch plywood. You will have 5 pieces all together.


You can now cut out your pieces using the Proxxon Band Saw.


  Using the Proxxon Drill Press and the 1/2’ drill bit, drill the hole at the top on the back piece.


After all the pieces are cut I like to lightly sand the edges using the Proxxon OZI/E Delta Sander.


   The next step is to assemble the candle box. Using wood glue, attach the two side pieces to the back. Next, I glued in the bottom. I secured the sides and bottom with 1” brads. Last, I glued on the front piece. I used a tiny amount of wood putty to fill in the nail holes.


I purchased 3 wooden candle holders and I screwed them on (inside the box).


Now to Paint!  I chose Plaid Waverly Inspirations Chalk Paint in the Moss color. Paint inside and out. I did 2 coats.  Once completely dry I applied a coat of Plaid Waverly Inspirations Wax in the clear color using the Martha Stewart vintage décor paint brush.  I then chose to apply a tiny amount of Plaid Waverly Inspirations wax in Antique color. Using it sparingly in certain areas to give it an aged look. Let dry overnight and buff.


This was a fun project and makes a great addition to my colonial décor. I tucked some eggs in for Easter and you can remove them later for a Spring display. Remember to log on to the Proxxon and Plaid websites to see all the great products they offer. See you next time!

Colleen