Showing posts with label plywood. Show all posts

Thursday, July 18, 2019

HOW TO BUILD A PRIMITIVE STOVE BOARD

  Stove boards or sometimes known as noodle boards sit on the top of your stove covering your burners. They can be functional as a tray or just give you a little extra counter space when not using the stove. Follow along with me and I'll show you how I made one,


Supplies:
  Proxxon Micro Band Saw
  Proxxon Table Saw
  Proxxon Delta Sander
  1/2' sanded birch plywood
  3/4" pine boards, 4" wide
  Blk Paint Pen
  Wood Glue
  1" Brads and Brad Nailer
  Wood Stain
  Polyurethane


Measure the top of the stove. subtract 1 1/2" from the length and 3/4" from the width. Transfer these dimensions to your plywood.


Cut out with my Proxxon Micro Band Saw and sand any rough edges with the Proxxon Delta Sander,


It can be left plain but I chose to make it look old by painting on some vintage style topography with the blk paint pen,


Next cut the back and sides from the 3/4" pine boards using the Proxxon Table Saw.. Cut the back first.then the two sides. I drew a slope on each of the side pieces and cut out with the band saw,

Glue and nail back on then the two sides. Sand everything.


Stain with the color of your choice.

Finish with 2 coats of satin polyurethane.

I hope you enjoyed my project as much as I did making it.   Colleen

Thursday, April 18, 2019

HOW TO BUILD A VINTAGE STYLE TOOL CADDY


    Hi everyone! I'm back out in my workshop getting ready to build my next project using Proxxon tools! I've found that even though these tools are small, I can still build almost anything. Today I'm making a vintage style tool caddy. Follow along with me and I'll show you how I did it.

Supplies:
  • Proxxon Micro Band Saw
  • Proxxon Bench Drill Press
  • Proxxon Delta Sander
  • 3/8' sanded birch plywood
  • Waverly Inspirations Chalk Paint by Plaid (Crimson and Ink)
  • Waverly Inspirations Wax by Plaid (Clear and Antique)
  • 3/4" brad nails 
  • Wood Glue
  • Wood Putty
  • Paper for pattern
  • Paint brush 2"
  • Waxing Brush
  1. I drew my pattern pieces out on paper determining how big I wanted the caddy then transferred the pattern on some scrap 3/8" birch plywood I had left over from my last project.


  2. Using the Proxxon Micro Band Saw I cut out my 6 pieces (1 base, 4 sides and a center divider). The 4 side pieces need to have a beveled edge on the bottom in order to set flat on the base. I set the table of the band saw at 15 degrees and trimmed the bottom edges.

  3. Using a brad nailer, 3/4' brads and wood glue I put together the 4 side pieces. Before I attached them to the base I sanded all the edges except the bottom edges. I like to sand it in spots to make it look worn and old.

  4. Using the 3/4' brads and wood glue I attached the sides to the bottom.
  5. The center divider piece is also used as a handle so I drilled it out for finger grips. I used the Proxxon Bench Drill Press and a 1' hole saw bit. I sanded it to look worn. I positioned the divider in the center of the caddy and attached it with brads and wood glue.

  6. At this time I now filled any nail holes or voids in the plywood with wood putty and let dry. After dry give the whole thing a good sanding.

  7. Now I'm ready to paint! I chose to use the Waverly Inspirations Chalk Paint by Plaid in the Crimson color. I put on 2 coats. After completely dry I applied the Waverly Inspirations Chalk Paint in the Ink color using the dry brush method. putting a tiny amount on my brush and blotting off most on a paper towel then sparingly painting in spots that I want to look worn from age. let dry.


  8. I then went over the entire piece with Waverly Inspirations Clear Wax by Plaid. Let it dry overnight and applied the antique wax.


   Here's my finished project! I cant wait to use it on my patio and fill it with flowers. Thanks for following along with me.


 Colleen


Friday, March 22, 2019

How To Build A Colonial Candle Box


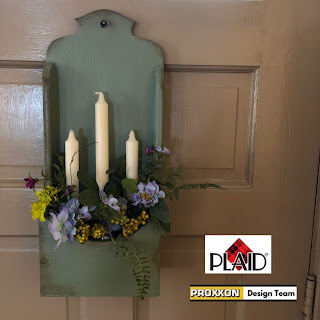
   Hi everyone!  With me being a lover of everything Colonial, I thought I'd build a Colonial Candle Box. This could hang on your wall or front door. I'm going to fill it with Spring flowers, but could easily change it out for other seasons.


Supplies And Tools Needed For Building This Project:

Proxxon Micro Bandsaw MBS/E
⦁ Proxxon Bench Drill Press TBM 115 with 1/2” drill bit
⦁ Proxxon OZI/E Delta Sander
⦁ 1/2" birch sande plywood
⦁ 3 wooden candle holder cups
⦁ Paper to draw pattern on
⦁ Scissors, pencil
⦁ Plaid Chalk Paint (Moss)
⦁ Plaid Waverly Inspirations Wax (clear & antique)
⦁ Paint Brush and Waxing Brush (Martha Stewart by Plaid)
⦁ Wood Glue
⦁ Wood Putty
⦁ 1’ brads and hammer

Instructions:

   Start by drawing the pattern out on paper. I use freezer paper or poster board. Cut out your pattern with scissors & transfer it to your birch plywood. You will have 5 pieces all together.


You can now cut out your pieces using the Proxxon Band Saw.


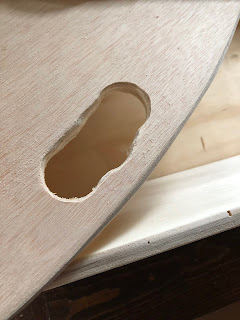
  Using the Proxxon Drill Press and the 1/2’ drill bit, drill the hole at the top on the back piece.


After all the pieces are cut I like to lightly sand the edges using the Proxxon OZI/E Delta Sander.


   The next step is to assemble the candle box. Using wood glue, attach the two side pieces to the back. Next, I glued in the bottom. I secured the sides and bottom with 1” brads. Last, I glued on the front piece. I used a tiny amount of wood putty to fill in the nail holes.


I purchased 3 wooden candle holders and I screwed them on (inside the box).


Now to Paint!  I chose Plaid Waverly Inspirations Chalk Paint in the Moss color. Paint inside and out. I did 2 coats.  Once completely dry I applied a coat of Plaid Waverly Inspirations Wax in the clear color using the Martha Stewart vintage décor paint brush.  I then chose to apply a tiny amount of Plaid Waverly Inspirations wax in Antique color. Using it sparingly in certain areas to give it an aged look. Let dry overnight and buff.


This was a fun project and makes a great addition to my colonial décor. I tucked some eggs in for Easter and you can remove them later for a Spring display. Remember to log on to the Proxxon and Plaid websites to see all the great products they offer. See you next time!

Colleen