Saturday, January 6, 2024
How to make a dollhouse chair.
Thursday, December 15, 2022
How to make a continuous calander
Merry Christmas to all of you. Hope your all warm safe and with family and friends.
The days have flown by, and it is soon to be another new year. What do we need to do? Oh yeah, we do need a new Calander, don't we? Every year. I have a solution, we can make a Calander to last forever and it's easy, and kind of cute. Best of all, everyone has little piece of wood to make it with.
Not sure if you can see the tiny little Calander in front of the books there, I should have made it bigger. But it is a little whale. I made it for a kid's room. The concept of blocks for days and months can be used to make it into almost anything or any size. Maybe even an adult something.Let's see how easy this is. I used the following: A piece of 1" thick cedar that was cut off of a fence rail in the making. It is about 7" long and maybe 2 1/2"wide. If your wood is a different thickness you need to multiply your measurements by that number. (for instance, If your wood is 2" thick make the whale twice as big and the blocks cut out will be 2 x 2 instead of 1x1 The cut out of his back would be 2 2/3 x 4. etc) I used 1" wood because 1st of all it was there, secondly it makes the calculations easy. Here is the pattern below that works for 1" wood.
The whale is cut out as a whole from the 1" cedar. I used the Proxxon mini bandsaw to do this. And to cut the 2 vertical parallel cuts (Those should be 1 1/3" deep)
Then I switched to the Proxxon mini scroll saw to make the corners on the squares as it was a little too tight for the bandsaw.
The top 1/3" is cut from this piece we just cut out. This will be the pieces used for the months. Now after you get that piece it needs to be cut into thirds so there are 3 pieces which are 1/3" x 1/3" and 2" long.
I used the Proxxon mini bandsw, BUT, that is a little close for the fingers. I recommend using the Proxxon mini scroll saw. Now cut the remaining rectangle in half. This gives you (2) 1" x 1" pieces. These will be the days.
Now it is time to sand this pretty cedar wood.
I used the Proxxon OZI/E delta sander for most of it.
Thursday, November 4, 2021
Small cedar Christmas tree decor
Let's see, It is November now and you know what that means.... time to get started on Christmas. Actually we should have got started earlier, but now, better late than sorry. Today let's do a little family Christmas tree. I have some 1/4" cedar and that should work. Also, I am still fasinated by my new Proxxon egraving set so maybe we can find something to do with that.
Ready? Let's get going here
Equipment and supplies
Scrap cedar wood, Im going little so I picked a piece with 1/4" thickness. (You can make this as big or as small as you like---I think a big one would be great!)
Proxxon OZI/E delta sander and / or Proxxon cordless mini belt sander. (either or both)
Proxxon mini drill press with small drill bit
Sealer of your choice
Small pieces of thin bendable wire
Plaid paints if you want -optional-
Cut the trees out using the Proxxon mini scroll saw.

For some crazy reason people feel so special when they see their name on something like this. Well if it makes them happy... It makes me happy too! Thursday, September 30, 2021
How to make a kitty cat gourd bowl using Proxxon tools
Hello again. As promised I made another project using gourds and Proxxon tools. I have been doing gourd projects for many years and have never found a better line of tools to do the work. The tools are smaller and easy to handle yet have the power to tackle the job. Anyway today we made a kitty cat gourd that I think you might like. And it wasn't hard to do.
Equipment and Supplies.
1 nice gourd that will sit well as a bowl. (In other words it has a flat bottom or can be made to sit flat)
Proxxon OZI/E delta sander and Proxxon mini bandsaw (optional)
Plaid paints Lots of different colors.
Proxxon mini torch or woodburner + press abd seal + sharpie pen (optional)
Cat pattern or your choice of pattern that will fit the gourd.
gourd cleaning tools. ie- any thing that works. scrapers etc.
gloss spray sealer.
Let's get started.
The first thing I did was to get my pattern onto my gourd. I use press and seal plastic wrap, a sharpie pen and and proxxon's mini torch as a wood burner to transfer my pattern. I traced my pattern onto the press and seal with my sharpie pen then laid the press and seal on the gourd and woodburned my pattern otno the gourrd. You could use a pencil and simply draw your pattern if you prefer.
The next thing I did was to cut off the top of the gourd., I didn't do any fancy cutting yet because I will need to clean out the gourd and I don't want to break any small pieces off. I cut the gourd top off using the Proxxon mini jigsaw. Note the adjustable speed dial in the first photo below.

Thursday, April 1, 2021
How to make fun salad tongs
Hi everyone. Today I have a fun and silly yet possibly useful project. It's hard sometimes getting the kiddos to eat their vegetables isn't it? Maybe this will help. We are going to make some salad tongs that hopefully appeal to the kids. Hoping they have fun using the salad hands, and this will get them to eat more salad. Farfetched??? maybe, but one could hope. Anyway it is a fun project, and features the Proxxon long neck angle grinder. Lets get started.
Equipment and supplies
5/8 -1" pine board
Proxxon long neck angle grinder
Butcher block non-toxic food safe sealer
Wood glue
Dust mask
The first thing I did was to pick out some scrap wood, this is 1" pine left over from some other project.
I drew an outline around my hands onto the wood pieces. (If you have kids, get their hands involved).
Next we cut out the hands using the Proxxon Mini bandsaw. I love that it is so easy to use.
Next we will use the Proxxon long neck angle grinder to grind the hands slightly concave and the tips of the fingers into a grasping position. (see photo below). Caution, be careful and keep your hands away from the grinder. This step is NOT for children! Please use a dust mask for this part, It gets a little messy and a lot dusty.
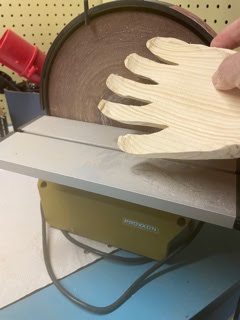
When I got the basic shape, I took my hands over to the Proxxon disk sander and continued the shaping, ie smoothing the joints of the hand and rounding all the edges.
To add handles, just cut out a half circle from the leftover wood. Optional- grind out the middle a little bit to make hand holds. Then glue it on to the back of the hands.
Finish the smoothing process using the Proxxon OZI/E delta sander.
I used watco butcher block sealer on the palm side of the hands (non-toxic and food safe) and I used Plaid paints on the back of the hands for decoration.
Once dry we are ready to dig into the salad, or better yet the kids will dig into the salad!
Thanks for visiting. Hope you enjoyed this little project
See ya next time....meanwhile, eat your vegetables! Carol