Showing posts with label kids project. Show all posts

Thursday, August 19, 2021

Weiner dog bobbin holder

 All right, I think I have said this before, but I have recently taken up a new hobby...Sewing... but just like every other hobby it comes with so much equipment and supplies, I wish I had a dedicated room for it, but I don't so I am enjoying making what I can to try and keep it a little organized.   Today we are going to make a simple, no, super simple, bobbin holder, but not for me.  This is for a young lady just learning to sew like me, and she is going to help me make it.  


We are going to start out with some pieces of scrap wood and a small wooden ball that I had on hand.


We used the Proxxon professional rotary tool to make a hole in one side of the wood piece where we will put a small dowel to mount the head.   We also put the same size hole in the round piece of wood. and glued it in place.  Now we will stick the remaining dowel part into the body of the "dog to be" to see if it works.  It' ok, but  we won't glue it yet.


Using the Proxxon mini band saw, I rounded off the corners a little bit on all 4 sides


We am going to use the Proxxon mini drill press to make lots of holes all over the "doggy's" back   Then I am going to use the Proxxon mini bandsaw to cut lengths of dowels that will fit into these holes.   This is where she will stack her bobbins.  Looks more like a porcupine.  


You can see we have added a small nose.  Wewill also cut out some simple ears.  This is best done on the Proxxon mini scroll saw.  We can attach these with small nails so they can be positioned in different ways.


Got the kid to paint it.  Look, she has added some pony beads as well as the bobbins.   Good for her.   You go girl, make it your own.  

She says she has a space for this on a shelf next to her sewing machine.   I am glad she likes it.  We had fun making it.
  
Important note.  Never leave youngsters alone with woodworking tools.  Close supervision is absolutely mandatory, and some tools, like the bandsaw should not be operated at all by children.  But do get them involved in safe ways.   They love it.

Well, thanks for visiting.  Hope you enjoyed the project.   Looking forward to seeing you next time.
Thank you Proxxon, love love love your tools.

Take care and play safe!   Carol


Thursday, April 1, 2021

How to make fun salad tongs

 Hi everyone.   Today I have a fun and silly yet possibly useful project.   It's hard sometimes getting the kiddos to eat their vegetables isn't it?  Maybe this will help.  We are going to make some salad tongs that hopefully appeal to the kids.   Hoping they have fun using the salad hands, and this will get them to eat more salad.  Farfetched??? maybe, but one could hope.   Anyway it is a fun project, and features the Proxxon long neck angle grinder.   Lets get started.


Equipment and supplies

5/8 -1" pine board

Proxxon mini bandsaw

Proxxon long neck angle grinder

Proxxon OZI/E delta sander

Plaid paints

Butcher block non-toxic food safe sealer

Wood glue

Dust mask


The first thing I did was to pick out some scrap wood, this is 1" pine left over from some other project.


I drew an outline around my hands onto the wood pieces.  (If you have kids, get their hands involved).


Next we cut out the hands using the Proxxon Mini bandsaw.  I love that it is so easy to use.


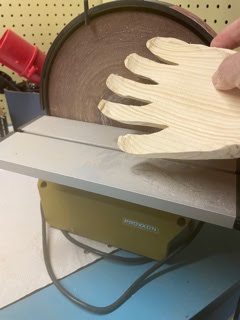
Next we will use the Proxxon long neck angle grinder to grind the hands slightly concave and the tips  of the fingers into a grasping position.   (see photo below).   Caution,  be careful and keep your hands away from the grinder.  This step is NOT for children!  Please use a dust mask for this part, It gets a little messy and a lot dusty.


When I got the basic shape, I took my hands over to the Proxxon disk sander and continued the shaping, ie smoothing the joints of the hand and rounding all the edges.


To add handles, just cut out a half circle from the leftover wood.   Optional- grind out the middle a little bit to make hand holds.   Then glue it on to the back of the hands.


Finish the smoothing process using the Proxxon OZI/E delta sander.


I used watco butcher block sealer on the palm side of the hands (non-toxic and food safe) and I used Plaid paints on the back of the hands for decoration.  


Once dry we are ready to dig into the salad, or better yet the kids will dig into the salad!


Thanks for visiting.  Hope you enjoyed this little project

Thank you Proxxon and Plaid

See ya next time....meanwhile, eat your vegetables!   Carol


Friday, July 3, 2020

How to make a Swinging Chicken coat hanger

Hi everyone, Carol here.   I have a special project today.   Our neighbor's granddaughter is turning 9 years old and I want to make her something special for her birthday.  
They raise chickens and goats next door so I had a choice.    For this project I chose chickens.   Goats wait your turn.   They have a young grandson as well..   ðŸ‘¦ A project featuring goats is likely in the future.  


Let's get started.

Supplies and Equipment:

1" x 2" pine board about 7 feet long
1" x 6" x 18" pine or plywood.  Or (3) pieces of 1" x 6" x 5"
Proxxon mini drill press and drill bits
(6) straight 3" nails (minus nail heads)
(8) 1 ½" wood screws
Plaid paints of your choice.
2 small picture hangers
Wood glue


I used the Proxxon Mini table saw to cut my frame pieces to size. 
  I cut 4 pieces of the 1 x 2 to 16" lengths
and 2 pieces 5" long.   I put these aside for now


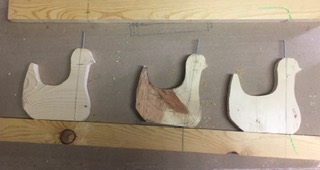
I free handed a chicken onto a piece of my larger wood.   I wanted her to be about 5" tall and 5" wide  I made sure she had a tail that could act as a " hook"   We need 3 of these

I cut the chickens out using the Proxxon mini band saw.

The next part is optional but recommended and actually kind of fun.
Using the Proxxon professional tool with the router base and chamfer bit I routed around the edges of the chickens to soften their edges. It was a little bit messy but worth it.  


After that I used the Proxxon OZI/E delta sander to smooth the edges even further.


Before and after


I need a hole in each head and each bottom.    The drill press allows me to make perfect perpendicular holes which is important so that the chickens can swivel.  


We need holes in the frame pieces as well.   Line up the chickens and place the nails in the chicken's head mark where the holes will go.  Then off to the drill press.  The holes in the top and bottom frame pieces will line up exactly.  Drill the holes in the center of the 1" side of the frame piece at your mark.


Ok, we still have 2 long frame pieces.   That is because I forgot that when we turn the chickens to use the hook the wall will prevent their turn.  So... glue the long pieces to the back side of the existing long pieces to make it thicker.  We are going to turn the end pieces on their side to complete the frame...in a little while.

Now take it all apart and paint it.   Plaid makes so many pretty paints.
 
.
Now,  put the nails in the ducks and then in the frame and using wood screws put the frame together by securing the sides to the top and bottom.    And it's done.  Don't make it too tight, the chickens need to swivel.

All it needs now is some picture hangers on the back and it is ready to hang.   Hope Emma likes it.


I had fun with this project.   I think just about any animal or whatever might work so long as there is something that can be used as a hook.    Customize it for any kid.

Thanks for visiting.   Thanks also to Proxxon and Plaid for their contributions of tools and paint.
Hope you try this.   Leave me a comment if you can.   Thanks again   Carol

Sunday, December 3, 2017

How to Make a Windowsill Village Using Scrap Wood

I love involving my grand daughters in my projects, and this windowsill village was a great hit with them. Not only did they get to paint the buildings, but they had a toy village when the project is complete. Added bonus for me: it was made from scraps of wood left over from previous projects.
Windowsill Village

Supplies and Equipment:

  1. Gather your wood scraps and leftovers. 
  2. Decide on the size of your village buildings. There is no exact size for the village buildings. Here are the measurement for mine:
      • Pink: 4¼" x ¾" x ½"
      • Melon: 2" x ¾" x ¾"
      • Lavender: 4¾" x 5/8" x ¾"
      • Chartreuse: 3¼" x 1" x ¾"
      • Purple: 1½" x ¾" x ¾"
      • Blue: 3¾" x ¾" x 5/8" 
  3. Use the bandsaw to cut the building shapes.
  4. Sand each of the shapes on the disc sander. Use the angle gauge to accurately sand roof lines.
  5. Use FolkArt ColorShift acrylic paints to paint each building.


  6. Add windows and doors. I cut vinyl on my Zing electronic cutter, but you could add windows and doors with acrylic paints or permanent markers. You could also omit the windows and doors, and sand edges for a rustic look.
  7. Seal everything with a coat of Mod Podge.
  8. Enjoy your windowsill village.