Hi everyone, Carol here. I have a special project today. Our neighbor's granddaughter is turning 9 years old and I want to make her something special for her birthday.
They raise chickens and goats next door so I had a choice. For this project I chose chickens. Goats wait your turn. They have a young grandson as well.. 👦 A project featuring goats is likely in the future.

Let's get started.
Supplies and Equipment:
1" x 2" pine board about 7 feet long
1" x 6" x 18" pine or plywood. Or (3) pieces of 1" x 6" x 5"
Proxxon mini drill press and drill bits
(6) straight 3" nails (minus nail heads)
(8) 1 ½" wood screws
Plaid paints of your choice.
2 small picture hangers
Wood glue
I used the Proxxon Mini table saw to cut my frame pieces to size.
I cut 4 pieces of the 1 x 2 to 16" lengths
and 2 pieces 5" long. I put these aside for now

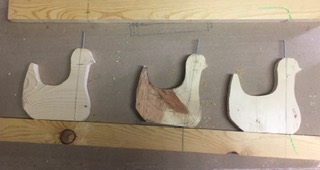
I free handed a chicken onto a piece of my larger wood. I wanted her to be about 5" tall and 5" wide I made sure she had a tail that could act as a " hook" We need 3 of these


I cut the chickens out using the Proxxon mini band saw.
The next part is optional but recommended and actually kind of fun.
Using the Proxxon professional tool with the router base and chamfer bit I routed around the edges of the chickens to soften their edges. It was a little bit messy but worth it.

After that I used the Proxxon OZI/E delta sander to smooth the edges even further.

Before and after

Now onto the Proxxon mini drill press
I need a hole in each head and each bottom. The drill press allows me to make perfect perpendicular holes which is important so that the chickens can swivel.


We need holes in the frame pieces as well. Line up the chickens and place the nails in the chicken's head mark where the holes will go. Then off to the drill press. The holes in the top and bottom frame pieces will line up exactly. Drill the holes in the center of the 1" side of the frame piece at your mark.

Ok, we still have 2 long frame pieces. That is because I forgot that when we turn the chickens to use the hook the wall will prevent their turn. So... glue the long pieces to the back side of the existing long pieces to make it thicker. We are going to turn the end pieces on their side to complete the frame...in a little while.
Now take it all apart and paint it. Plaid makes so many pretty paints.


.
Now, put the nails in the ducks and then in the frame and using wood screws put the frame together by securing the sides to the top and bottom. And it's done. Don't make it too tight, the chickens need to swivel.
All it needs now is some picture hangers on the back and it is ready to hang. Hope Emma likes it.


I had fun with this project. I think just about any animal or whatever might work so long as there is something that can be used as a hook. Customize it for any kid.
Hope you try this. Leave me a comment if you can. Thanks again Carol
3 comments:
Carol, Emma was tickled to pieces with her gift. You could tell she liked it a lot. Her mom and aunt love it as well. Think it was a big hit.
Great idea and like you say you can use anything for hooks. First thing that came to mind was a fish with a flipped up tail for the hook. Think the guys would like that too.
Keep up the good work.
so cute can hardly wait for the goats and chickens are really is cute like the colors keep these ideas coming bj
Carol, you come up with some great ideas. This one is so cute and useful. A unique gift for a little girl.
Post a Comment