Materials List:
- 2" pine scraps
- Proxxon Micro Band Saw
- Proxxon Delta Sander
- Drill and Drill Bit
- Wooden Candle Cup
- Adjustable Thumb Screw
- Plaid Paint-Black
- Spray Polyurethane
Draw out the pattern on the scrap pine.
Cut out the clamp with the Proxxon Micro Band Saw
Sand edges with the Proxxon Delta Sander.
Drill a starter hole for the candle cup. This will insure your wood wont split. Attach candle cup with 1" wood screw.
Drill hole in bottom for thumb screw.
Test on edge of table for fit,
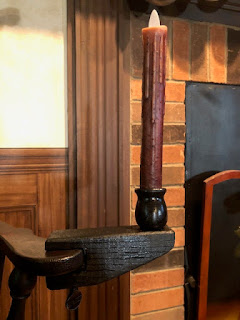
Remove screw and paint with Plaid Paint, I used Black. After dry I sprayed the candle holder with clear polyurethane. Let dry. Insert thumb screw in bottom. This will enable you to tighten it on the surface you choose. Insert a battery operated taper candle or a wax candle.
Your clamp on candle holder is now ready to attach to whatever you wish. I put it on the arm of a Windsor chair.
Thanks for following along with this project. Colleen :-)


3 comments:
HOW CUTE IS THAT! CAN"T WAIT TO MAKE ONE
Carol I think you are giving that carver a work out. Looking good, and I can't
wait to see the finish product.
Amazing what these little tools can do. Way to go.
Collen I am sorry I posted to the wrong
comment.
I liked your blog and thing it is very nice,
Post a Comment