Showing posts with label Colleen King Colaizzi. Show all posts

Thursday, January 20, 2022

How To Build A Paint Cabinet


Hi friends. It's January and I need to make some major changes in my workshop. My New Year's resolution Is to get more organized.  I desperately need a place to store my paint bottles so I can see what colors I have.  I had a cabinet door that I saved for future projects.  It seemed perfect for what I had in mind. Follow along with me and I'll show you how I built the wall cabinet.


SUPPLIES:


        Wooden Cabinet Door
        1x2" pine boards for outside frame
         1/2" scrap birch plywood
         Drill
         Screws
         Brad nails and nail gun


First I laid the cabinet door on the floor to get the exact measurements. Simple way was to just lay the 1" x 2" next to it and transfer the length.  


I cut 2 side pieces and then figured the measurement for the top and bottom pieces. Measure the top then deduct 1 1/2".  I cut these pieces to length with the Proxxon Scroll saw but I could have also used the Proxxon Table Saw FET.


Now with my 4 pieces cut I simply drilled tiny holes in the ends of the side pieces and screwed them together making a frame the same size as the door.


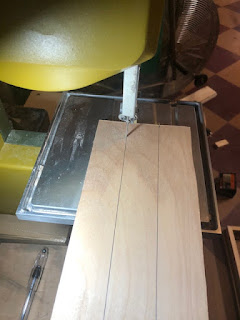
Next, I needed to make the shelves.  I used scrap 1/2' birch plywood.  I measured the inside distance between the 2 outer sides and also measured the depth.  I cut out as many shelves using the Proxxon    Micro Bandsaw as I could, remembering to leave a little head room so I could pull out each bottle with my finger. Measuring the height of each shelf, I attached them to the frame using the brad nailer.


Here's how it looks so far.  I decided to add one more piece of plywood inside at the top to have something to screw through to attach it to the wall


I drilled two holes at the top through the header piece and screwed it to the wall.


Next I attached the hinges to the cabinet door.  Held the door to the frame and attached the hinges to the frame.


Thats it!!!  All I needed to do was fill it up.  I did end up putting a hook and eye latch on it to securely close it


Depending on the width and depth of your wood this could be modified and used to store all kinds of stuff.  Thanks for following along with me.  Till next time....
Colleen :-)

.


Thursday, September 17, 2020

How To Make A Whirligig Phase 2


Hi Friends!  Last month I showed you all how to make a wood sculpture using Proxxon tools.  That was phase 1 of this project.  Today I'll show you how I added to it, turning it into a whirligig.


Supplies:

 Proxxon Micro Band Saw

 Proxxon Longneck Angle Grinder

 Proxxon Delta Sander

 Fan Blade Hub (Ebay)

1/2" poplar

 Scrap 3/4' pine

 Wire Coat Hanger

 Wood Glue

 Plaid Paint


I ordered a fan blade hub from Ebay. I drew out a pattern for the fan blades on the 1/2' poplar and cut out 8 of them. I had to sand down the edges with the Angle Grinder for them to fit in the hub.


I sanded around the edges of each blade.


Next I built the wood bracket that the blade would be mounted to out of scrap 3/4" pine.  Mounted it inside the wave portion of my project.  I then drilled holes in it to accept the wire (coat hanger) that the fan blade would spin on.


The wire had to be bent for the whale to have the  motion action of bobbing up and down. I drilled a hole in the side of the waves and straight through the whale. Another piece of the coat hanger was inserted through. This would enable the whale to move. 


I inserted a screw eye on the end of the tail. Another wire was attached from the screw eye to the bend in the coat hanger. Using a scrap of a large dowel rod and the longneck grinder I made a cap to disguise where the wire stuck out on the end of the blade.


Next I attached everything to see If it worked correctly.  It was suggested by a friend that I add another row of waves which I did. I also added a tiny boat that I cut out with the Micro Bandsaw and carved with the Longneck Angle Grinder.


I painted it with Plaid Paint. My project is complete. I love how it turned out. All that's needed is a little wind to see it in action! Thanks for following along with me...Colleen


Thursday, June 18, 2020

How To Build A Colonial Clamp On Candle Holder

     Hi everyone! Today I'm going to show you how I made a simple clamp on candle holder. It could be used with a real taper candle or a battery powered candle. It could be clamped on a window sill or a table. On the edge of a desk would be cute also. It's just a cute little accent piece.  Follow along with me and I'll show you how I made it.


Materials List:

  • 2" pine scraps
  • Proxxon Micro Band Saw
  • Proxxon Delta Sander
  • Drill and Drill Bit
  • Wooden Candle Cup
  • Adjustable Thumb Screw
  • Plaid Paint-Black
  • Spray Polyurethane
.   
Draw out the pattern on the scrap pine.


Cut out the clamp with the Proxxon Micro Band Saw


Sand edges with the Proxxon Delta Sander.


Drill a starter hole for the candle cup. This will insure your wood wont split.  Attach candle cup with 1" wood screw.


Drill hole in bottom for thumb screw.


Test on edge of table for fit,


Remove screw and paint with Plaid Paint, I used Black.  After dry I sprayed the candle holder with clear polyurethane. Let dry. Insert thumb screw in bottom.  This will enable you to tighten it on the surface you choose.  Insert a battery operated taper candle or a wax candle.


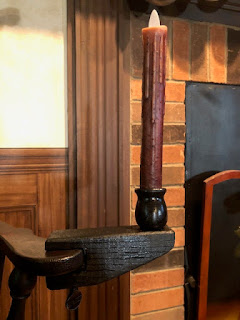
Your clamp on candle holder is now ready to attach to whatever you wish.  I put it on the arm of a Windsor chair.


Thanks for following along with this project.    Colleen :-)


Thursday, May 21, 2020

How To Build A Display Base


Hi everyone!  Today I'd like to share how I made this simple display base for a punch needle eagle I designed. I wanted a base that I could mount 3 flags so this is simply made with 2 pieces of pine to lift the eagle up and adapt to being a flag holder. Follow along with me and ill show you how I  made it using Proxxon tools!


Supplies
  • Proxxon Micro Bandsaw
  • Proxxon Delta Sander
  • Proxxon Power Carver
  • 3/4" scrap pine board
  • Wood glue
  • Plaid Paint black 
  • Mat finish spray polyurathane


I determined the size I made by the base of the oil can that my punch needle piece is mounted on. I drew a circle about a 1/2" larger and cut out with the Proxxon micro bandsaw. I cut out a second piece a half inch larger and extended it out and squared it off


I then stacked the smaller circle on top of the second piece to check for fit.


Next I decided where I wanted to drill the holes for my flags  I marked them and drilled them.

Next I centered the oil can on the circle and drew a line around it. Using the Proxxon Power Carver I removed some of the wood in the center so my oil can will be a tiny bit recessed.  I sanded everything with the Proxxon Delta Sander, rounding the edges.


Glue the two pieces together.


Lastly paint with Plaid Paint.  I chose black


I then sprayed with a mat finish polyurathane


Thanks for following along with me...Colleen :)


Thursday, April 16, 2020

How To Make A Candle Sconce


   Hi everyone! Continuing on with working on a few things for my powder room. Today I'll be making a candle sconce.  Let me show you how I did it.

Supplies:
  Proxxon Micro Band Saw
  Proxxon Drill Press
  Proxxon Delta Sander
  3/4" scrap pine
  Wooden candle cup
  Plaid paint black
  Plaid Inspirations clear wax

1. I drew out a pattern on paper

2.  Transferred my pattern to the scrap 3/4" pine board.                                                                       
                                                                                                           
3. Using the Proxxon Micro Bandsaw I cut out both pieces.                                              


4. I sanded the pieces using the Proxxon Delta Sander                                                                            


5.  I then attached  the wooden candle cup to the base using a wood screw .                             .           
                               

6.  I drilled a hole for hanging using the Proxxon Drill Press.                                                              
                                                 

 7.  I then glued and nailed the base to the back.

8.  Paint with black Plaid paint and wax with clear Plaid Inspirations Wax.                                           


Thanks for following along with me.... Colleen