Showing posts with label Plaid Apple Barrel Paint. Show all posts

Sunday, February 20, 2022

Making Miniature Patriotic Decorations


Hello friends.  I've been so busy building my tiny homesteads with my Proxxon tools.  I was thinking I wanted to make some patriotic decorations for on the outside of the houses. Follow along with me and I'll show you how I made them using my Proxxon tools and Plaid paint :-) 


SUPPLIES:

    Proxxon MICRO-Bandsaw MBS 115/E
    Proxxon Table Saw FET
    Plywood Sheet Board 1.5mm thick
    Plaid Paints   assorted colors
    1/4" Dowel Rod


    Nail File
    Wood Glue
    Drill and tiny drill bit


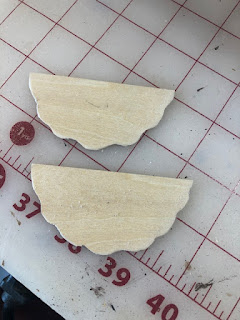
I first drew out my little patterns and drew them on the thin plywood.  I made the buntings in 2 different sizes as I was using them on two different style houses.  I then cut them out with my Proxxon MICRO-Bandsaw.


After my half circles were cut, I went back and cut in the wavy edges. I used the bandsaw but these could also have been cut with the Proxxon scroll saw.  I sanded lightly with a nail file around the edges,


I next drew on the design that I wanted to paint.


Using my Plaid Paints I filled in the design.


I drew the pattern for the flag and cut it out with the Proxxon bandsaw.  Followed along with the same steps as the buntings.


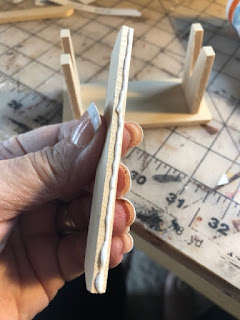
I needed a base for my flag, so I went to the Proxxon Table Saw FET and cut out two different size blocks.  Stacked them together and glued.  Painted the base with Plaid paint and drilled a1/4" hole straight down to receive the dowel rod.


I cut my dowel rod the length I felt was appropriate for the size of my little houses, I inserted it in the block base.  Lastly, I drilled tiny holes in the side of the flag and tiny coordinating holes in the dowel rod. I used thread to attach them together.


Here's my finished pieces. Showing them on two different houses I built.  


I hope you enjoyed seeing how I made these additions to my houses!  See you next month for more Proxxon projects   :-)

Colleen


Thursday, January 21, 2021

How To Make A Tiny Bench


Hi everyone!  I've been building tiny houses with my Proxxon tools. I've been selling them as fast as I can make them.  I need some little props with my houses for photo shoots.  I found some tiny crocks and thought a little bench would be nice to set them on.  Follow along and I'll show you how I made it  :-) 


Supplies:

  Proxxon Micro Bandsaw 

  3/16" basswood

  Wood glue

  Plaid Paint

  Fine sandpaper


I first sketched out a pattern and then transferred it to my basswood. Two legs, one top and two skirt pieces.


Next using my Proxxon Micro Bandsaw I cut out all five pieces.


I now have the five pieces cut out. I use a nail file to take off any burrs on the wood pieces or you could lightly use the Proxxon Delta Sander.

Next taking each of the leg pieces I applied a tiny bit of wood glue on the top edge and glued them to the underside of the top piece about 1/4" from the edge. Let dry.


Next take each of the skirting pieces and apply a line of glue to the top edge and a tiny bit on the top of the legs. Glue in place. 


After it was dry I set it in front of my cabin to see how it looked.  I thought it was a little to tall so I trimmed the legs down about 1/8" using the Micro Bandsaw.


Next I painted the entire piece with Plaid Burnt Umber Paint and let dry. 


Finally using my nail file I filed it on the edges to make it look old.


Here's my finished piece.  I think it looks cute in front of my cabin with the tiny crocks I found. Thanks for following along. .....Colleen


Thursday, October 1, 2020

How to carve a gourd pumpkin

Halloween is almost here and it is time to start thinking pumpkins, carving pumpkins and jack-o'-lanterns ðŸŽƒðŸŽƒðŸŽƒðŸŽƒ   I love pumpkins, and I enjoy carving them, but it's a little sad when the pumpkin begins to shrivel up after just a few weeks.   This year I am going to bring out a few of my smaller gourds and show you how easy it is to carve them using Proxxon tools.   And these "pumpkins" will last forever.  


Equipment and supplies

Small pumpkin shaped gourds

Proxxon mini jigsaw

Proxxon rotary tool with small drill bit or a sharp awl.

Plaid paints

sealer of your choice

2 small hinges + one small latch

super glue and small screwdriver

velcro dots

1 battery powered candle light.


Let's get started.   First we need to choose a gourd   Warning gourds start out dirty!  But they are easy to clean using steel wool and water.


Now we are going to cut him open.   It is always a surprise to find out what is inside.

We need a small hole in order to insert our jigsaw blade.   If you have a Proxxon rotary tool this is perfect for drilling the small hole.   If you don't you may punch a hole using a sharp awl.


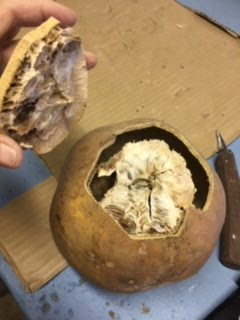
Using the Proxxon mini jigsaw I cut out the bottom of the gourd.  Notte that I made a zig-zag in my cut.   This is to make it easy to put back together properly.   Also it is important to make a straight edge where we are going to attach the hinges later.    OK let's open her up.  


Lucky me, it is dry and easy to remove.   Now my pumpkin is hollow.

Now to design a jack-o'-lantern.   I drew a simple face.   You can be more creative!


I cut it out using the Proxxon mini jigsaw.  It was a breeze!

Optional step:
Using the proxxon rotary tool with the bull nose rasp cutter I added some hair and a label on the back.


Ok back to our original plan.   We are going to add hinges to the bottom of our gourd and a latch to keep it shut.    I used glue to first affix the hinges then added very small screws.   I did the latch in the same way.


For candlelight I put velcro on the inside of the bottom of the gourd and the other side to the bottom of my battery powered candle.  That way I can open the bottom of the gourd, stick the candle on the velcro and shut the gourd.   I used some watered down plaid paints to give my pumpkin his orangey color.    And we are done.  


😀😀😀My candle changes color.  😀😀😀


Thanks for visiting.   I hope you have a happy and safe halloween.    
Thank you Proxxon and Plaid.

Check out these fine products.   Just click on the links above.   
Have fun!   catch you next time  Carol