Saturday, September 21, 2019

How to make a hanging herb garden


Hi everybody.  Thanks for visiting.   Today we are going to try something a little different.   Let's make a hanging herb garden.


Equipment and Supplies


Thin plywood cut into a 15" circle    

                  or

 a large gourd bottom


Proxxon mini jig saw
Proxxon OZI/E delta sander
Chain, cord or rope
5 jelly jars
Plaid paints
Key ring


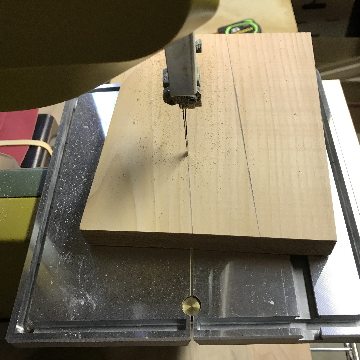
I chose the gourd bottom because I liked the roundness of it.   I drew a line around the gourd then cut it using the Proxxon mini jigsaw.   If you chose to use the thin plywood then simply draw a 12-15" diameter circle and cut it out.  You could use the Proxxon mini scroll saw for that if you prefer.


Next I drew circles around the bottoms of one of my jelly jars so that I would know how big I needed to cut my circles.  I cut 5 circles out so that I could arrange it on my gourd.   There is a mathematical approach of 72 degrees, if you want to be exact, but I didn't have a protractor so I just placed them by hand, spaced as evenly as I could.


When I got them to my liking I drew circles with a pencil around the circle template then proceeded to cut them out using the Proxxon mini jigsaw.   (If you are using plywood you could cut them out on the Proxxon mini scroll saw.)


Make sure the jelly jars fit into the holes.   Holes can be enlarged slightly using the Proxxon OZI/E delta sander.  The rim on the jars will keep them from sliding through.


Next I drilled 3 holes in the gourd piece so that I could thread 3 cords through, then tied them underneath.


Looks like everything is going to fit so I took out the jars and painted my gourd.  I used Plaid paints
Old Ivy, Villa Green, and Spring White.


The last thing I did was to braid my cords incorporating the key ring so it will hang from a hook probably near my kitchen window.  I added dirt and some seeds.  I am hoping for some serious herbs.  


I put some sprigs of my herbs in the holes so you can have an idea of what it might look like.   I really like it and hope it will be productive.

I enjoyed this project.  I hope you did too.  Please leave me a comment let me know what I can do better or what kind of project you might like to see next time.   Again, thanks for visiting.  Thank you Proxxon for the great tools, and Plaid for the great paints.         Carol


Thursday, September 19, 2019

Building A Gustavian Bench Using Proxxon Tools


   Hi everyone! I wanted to share my latest project with you. Years ago I saw an antique bench pictured in one of my magazines. It was called a Gustavian bench and it was attributed to a Swedish furniture maker. I tore out the page and saved it thinking one day I'd try building my own version. I don't have a pattern to share because I just made it up as I went. I wanted to prove to myself I could make it using my Proxxon Tools. I was able to cut out all the pieces with the Proxxon Micro Band Saw and Proxxon Table Saw except for one long board on the back. If I had another person to help hold the board as I ran it through the band saw I know I could have cut that one too. The legs and the curved pieces on the back were cut with the Proxxon Micro Band Saw. All the other boards were cut to length using the Proxxon Table Saw. The Delta Sander was used to round off edges. If you follow along with my pictures you'll see how it all came together.

Supplies:
 Proxxon Micro Band Saw
 Proxxon Table Saw FET
 Proxxon Delta Sander
 1" pine boards varying widths
 2 x 4 pine board
 Pocket hole jig and screws
 Brad nailer and brads
 Wood glue
 Wood putty

  1.  I drew my pattern out for the front legs. Traced them on a 2x4 and cut out with the Proxxon Micro Band Saw. 
  2.  Drew out my pattern on the apron and cut out using the Proxxon Micro Band Saw.
  3.  Screwed the legs to the apron using a pocket hole jig and screws.
  4.  Cut all support pieces and sides to length using the Proxxon Table Saw FET. Glued and screwed them together using the pocket hole jig.
  5. Cut the back legs using the Proxxon Micro Band Saw and cut the back support to length. Attached them with wood glue and pocket hole screws.
  6.  Cut the seat boards to length with the table saw. Attached them with glue and the brad nailer.
  7.  Started laying out the back boards and drawing out the scrolled pattern. Removed them and cut out the design with the Proxxon Micro Band Saw.
  8.  When all the boards were cut with my desired pattern I removed them. Laid them on the floor and glued and screwed them together using the pocket hole jig.
  9.  Spacers between arms were cut. They were attached with screws and glue.
  10.  I decided to cut out some extra decorative trim for the top back edge. This gave it more stability. The pieces were attached with glue and brads.  I filled in nail and screw holes with wood putty.  Sanded everything and rounded edges with the Proxxon Delta Sander.
  11.  Thanks to Proxxon tools I was able to complete this project in a week. I painted the bench and I sewed a cushion for it. Here's my finished bench! Thanks for following along with me … Colleen 

Wednesday, September 18, 2019

Review of the Pensander

Hi everyone, Steph Ackerman here today sharing a review of the Pensander.


The Pensander is approximately 6" in length and is easily handled like a pen.  And weighing less than one half pound, there is no strain on your hand or wrist when used for extensive periods.  The Pensader is perfect for small areas or small projects.

This mini sander has a linear sanding motion and operates at 8,000 strokes per minute.  There are four sanding attachments with straight shanks and four sanding attachments with angled shanks.  Also included are 3 sheets of adhesive sanding pads in 3 different grits, enough for many projects.

The adhesive pads are cut to fit each shank so you simply remove the adhesive backing and adhere the sanding pad to the shank you are using.

An AC adapter is required and I use the NG 5/E.  It's speed can be controlled for a variety of projects.

Following are several projects on which I've used the Pensander.


Thanks for stopping by.


Sunday, September 15, 2019

How to Make a Letter Holder

Who doesn't need a place to organize their mail? This letter holder is a great project for learning to use both the table saw and the band saw.

Supplies and Equipment for the Letter Holder

Instructions for the Letter Holder

  1. Measure and mark the pattern from the schematic onto the wood pieces.
  2. Cut the side pieces on the band saw.
  3. Cut the back piece on the table saw.
  4. Cut the front slats and bottom on the table saw.
  5. Sand the edges of the slats and bottom piece on the disc sander.
  6. Sand all surfaces with the Delta sander.
  7. Glue the pieces together. Glue the sides to the back, and let it thoroughly dry. Then, glue the front slats and bottom in place.
  8. Paint and finish the letter holder with your choice of finishes. I used FolkArt Ultra Dye.
  9. Attach a hanger of your choice to the back of the letter holder. Enjoy!!

Carole

Friday, September 6, 2019

How to make some dog and cat decor for the kids, (using scraps from the shop)

Hi everyone.    Today l have a project the kids are going to enjoy.   We will be making some whimsical décor for their bedrooms using only scraps found in the workshop.  To make it even better let's let the kids paint and decorate.

Materials and equipment needed.  
Scrap wood.  I used some 1/2" x 3" pieces of pine cut offs
Wood glue, 
toothpicks
washers, nuts bolts, screws or  anything you can find to decorate.
Proxxon mini drill press with small bit.

To get started I just drew some simple patterns onto my pieces of scrap wood.
These will be the dog's and the cat's heads


Next I cut them out using the Proxxon mini bandsaw.


What I cut out under the dog's ear I will use for the cat's ear.
Waste not want not.  
I next cut out two pieces for their backs and four pieces for their feet.
Using the Proxxon mini bandsaw makes this so easy.   Have I said it before that I love this tool?


Sand all your pieces really well using the Proxxon OZI/E delta sander.  This is going to kids and kids, (like everyone), hate splinters.  
Now I have all the pieces and I need to put them together.   Since these are for kids I want to make them a little bit stronger than just glue alone so we are going to use some toothpicks as tiny dowels to reinforce the bonds.

First thing to do is to line up the pieces where I want them to go and make some guide marks. 
Next using the Proxxon mini drill press and small drill bit (the size of the toothpick), I drill 1/2" deep into the center of the wood sides I want to join. 


 I glue the toothpicks into one side, then add glue to the board edge and tooth picks and put the sides together.  It's a good idea to clamp it together until the glue dries completely.


Do the same with the ears and feet.   This will hold things together securely

Now it is time to paint.   I recommend Plaid paints because of the many choices of such beautiful colors.   This is a good time to get the kids involved.  Let them paint their new little animal friends.


   Now add some "stuff" from the shop.  I used washers and screws for the eyes, a bolt for doggy's nose, a duck tape tongue, and wire for kitty whiskers.   You got to admit they are unique.

They sit well and can be used as bookends if you like.  

Well, wasn't that fun?    Make em funny or make em cute, it's up to you.  

Thanks for visiting.   
Thank you Proxxon,   I LOVE your tools!!!
Thank You Plaid paints, you are awesome too!!!

Hope to see you next time.  
Feel free to suggest a new project.     Carol