
Supplies:
Proxxon Micro Band Saw
Proxxon Table Saw FET
Proxxon Delta Sander
1" pine boards varying widths
2 x 4 pine board
Pocket hole jig and screws
Brad nailer and brads
Wood glue
Wood putty
- I drew my pattern out for the front legs. Traced them on a 2x4 and cut out with the Proxxon Micro Band Saw.
- Drew out my pattern on the apron and cut out using the Proxxon Micro Band Saw.

- Screwed the legs to the apron using a pocket hole jig and screws.

- Cut all support pieces and sides to length using the Proxxon Table Saw FET. Glued and screwed them together using the pocket hole jig.

- Cut the back legs using the Proxxon Micro Band Saw and cut the back support to length. Attached them with wood glue and pocket hole screws.

- Cut the seat boards to length with the table saw. Attached them with glue and the brad nailer.

- Started laying out the back boards and drawing out the scrolled pattern. Removed them and cut out the design with the Proxxon Micro Band Saw.

- When all the boards were cut with my desired pattern I removed them. Laid them on the floor and glued and screwed them together using the pocket hole jig.
- Spacers between arms were cut. They were attached with screws and glue.

- I decided to cut out some extra decorative trim for the top back edge. This gave it more stability. The pieces were attached with glue and brads. I filled in nail and screw holes with wood putty. Sanded everything and rounded edges with the Proxxon Delta Sander.

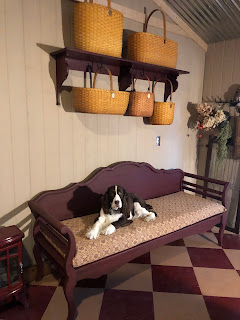
- Thanks to Proxxon tools I was able to complete this project in a week. I painted the bench and I sewed a cushion for it. Here's my finished bench! Thanks for following along with me … Colleen


1 comment:
wow!! that is beautiful!! You should be so proud of that.
Post a Comment