Friday, January 26, 2018

How to Make a Crate Gift Box

This is a relatively simple project that can be adjusted in size, color, embellishment etc. I thought this was something that many people would want to make and use.

The supplies needed for this project:

Proxxon Table Saw FET
Proxxon Delta Sander
Paint Stir Sticks cut down to 8" pieces
Scrap wood panel 8" X 8" for base
1"X 1" wood piece cut into 4 pieces for corner supports
Nail gun
1" 18 ga. brad nails
Acrylic Paint
Paint Brush
Embellishments or not, your choice

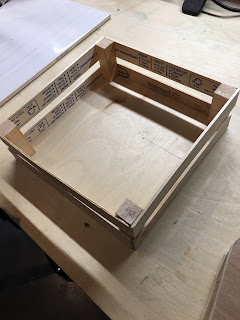
To begin with I cut all the pieces that I would need for the project. It made it much simpler to put together. I cut eight paint stir sticks down to 8" pieces, a piece of scrap wood into an 8" square and a 1"X 1" piece of wood into 4 pieces for the corner supports by using my Proxxon Table Saw FET.

Once all of the pieces were cut out, I used my Nail gun to put all of the pieces together.
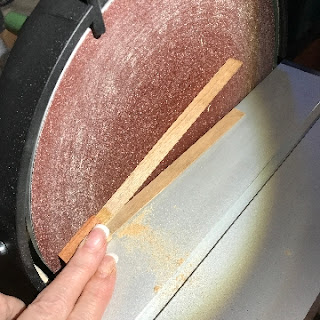
I then used the Proxxon Delta Sander to smooth out any rough spots on the pieces that I had nailed together. I want to mention that you can use regular wood for the sides but the paint stir sticks are free and for a simple lightweight crate that's what I chose to use.
Once everything was sanded and cleaned off, I used  Red Acrylic Paint to cover the entire crate. I then took some pre-cut wooden hearts that I had, painted them white and added a fine glitter to them. I then glued them to the crate.
        
Now this will make a great container for a Valentine's Day Gift. There is one thing I would recommend though and that is to gesso the paint stir sticks on the printed side because it took several coats of the Red Acrylic Paint to cover up the print. You can adjust the size of your crate by simply making everything smaller or larger (but if you go larger you will have to get the larger paint sticks if you can) or use wood that you have. You can also make the crate with more sides as in 3-4 paint sticks high. I plan on putting some red shredded paper in this crate and then adding whatever gift I get into it. Need something special to put that Valentine's Day gift in? Well this is it and you can find the perfect tool to build this with at www.proxxon.com. Maybe you would like a Proxxon Tool for Valentine's?

Barbara

How to make a Butterfly House

How to Make a Butterfly House


Finished Project


After a few weeks of below zero temperatures, my thoughts have turned to spring. A season when the air comes to life. The birds, bees and butterflies  fill the air space and the flowers add their sweet fragrance to the mix. I decided to make a home for the butterflies and thus my project is born.

Tools.
Proxxon Mini Jig Saw
Proxxon Mini Delta Sander
Proxxon Scroll Saw
Rotary Tool


Supplies
Small Gourd
Piece of wood to fit the back of the gourd
Wood Glue
Rubber Bands
Piece of pipe or wooden dowel
Leather Strap
Two beads
Apoxy Putty
Plaid Folk Art Paints

First step was to take the gourd and draw a dividing line down the middle of the gourd length wise.


Next I used the Proxxon Mini Jig Saw to cut the gourd along the dividing line.


After cutting the gourd it has to have the insides cleaned out


Above I am smoothing the edges of the gourd with the Proxxon Delta mini
sander.  this sander is awesome, it can get to the insides and all the nooks and curves a gourd or some small projects have. It is one of my favorites. 
Then I chose the side I wanted to use, then painted a coat of Gesso to the outside of the gourd. Then drew the size outline of the gourd onto the piece of wood for the back.


Using the Proxxon Scroll Saw I cut out the piece of wood for the back of the butterfly house.


Applying Gorilla Glue to the edges of the wood getting ready to put the gourd and wood together. 


Using rubber bands to secure back to front


 Secured areas of the wood and gourd to ensure they stayed in place while drying.


I had to add Apoxy putty along the edges in areas that did not meet perfectly 
When working with gourds and their shapes you will find you need to make adjustments to make a area that is being difficult work.


I added a stencil of a butterfly with folded wings next to the holes for the insects to enter.  I do not stencil. This is the second time in my life and I did not have the brush or dabber needed so improvised with a stiff paint brush.


Since I did not love the way the stencil came out I decided to work around it with a brush adding black color.


This is a little better I think and proceed to freehand a simple vine with flowers for the butterflies .

With Plaid Folk Art Paints this was such a neat way to complete this project.  I got to play.The base coat for the Gourd was with plaid outdoor acrylic paint  (6245 Red Hot. The leaves were painted with a combination of three greens. (458 Sap Green)(2914E Lime Green)  (5129 Green Flash) a color Shift Paint  and (4004 Butier Magenta) Enamel paint.
Last but not least (5816 Gypsy Rose) a Pickling Wash.
Love the pickling washes, you can get such a lot of different values when using them where nothing else seems to quite cut it.
Now to add the hanger and call this project complete. I may add a little nectar spray to the inside before I put it our when the weather warms and sweet spring has arrived. 


My sincere thanks to all of the people who help make this blog possible.
Proxxon Mini Tools, Plaid Paints, and Terri Sproul the bloggers helper and leader. 
Then to all of the wonderful friends who support these blogs by visiting and commenting weekly.
Thank you so very much you are great friends. I love you all.


Friday, January 19, 2018

Puppy dog leash holder


How to make a crafty little leash holder for your beloved fur-buddy.

Guess what?   We got a puppy!  Well, she has been with us a couple of months now but seems like she has been a part of this family forever.  Time for her to have a place on the wall.  You would not believe how much stuff she has already collected...   Not spoiled though.....nah....   Jellybean is a Yorkshire Terrier cute little thing.  Behavior wise however, I think she is a Yorkshire terrorist.   But we go to school every week to learn manners and she is learning..... slow but sure.
I want to show you how I made this little wall hanging to keep some of her accoutrements handy.

This is a fun and easy project.   With proxxon tools it is super simple.

Equipment and Supplies:

Proxxon scroll saw
Proxxon OZI/E detail sander
Drill with drill bits..
3 cup hooks
embellishments of your choice
spray adhesive
Plaid paints
spray sealer of your choice.  I used krylon triple thick glossy.

The first thing I did was to draw a pattern of my bone onto the piece of wood..  This was easy enough to just freehand it.     Then I cut it out using the Proxxon scroll saw.   I sanded it smooth using one of my favorite tools, the Proxxon OZI/E detail sander.   I like my edges slightly rounded and this is easy to do with this tool.


Next step:   Personalize it:
My handwriting is not the greatest so I used my computer to design the "Jellybean" I will cut out.  Once I had it how I liked, I printed it onto regular paper.   I used adhesive spray on the back of the paper, waited a few seconds until it got tacky and stuck it on the "bone".  


Then I cut it out using the Proxxon scroll saw.   This is an inside cut so it is necessary to drill some starter holes to slip the blade through.  I drilled the hanger hole at this time also.


Scroll sawing is relaxing to me.  The Proxxon scroll saw has two speeds so it is easy to control at the speed that works best for you.  After the cutting be sure to sand the edges if there are rough spots or splinters.   Using a fine toothed saw blade pretty much eliminates the need to do that because it really cuts clean.  I drilled two holes at the bottom where I will fit some pegs.


I painted the little stars and put the pegs in the holes.   


Wednesday, January 17, 2018

Floral Dare Sign

Hi everyone, Steph Ackerman here today with a new sign for 2018. 

My word for 2018 is Dare.  Why not take this year and dare..........to try something new...to use existing supplies....to create something different....to connect with someone you've lost sight of, etc, etc........


Begin by taping off the edges of a metal edged sign, then painting it with Plaid paint.


Select embellishments of choice and adhere to the sign.  This is a great way to use items in your stash.  Remember, this project is a Dare.......or a challenge...to do something different.


Selecting assorted clay elements created with Makin's Clay, I used the Pensander to sand the rough edges.  I added a flower atop clay branches and added leaves created from Rinea foiled paper.  Then I added Dare to the corner.


This sign will hang prominently in my craft room reminding me of this year's challenge.

What is your Dare this year?

Thanks for stopping by.


Sunday, January 14, 2018

How to Make a Pair of Toast Tongs

Don't get burned!! Use these toast tongs to remove slices of bread or a bagel from the toaster to keep your fingers away from the heat. These handy tongs can also be used as ice tongs or to toss a green salad.

Equipment for Making Toast Tongs

  • Length of ½" hardwood for tapered block (see pattern for finished measurements)
  • Two 7" x ½" x 1/16" pieces of hardwood wood for tong blades
  • Two 1¼" x ½" x 1/16" pieces of hardwood for accent on tapered block (OPTIONAL)
  • Wood glue
  • Clamps

Instructions of Making Toast Tongs

  1. Use the table saw to cut a 1" strip of hardwood (I used oak, but cherry or maple are suitable alternatives) that will be used for the tapered block that is set between the blades. Set the blade height so that the saw blade extends above the piece of wood that you're cutting.
  2. Use the band saw to cut the blade lengths and optional accent pieces for the tapered block.
  3. Scribe lines on the 1" strip of hardwood for the tapered block and kerfs according to this pattern.
  4. Use the band saw to cut the tapered block and kerfs. Be sure not to over cut the kerfs; the blades need to fit snugly.
  5. OPTIONAL—Use a strong wood glue and clamps to attach the accent pieces on tapered block.
  6. Use a strong wood glue to glue the tong blades in place in the kerfs.
  7. When the glue is thoroughly dry, sand all edges smooth and even using the disc sander.
  8. Using the disc sander, sand an angled edge on the bottom of each tong blade.
  9. Ta Da!! No more burnt fingers!!

Saturday, January 13, 2018

A Niche made with Love

The word that I've chosen for the year is Love. In this year why don't we share some love and kindness with someone who might need a little encouragement, an outstretched hand, a lift up or something material to help them to survive in this world?  The Niche that I've created will remind me to do that each day this year. 

The Materials Needed for this Project are:

Assorted pieces of wood
Wooden Balls (for the feet)
Small nails (I used a nail gun)
Assorted Papers
Gesso
Assorted Embellishments
Balsa Foam
X-Acto Knife
Paint Brushes
Glues
Hinges and a Latch


I started the project by drawing out my pattern. I cut two of the arched pieces and one backing piece. I also cut a small piece to use as the base.
I've been trying to use wood that I have on hand and not purchase more until I've used up what I have.
I cut out the door using a thinner piece of wood than the arch so that I could leave as much room as possible inside the niche to place my embellishments.

I used the Proxxon Table Saw FET to cut all the straight lines and the Proxxon Scroll Saw to cut the arched pieces.


Once I had my wood pieces cut out, I drew a heart unto the balsa foam and cut it out in a rough style with an X-acto knife.
I then took the two pieces of arched wood and using wood glue, I glued and clamped them together.
Taking care to wipe off any glue that had squeezed out when I clamped the two pieces together. lol By cutting out the two pieces it made my niche deeper. I let the clamped pieces set overnight to dry and then used my Proxxon Belt Sander to even out any pieces that might have been uneven.
That Proxxon Belt Sander is as handy as a pocket on a shirt! Talk about sanding both pieces level with each other! It is just an awesome tool, as are the table saw and scroll saw. I had a friend stop by the other day who just drooled over my Proxxon Table Saw FET. I attached the back of my piece to the arched piece with some very small nails and a nail gun.
Here is the pieces of wood put together and sanded. I used black gesso to cover the heart for a base coat.

Once all these pieces were ready, I used Plaid Mod Podge to adhere all the papers ( I used wallpaper, scrapbook paper and napkins ) and lace to the niche. I then added the saying, heart and embellishment to the inside of the niche. I used Plaid Color Shift Paint to paint the pieces not covered by papers. I then put on the latch and hinges with the screws that came with and glued the wood balls unto the bottom for feet. These were also painted with Plaid Color Shift Paint.


I was so happy with the way everything turned out. Yes, you probably could have made this with some lighter materials ( stryofoam perhaps ) but it certainly wouldn't have been as sturdy as this niche is. I want to say that I appreciate the Proxxon Company for providing us with all the tools that we get to use and also Plaid for providing all the new paints that we've had the pleasure of using in our projects. You need to check out the tools from www.proxxon.com and also the paints and other things from Plaid

Barbara