Sunday, February 20, 2022

Easter Rabbit and Stand Is an Easy Beginner Scroll Saw Project

This cute Easter rabbit with its own stand is a great beginner scroll saw project. 


Here are the supplies that you'll need for your Easter Rabbit and Stand:

Let's make the Easter Rabbit and Stand:

Note: The pattern template includes three sizes. The large and medium rabbit are designed for ¼" thick wood. The smallest is designed for 1/8" thick wood. Other thicknesses can be used, but the receiving slot in the rabbit and stand must be adjusted to the thickness of the substrate that you are using. Make these adjustment on the pattern before cutting the shapes.
  1. Cover one side of the blank with painter's tape. Mist the back side of the pattern with spray adhesive, and mount on the taped blank. The painter's tape makes removal of the pattern easy without leaving any sticky residue.

  2. Cut out the rabbit and stand shapes on the scroll saw.

  3. Use the Delta sander to sand and smooth all surfaces. I have mounted my Delta sander in the precision vice which allows me the use of both hands in manipulating the piece for sanding.

  4. If necessary, finish with hand sanding with a fine grit of sandpaper.

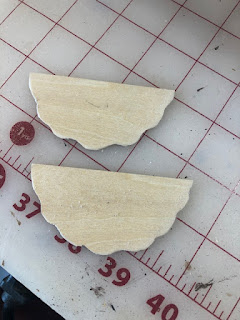
  5. Here are my cut and sanded pieces.

  6. The pieces are now ready for the finish coat. I chose FolkArt Milk Paints, but the rabbit and stand could be finished with wood oil, paste wax, or acrylic paints.

  7. Enjoy your Easter rabbit and stand.

Carole

Making Miniature Patriotic Decorations


Hello friends.  I've been so busy building my tiny homesteads with my Proxxon tools.  I was thinking I wanted to make some patriotic decorations for on the outside of the houses. Follow along with me and I'll show you how I made them using my Proxxon tools and Plaid paint :-) 


SUPPLIES:

    Proxxon MICRO-Bandsaw MBS 115/E
    Proxxon Table Saw FET
    Plywood Sheet Board 1.5mm thick
    Plaid Paints   assorted colors
    1/4" Dowel Rod


    Nail File
    Wood Glue
    Drill and tiny drill bit


I first drew out my little patterns and drew them on the thin plywood.  I made the buntings in 2 different sizes as I was using them on two different style houses.  I then cut them out with my Proxxon MICRO-Bandsaw.


After my half circles were cut, I went back and cut in the wavy edges. I used the bandsaw but these could also have been cut with the Proxxon scroll saw.  I sanded lightly with a nail file around the edges,


I next drew on the design that I wanted to paint.


Using my Plaid Paints I filled in the design.


I drew the pattern for the flag and cut it out with the Proxxon bandsaw.  Followed along with the same steps as the buntings.


I needed a base for my flag, so I went to the Proxxon Table Saw FET and cut out two different size blocks.  Stacked them together and glued.  Painted the base with Plaid paint and drilled a1/4" hole straight down to receive the dowel rod.


I cut my dowel rod the length I felt was appropriate for the size of my little houses, I inserted it in the block base.  Lastly, I drilled tiny holes in the side of the flag and tiny coordinating holes in the dowel rod. I used thread to attach them together.


Here's my finished pieces. Showing them on two different houses I built.  


I hope you enjoyed seeing how I made these additions to my houses!  See you next month for more Proxxon projects   :-)

Colleen


Thursday, February 17, 2022

How to make a 3-tiered plant hanger from gourd pieces

 Hi again.,   Time for another project made from recycled goodies.  I am a member of a group called the gourd patch and we get together about once a month and make things out of gourds.  I have been saving up some scraps and now it is time to put them to use.  We are going to make a hanging plant holder out of some of these extra gourd pieces.   You would be surprised at how versatile the humble gourd is.  Remember the native Americans used them for many purposes.  They are naturally waterproof and strong.  Let's see what we can make.

Supplies and Equipment.

Gourd pieces (preferably the bottoms of 3 escalating sizes of gourds)

Proxxon mini jigsaw

Proxxon proffessional rotary tool

Proxxon cordless mini belt sander

spray paint or other decorating medium

about 10 feet of light chain or rope

pliers,  

heavy gauge wire.

(I used some pennies 18cents worth) as an accent and to strengthen my gourds)


Ok, let's get started.   First, I want to show you a raw gourd, which is a good place to start if you haven't collected scraps.  Warning, they come dirty and need a bit of elbow grease to spruce them up.  Nothing that a pot scrubber can't fix.


After cleaning it up, I drew a pencil line around the gourd where I intend to make my cut.   Then I used my Proxxon professional rotary tool and a 1/4" brad point bit to make a small hole just above my line.  This is where I will insert my saw blade to cut the gourd.


I simply followed my line and cut the bottom of the gourd off


After scraping away the mess inside I decided to scallop the edges which I did using the Proxxon mini jigsaw again.  Then I picked up my Proxxon cordless mini belt sander and smoothed everything.  


I used spray paint to decorate my 3 "bowls"

When everything was dry I used my Proxxon rotary tool to drill 3 holes equal distance apart in each gourd bowl approx 1 inch down from the top.  
I got to thinking that with the weight of the flower pots maybe the wire might pull through the gourd so I took an extra step and made my own washers out of pennies that I drilled the same size hole in using again the Proxxon professional rotary tool.  These I glued to the inside and outside of the gourd where the wires will go through.  


I bent my wire to make hooks where i will fasten the gourds to my chains. 


Lastly, I cut my chains into 3 equal pieces and attached the gourds to them using the hooks.  Look you can hang your bathroom supplies or other things if you want.  But I am going to use it for some small potted plants.


That's it.   This project has a lot of potential.  I took a shortcut with the spray paint.
You can do better.   It's a fun project.  Give it a try.  
 Thanks for visiting.  Check out the Proxxon site.  These smaller tools are fun and easy to use.
Till next time,  Play safe.   Carol


Sunday, February 6, 2022

How to Use Wood Burning to Add the Perfect Decoration to Wooden Spoons

Spice up your mundane wooden kitchen spoons with a touch of wood burning. The Proxxon soldering kit makes it easy.


Here are the supplies and equipment that you'll need:

Let's get started:

  1. If your pieces need any sanding, do this before you transfer any pattern or begin wood burning.
  2. You can either free hand the wood burning or transfer a pattern. For the stirring spatula and the striped spoon, I measured and marked the pattern on the utensil so the decoration would be exact. The two dotted spoons were done free hand.

  3. The Proxxon MICROFLAM is fueled with butane—the same gas that is used for refilling lighters. Turn the unit on, and let the nib heat up for a minute or so.  The temperature of the nib  is controlled with the flow valve. Different woods require different temperatures. Experiment on a scrap.

  4. Press the tip of the nib onto the wood, following the dotted pattern. I used the soldering nib for the dots.

  5. When the unit is completely cool, the nibs are easily changed using the included 7mm wrench.

  6. I used the angled nib for the lines.

  7. You can treat the finished utensils with butcher block oil, if desired.


Carole