Sunday, March 31, 2019

How to Make a Minimalist Phone Stand

A phone stand can offers two major benefits. First: it transforms your phone into a hands-free device since you don't have to hold the phone. Second: your phone always has its own home, and you know where to find it. This minimalist phone stand was make using Proxxon MICROMOT tool.

Supplies and Equipment to Make the Phone Stand

Instructions for Making the Phone Stand

  1. Print pattern and mount on a piece of Baltic birch plywood. Cover the blank with painter's tape. This makes removing the pattern easy. Lightly coat the reverse side of the pattern with adhesive spray, and mount on your prepared wood blank.
  2. Cut the exterior sides of the phone stand using the bandsaw.
  3. Cut the cord notch using the scroll saw.
  4. Cover the reverse side of the blank where the holes for the dowels will be drilled with a piece of painter's tape. This will help to minimize tear out when the holes are drilled.
  5. With a ¼" bit drill the two holes for the dowel supports. Use the stop to ensure accurate placement.
  6. Sand any rough edges on the base using the disc sander.
  7. If desired, stain any or all parts of the phone stand. I chose to keep the base natural, and stained the dowels.
  8. When the stain is dry coat all pieces with paste wax and buff.
  9. Use a strong liquid adhesive to glue the dowels in place.
  10. Enjoy hands-free use of your mobile phone!

Carole

Saturday, March 23, 2019

Hoppy Easter Proxxon Peeps!


Brushes
Cord or ribbon
Small white pom-poms
1/4 inch plywood
pencil and cardstock


Start out by drawing out a bunny on cardstock, cutting it out and using it as a template. Draw out six bunnies on a piece of 1/4 inch plywood.


You will probably need to cut out between your bunnies in order to cut them out easily with the saw. 


Cut out each one of the bunnies with the Proxxon Scroll Saw. The Proxxon Scroll Saw makes cutting out small objects very easy and it cuts the wood like butter!


The Proxxon Delta Sander smoothed out the edges in a snap. Then I used the Proxxon Drill to make a hole in each of the bunnies ears.


I tried to match each of the Plaid Glitter Paints to either glossy or enamel Plaid Paint


Paint the Plaid Glossy or Enamel Paint on your bunnies first and then add the Plaid Extreme Glitter Paint


I wanted to hold these bunnies up with the Plaid Extreme Glitter Paint under some light so that you could see how pretty this paint looks. Once the paint is dry, thread your cord or ribbon through the holes in the ears and glue their little pom-pom tails on.


I can think of several places around my house that these little bunnies would look good.
If you haven't already done so after my reminders, please take the time to go to: www.proxxon.com and choose the tools that you would really like to work with and make a wish list. Then go over to: www.plaidonline.com and see all of the projects and products that they have to offer, make another wish list.

Barbara


Friday, March 22, 2019

How To Build A Colonial Candle Box


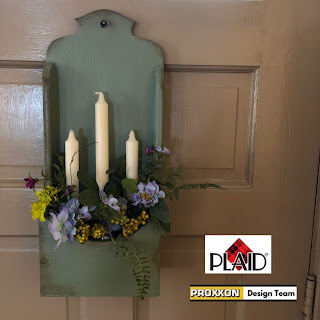
   Hi everyone!  With me being a lover of everything Colonial, I thought I'd build a Colonial Candle Box. This could hang on your wall or front door. I'm going to fill it with Spring flowers, but could easily change it out for other seasons.


Supplies And Tools Needed For Building This Project:

Proxxon Micro Bandsaw MBS/E
⦁ Proxxon Bench Drill Press TBM 115 with 1/2” drill bit
⦁ Proxxon OZI/E Delta Sander
⦁ 1/2" birch sande plywood
⦁ 3 wooden candle holder cups
⦁ Paper to draw pattern on
⦁ Scissors, pencil
⦁ Plaid Chalk Paint (Moss)
⦁ Plaid Waverly Inspirations Wax (clear & antique)
⦁ Paint Brush and Waxing Brush (Martha Stewart by Plaid)
⦁ Wood Glue
⦁ Wood Putty
⦁ 1’ brads and hammer

Instructions:

   Start by drawing the pattern out on paper. I use freezer paper or poster board. Cut out your pattern with scissors & transfer it to your birch plywood. You will have 5 pieces all together.


You can now cut out your pieces using the Proxxon Band Saw.


  Using the Proxxon Drill Press and the 1/2’ drill bit, drill the hole at the top on the back piece.


After all the pieces are cut I like to lightly sand the edges using the Proxxon OZI/E Delta Sander.


   The next step is to assemble the candle box. Using wood glue, attach the two side pieces to the back. Next, I glued in the bottom. I secured the sides and bottom with 1” brads. Last, I glued on the front piece. I used a tiny amount of wood putty to fill in the nail holes.


I purchased 3 wooden candle holders and I screwed them on (inside the box).


Now to Paint!  I chose Plaid Waverly Inspirations Chalk Paint in the Moss color. Paint inside and out. I did 2 coats.  Once completely dry I applied a coat of Plaid Waverly Inspirations Wax in the clear color using the Martha Stewart vintage décor paint brush.  I then chose to apply a tiny amount of Plaid Waverly Inspirations wax in Antique color. Using it sparingly in certain areas to give it an aged look. Let dry overnight and buff.


This was a fun project and makes a great addition to my colonial décor. I tucked some eggs in for Easter and you can remove them later for a Spring display. Remember to log on to the Proxxon and Plaid websites to see all the great products they offer. See you next time!

Colleen


Wednesday, March 20, 2019

A revew of the Micro Bandsaw

Hi everyone, Steph Ackerman here with another Proxxon review.  The Micro Bandsaw is a diverse tool in that it can cut steel, non-ferrous metals, wood, plastic, glass and ceramics.


The Micro Bandsaw is "solid, ribbed die'cast aluminum house" that has a table and slot for miter gauges.  The table can tilt up to 45 degrees.   The Bandsaw has a low noise, but high quality motor for quiet operation.   A chart is affixed to the unit indicating the speeds that can be used to cut assorted materials.

It comes pre-assembled and ready to use, but it is easy to disassemble to replace or change the blades.  An assortment of replacement blades are available including a fine tooth blade, a diamond blade and a bimetal blade.   It's small footprint allows the Bandsaw to fit in the smallest of spaces as the table spans only 8".


I easily cut a thick piece of firewood. 


Plywood cut quickly and easily and the cuts were clean.  Only a little bit of sanding would be needed for a finished project.


I also cut plywood creating mitered corners by placing the table on it's 45 degree angle.

I have a number of projects I can't wait to share over the next months. 

Thanks for stopping by.