Sunday, September 30, 2018

How to Make the Bird on a Stand Decor Piece

This versatile Bird on a Stand decor piece is sure to brighten any room. And, it's easy to create using Proxxon tools.


Equipment and Supplies for the Bird on a Stand

Instructions for Making the Bird on a Stand

  1. Cut MDF or wood pieces to size using the band saw.
  2. Print the body and wing patterns and adhere to wood pieces. Cover the substrate with painter's tape; spray the reverse side of the pattern with spray adhesive; mount the pattern onto the covered substrate. The adhesive holds the pattern in place, and the painter's tape makes removal easy.
  3. Cut the bird body and wing using the scroll saw.
  4. Sand any rough edges using the disc sander.
  5. Mark the center of base for drilling a hole for the dowel rod stand.
  6. Mark the center of the bottom of the bird for drilling a hole for the dowel rod stand.
  7. Drill holes in bird body and base using the bench drill press.
  8. Distress the edges of the bird body, front and sides of wing, base, and dowel rod with a dark brown stamp pad.
  9. Cut out bird body papers, and adhere one to each side of the bird using Mod Podge.
  10. When the Mod Podge is thoroughly dry, glue the wing in place with liquid adhesive, and glue the dowel into the bird and the base.

Carole

Saturday, September 22, 2018

How to make a Knick Knack box


It's always a challenge for me to come up with something new whenever I'm creating for this blog. Sometimes the ideas come to me while I'm sleeping and other times, just looking at pictures or pinterest gives me ideas. This project was one of the "I just dreamed it up" ideas.

Supplies needed for this project: 

1/4" Birch wood sheet, 1'x2'
3/4" Decorative Block 4" Square
3/4"x 4" Square plain block of wood
Wooden Knob (for top of lid)
Carpenters' wood glue


First you need to cut four, 4 1/4" squares from the birch wood sheet to use for the sides around the  
one plain piece of wood which is 4" square and 3/4" thick to form a box. 


Glue all of the joints together with the carpenter's wood glue.


Now you need to cut a 4" Square and a 5" Square from the birch wood sheet. Sandwich those two pieces together to form the lid the smaller piece will fit into the box to keep the lid from sliding off.  Make sure that the smaller piece is centered on the larger block. Once that is completed you need to glue the decorative 4" Square block to the other side, glue the wooden knob in the center of the decorative block. 


Use your Proxxon Delta Sander and your Proxxon Belt Sander to smooth out any edges that might need it.


Once the glue is dry you can then finish the box off in whatever manner you desire.  I used some Plaid Chalk Paint and some stamps that I had to finish mine off. I tried to give the box a shabby chic look by sanding the outside in places after I applied two colors of Plaid Chalk Paint and just used a regular black ink pad to stamp with.


What do you think? My future daughter-in-law said that she would like to have it. Hmmm, thoughts of Christmas stockings?
You really need these Proxxon Tools to do a really good job on your wood working projects. They are "Tiny Tools with Character" and are easily handled. Check out their catalog  at www.proxxon.com and check out Plaid's at www.plaidonline.com. I think you'll be happy that you did.

Barbara

Friday, September 21, 2018

How to make a gourdgeous punkiwitch

Oh goody Halloween is coming!   this is one of my favorite times for crafting.  Ghouls, scary black cats...pumpkins witches... I can't decide....  Let's throw them all in a boiling cauldron  and see what comes out.      Uh oh.. I think I stirred too much.  Looks like a mutant,  punkiwitch or a witchkin.

This is going to be a creation out of 2 gourds


Supplies: 
2 gourds, one  medium size with a top that we can use for a hat, and  one small one (this one was a long handled dipper that I cut the tail off )
Plaid paints for decoration
Stuff to decorate witch or pumpkin as you desire.   (I used some doll hair)
18" stiff wire
1" dowel   about 6 inches will do
hot glue
scrap wood
2-3 1 1/2 ' screws

Equipment:
Proxxon mini bandsaw
Proxxon mini jigsaw
Proxxon OZI/E delta sander
small drill and drill bits
screwdriver
hot glue gun.
1" forstner bit and drill

Let's go for it!    First thing to do is to select your gourds.   I chose these 2.   The next step of course is to get them clean.  This is easy with a scrubby pad and a little elbow grease.


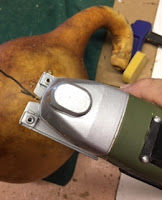
The next thing I want to do is to cut the top off the larger of the two gourds.  I am going to use this part for the witch's hat.  I also need to cut the tail off the long handled dipper gourd.  Leave a little piece for her neck.  (this is going to be the witch's head).   I used the Proxxon mini jigsaw to do this.  It really does a nice job on gourds and it is super easy to cut a rounded surface with this tool.


Of course after cutting I always sand things smooth with the Proxxon OZI/E delta sander.   Still one of my favorite tools.  It also works really well on gourds.  What is really nice about this sander is that you can change sandpaper pads, if you want a different grit, but you don't have to throw away the one you take off.  It will go right back on.  The velcro attachment is very strong and holds the paper securely but lets you take it off and on when you want to, and reuse them over and over. (call me frugal 👧.)  It's ok, cuz I am.  


I want to make a spring so the witch head will jiggle.  This is easy.  I just twist the wire round and round the dowel, then slide it off.  Presto, a spring is born.  But, then I got to thinking about this (dangerous),  and I think that spring  in the toilet paper roll holder would work even better.  It would be a little stiffer,... but this works well and nobody's gonna be hollering at you from the bathroom that you broke something...  


Now for the technical parts:  Problem #1 is that I have a round bottom gourd and I want it to sit still and not roll around when the witch gets excited.
Problem #2 I need a way to fix the spring securely in the gourd.  
Solution:  I am going to take 2 small pieces of scrap wood and sandwich the gourd between them.  This will give the gourd a platform to sit on and the inside piece will let me fasten the spring to it.  The 2 pieces of wood also provide solid surfaces for my screws to hold.  This little pumpkin gourd is really too thin for a screw to hold well.  

On the inside piece of scrap wood I used a 1" forstner bit to drill a little ways into the wood.  My spring should fit into that hole.  Then I cut it down to size using the proxxon mini bandsaw.  Next I screwed the pieces together using 1 1/2" screws.   See diagram below


inside view of gourd   disregard the strings.


Now we paint and decorate:

Here is the pumpkin part, painted with Plaid paints.

The witch is painted green and her hair and hat are attached with hot glue.  Her hat is purple with white stars and yellow moons. Plaid makes so many nifty colors.  Hair is a mess.   This girl needs a comb!

The neck of the gourd fits easy on the spring. 
 Her jiggly self is all done (for now).   I think I might cut the pumpkin into a jack o'lantern.   Maybe next year!

Thank everyone for visiting.  Hope this helps ya'll get into the spooky spirit.   
Thanks ProxxonPlaid paints, and Terri.

Catch ya next time.   Carol


Wednesday, September 19, 2018

How to Create a Fall Pennant

Hi everyone, Steph Ackerman here today with a new Fall project.  Using an assortment of Proxxon tools, you can easily create a Fall Pennant.


Use the Kapro Measure Mate ruler to draw the pennant shape on a wood panel.


Then use the Scroll Saw to cut the pennant.


The Bench Drill Press was used to drill 2 holes in the top for the string.


The panel was sanded with the Delta Sander.


Using the 6" Swirl Pumpkins stencil from Clear Scraps, I placed it in the center then painted it with shades of orange and green.  For additional dimension, I used additional stencils around the pumpkin to create dimension.  I wanted the focal point to be the pumpkins, so I painted around the pumpkins with brown paint.


While the panel dried, I created leaves from Makin'sⓇ Clay green clay and a Leaf push mold.  I used Fireworks! Spray Ink to add color.


To create a 3 dimensional effect, I glued raffia around the pumpkin, then glued on the clay leaves.  FALL was free hand cut from felt and glued to the raffia.


A perfect panel to showcase Fall, don't you think?

Thanks for stopping by.


Sunday, September 16, 2018

How to Make a Santa and Stars Christmas Decoration

It's never too early to start making Christmas decorations, and this rustic Santa and Stars in a great beginner project.

Supplies and Equipment for Santa and Stars Decoration

Instructions for Santa and Stars Decoration

  1. Using the pattern as a guide, measure and mark the cutting lines for the Santa.
  2. On the ¾" side of the lumber, mark the hole for the wire on the top of the Santa and the smaller star. Mark the hole for the wire on the top of the larger star.
  3. Using the professional rotary tool, drill these holes for the wire before cutting the top angles.
  4. Using the band saw, cut out the Santa.
  5. Cover the lumber with painter's tape. Spray the reverse side of the patterns with spray adhesive. Mount the star patterns on the lumber. Alternatively, trace the star patterns in pencil. Cut the stars either on the band saw or the Proxxon Scroll Saw DS 460.
  6. Drill he remaining hole for the wire on the bottom of the Santa and the bottom of the larger star.
  7. Sand any rough edges using the disc sander.
  8. Cover all the pieces with a coat of gesso.
  9. Use air dry clay to make a small ball for the nose, or use a small bead. 
  10. When clay nose and the gesso are thoroughly dry, paint the stars with Glitterific paints, and paint the Santa and his nose with acrylic paints. Use artist's cement for the beard and hat trim to add dimension. Alternatively, paint these areas with acrylic paints. 
  11. When the paints are dry, glue the nose in place with liquid adhesive.
  12. Use the Coiling Gizmo to make a coil of wire.
  13. Gently pull on each end of the wire coil to open the coils. Cut into three sections, and glue each section into the pre-drilled holes using DAP Rapid Fuse.

Carole