Friday, August 25, 2023

"Family Matters"


 "Family Matters"

By Sherri Welser


I have always loved family photos,, the very fun vintage style and hopefully you are lucky enough to have some also! I found a handful of vintage style family photos and wondered about the  unique ways I could display them. I had some wooden blocks from a previous project so I decided I would use them. I integrated  vintage style metal embellishments, ribbon and journal papers to create this special piece of art!


Supplies
 Proxxon Cordless Belt Sander BS/A
Copies of Family photos
2 x 4 piece of wood  cut to size
Tim Holtz metal vintage frame , feet , decorative corners and metal quote tags
Metal butterfly
Wooden rectangle with the word "family" on it
Distressed ink pad (from Ranger ) in Sepia
White paint
Clear knob
Art Journal papers with butterflies
Lace and ribbon
Small metal trinkets for embellishing
E 6000 and Mod Podge for gluing 


  1. Sand the wooden block until smooth with the Proxxon belt sander
  2. Paint with white paint and let dry
  3. Distress  all sides with the Distress ink pad
  4. Place picture to fit in metal frame and place in the center of painted block
  5. Glue in place with E 6000 and let dry
  6. Add the wooden family piece underneath and glue in place
  7. Screw the knob in place at the top in center
  8. Add metal corner tabs,  metal butterfly  and  the feet at the bottom glue in place
  9. On the back glue the art journal butterfly papers  with Mod Podge
  10. Add the  metal lock and quote at the bottom  and glue in place with E 6000
  11. Distress the papers on the back with the ink pad
  12. Tie the metal embellishments to the ribbons and tie around the knob at the top 


I have so much loved creating this project and I hope you have enjoyed as well!
Happy Creating!


Sunday, August 20, 2023

How to Make a Wine Bottle Bird Feeder

If you enjoy bird watching, you'll love this wine bottle bird feeder. It's a great project to make using Proxxon MICROMOT tools.

Supplies and Equipment:

Instructions for making the Wine Bottle Bird Feeder:

  1. Cut one 15" length from the wood blank for the back; one 10" length for the side pieces; one 7" length for the bottom; and one 1" length for the front piece using the table saw.

  2. Mount the template for the back top on the 15" wood blank, and the templates for the sides on the 10" blank. Cover one side of the blank with painter's tape. Mist the back side of the pattern with spray adhesive, and mount on the taped paint stir stick.  The painter's tape makes removal of the pattern easy without leaving any sticky residue.
  3. Use the bandsaw to cut the top of the back and sides.

  4. Sand any rough edges with the Delta sander. I have my sander mounted in the Precision Vice FMZ so that both hands are free.

  5. Use the bench drill press to drill holes in the back piece for the zipties and a hole at the top for hanging the feeder. The size of the drill bit used for the ziptie holes will depend on the width of the zipties you select. 

  6. Drill random drainage holes in the bottom piece. Holes should be large enough to provide drainage, but not so large that the bird seed falls through.

  7. Use wood glue to glue the bottom and side to the back piece. Clamp the pieces and let the glue dry thoroughly.

  8. Cut the 1" front piece to size, then glue and clamp in place.
  9. Use zipties to secure the wine bottle to the back board of the feeder. The ties should be tight enough to hold the bottle firmly in place, but loose enough to allow the bottle to be lifted out of the feeder for filling. Refer to the picture below to see how the lower ziptie forms a U-shape around the neck of the bottle. If necessary, link zipties together to get the required length to go around the bottle.

  10. Grab those binoculars and enjoy the birds feasting at your wine bottle feeder.

Carole

Sunday, August 13, 2023

Making A Nautical Trade Sign Part 1


Hi friends!  Today I'm starting kind of a lengthy project.  I'm designing and building a nautical trade sign to hang on the wall. I'm splitting it in 3 parts because each element is a project in itself.  The first is cutting and carving this whale. The second will be a ship and the third will be a wood sign with carved elements to mount parts one and two on.  Follow along with me.  Lets get started  :-)


Supplies  

   Proxxon  2 speed Scroll Saw DS 460
   Proxxon Cordless Belt Sander  BS/A
   Proxxon Power Carver
   Proxxon Precision Rotary Tool FBS 115/E
   Clear #1 white pine board   1x8x6
   Wood Glue
   Brad Nailer


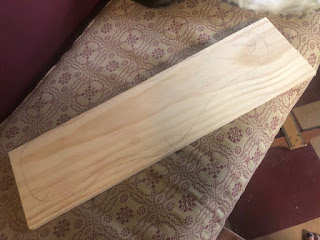
First, I started by drawing my whale directly on the pine board. This was some pine I had left from another project. 


Using The Proxxon Scroll Saw, I cut out the whale.


Now the fun begins!  Using the Proxxon cordless belt sander, I began to round off the edges. I also used the Proxxon rotary tool and Proxxon power carver for details.


Next using the Proxxon rotary tool, I worked on the eye.


Lastly. I cut and carved the flipper.  I laid a small piece of wood on the whale and drew what I felt would be the appropriate size.  Using the scroll saw, I cut out the flipper.  I used the belt sander to round off the edges, then I attached the flipper to the lower portion of the whale with wood glue and a brad nail.


This part 1 is complete except that it will be painted when the other two elements are finished.  

Thanks for following along with me.  Stay tuned for 2 more segments to this project.
Colleen :-) 


Saturday, August 5, 2023

How to make a simple shoe rack

 Hi everyone, it's me again.   I struggled a little bit this month trying to come up with a project that I thought you might enjoy.  This is another hopefully useful item that is easy to make and doesn't take a lot of time or resources.  Are you ready?  drumroll please....... We are going to make a small shoe rack that can sit by your door so shoes dont collect all over the house.  


I used some reclaimed poplar plywood, and some left over hollow metal tubes to make this project.   If you don't have the tubes, dowels would work just as well.  Add little paint, a few small screws and you have everything you need.   Oh, I also used the Proxxon mini table saw,the Proxxon mini bandsaw, the Proxxon cordless rotary drill and a screwdriver.

Let's get started.   I laid  out my design on the plywood to get started.   


 Using the Proxxon mini table saw I cut my pieces out.   For the diagonal cutting I did not use a fence or

 miter guide but simply and carefully ran the wood through the saw blade


Then I cut out the notches using the Proxxon mini band saw.


Using a full size drill. I drilled holes where the pipes will settle into.


I put it together, then fastened the fromt and back pieces with small screws.  It fits tight and I am pretty sure will not soon come apart.   So basically, it's done.  Now let get some shoes in it.   See below.


This will be great by the back door.  

I forgot to mention that it is easiest to paint before it is permanently put together. 


All done.   Well, I did say it was an easy project.  Thank you for visiting, Thanks Proxxon, Im still loving your tools.  Carol